Thursday 31 October 2013

Quick update on the skull studs!

Hello - no new manicure to post today as I've been feeling really sick! I just wanted to post a quick update on the skull studs I wore on my nails yesterday. They looked fab, but the sticky-outy parts kept getting stuck in my jumper, pocket, gloves etc, and I think one eventually pinged off near the end of the evening when I was getting some money out of my purse! They did last about 3 hours though and were only stuck on with topcoat, so I was quite impressed. Here's me modeling them:


This is where we went last night - to see Illuminating York, where they light up various buildings and monuments in our city with cool patterns, and accompany it with music/storytelling. It's fab and atmospheric and I just had to share a few pics:


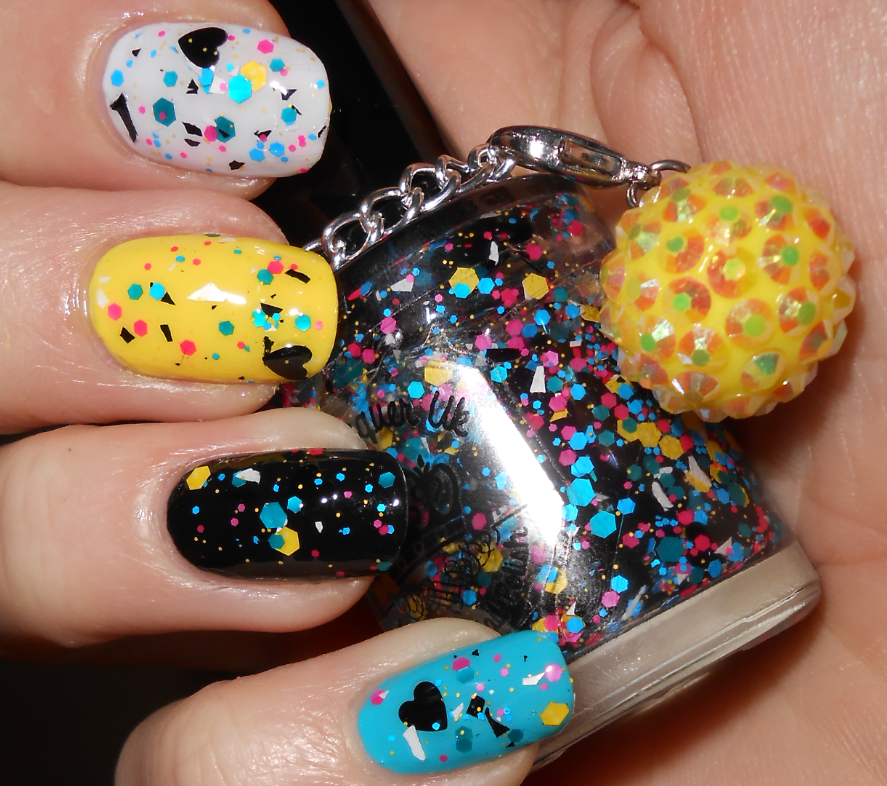
Also, today I got my two Indy's Indies minis in the post that I bought earlier in the week! Very excited to try them out, but they're both quite bright so I'm going to have to wait until I have some more days off, which isn't for a week - booo! I had a quick play with them over the black, and they both look fab, but I'll save posting about them until I've done a full proper mani with both.

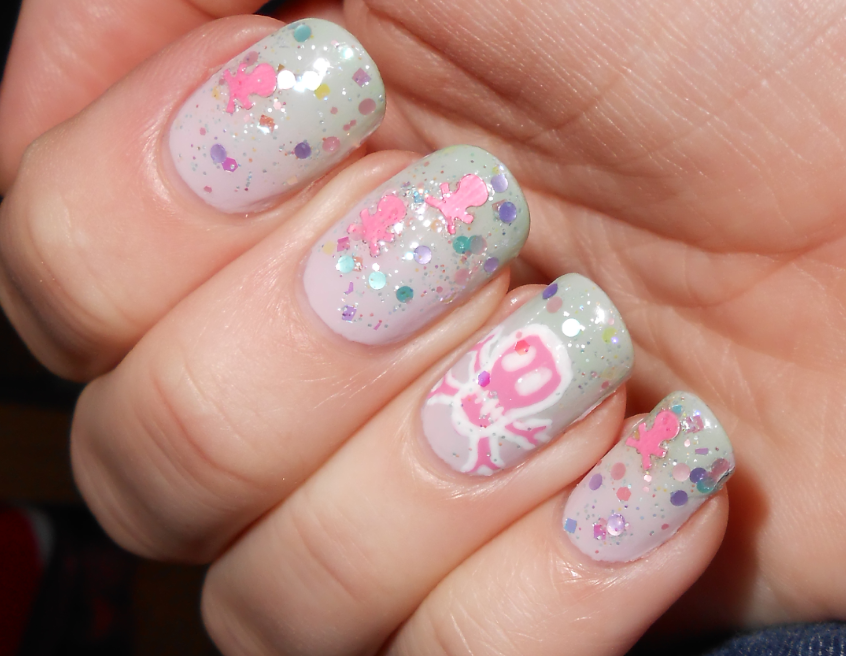
Here's my nails for work tomorrow, I used Sweetie Belle by Nail Lacquer UK again. I love this polish, and I think it's subtle enough for work, but still really delicate and pretty.

Wednesday 30 October 2013

Matchy Matchy Skull Studs


Hello! Here are my nails today, done to match my phone case. I love bling, studs and skulls on things at the moment, so this manicure combines all of that. I've had this idea for a while for my nails - well - since I got the phone case a few weeks ago. I went online for a search for small skull studs, but couldn't find any at all in a similar shape to the ones on the phone. 

In the end after an EPIC search on Born Pretty - none came up when I searched for 'studs' or for 'skulls' or any other combo, but I was sure they would sell them and in the end found them under 'rhinestones' - whyyyy - but it didn't matter because I found them :-D They weren't exactly how I wanted, both kinds offered had 'crossbones' with the skulls! But they were very cheap, so I ordered one packet of each kind in gold. They were delivered quite quickly for Born Pretty, and I received them the other day. 


Here they are - they are similar, and quite large. Because of this I decided to just use one on each hand, on my largest nail. I started with two coats of black on all my nails, then stuck the skulls and studs into wet nail varnish. On my little finger, I added another topcoat to keep the studs on but I couldn't really do this for the skull as it was so big, so just hoping it stays on, at least for this evening because I'm going out!

On my thumb, I used a gold polish before topping it with a black crackle, just to mix things up a bit. :-)


Annoyingly, a few days ago I stumbled across these skull studs on She Sells Seashells. Damn it, these would have been so much better for the design - much more similar to the ones on the phone - AND they're only £1, but I resisted getting them because I think with my Born Pretty purchases I have enough skull studs to last me for a good while yet!

Also, I've ordered a few lots of indie polish (baaad - someone make me stop spending all my money!) and I was so sure they'd come today, but they didn't :-( Stupid Royal Mail- really hope they come tomorrow as I have a day off and want to play with them!

Tuesday 29 October 2013

Pink Holo Halloween!


Hello! Some more halloween(ish) nail art today. This beautiful polish is a holo I bought the other week from Born Pretty along with some other bits and pieces - it was really cheap (can't remember the exact price) and looked beautiful so I thought I'd go for it, and I wasn't disappointed! I know it's not really a halloween colour, but I do love pink.

I first applied three coats of this on bare nails, and under bright light it looked like this:
 

Fab, right? Look at all those colours! But you can still see my nail-line underneath. So I then had a play around, my first idea was to add an accent nail with silver holo, but I somehow ended up painting them all with the silver, then again with the pink, which solved the problem of the visible nail line as the silver I have (by Seventeen at Boots) is less sheer. I think I could have used any colour underneath to make sure it wasn't see-through, but there we go.


Before I added the pink on the top of the silver, I doodled some halloween designs on two of my fingers with the Barry M nail art pen. I then added the pink to make the designs shimmery. Soooo pretty!


As I mentioned, this polish is available from Born Pretty for a couple of quid and there were a few different colours to choose from! 


Sunday 27 October 2013

Hell'o'ween - Nail Lacquer UK

Hello!


Here's my third halloween manicure of the week. It doesn't fit with the theme for today, but I still love it!

I bought Hell'o'ween from AJ's etsy shop, Nail Lacquer UK along with a few others, which I've already posted about. I've been saving this one until close to halloween to use. I spent a while choosing which one I wanted from her beautiful halloween collection and in the end settled on this - it's a beautiful mix of different sized, shimmery pastel glitter, and little pink skull shapes - sooo cute!


I've been thinking for a while what colour to use as a base, and I tried out a few different combinations. Black was too dark, and Barry M's Greenberry meant that the green glitters were lost. I liked how it looked over nude, and over pale green, so I took an idea from Penny Pinching Polish and used a gradient with these two colours as a base. This is Models Own Utopia and W7s Spearmint, and I used a sponge to create the gradient. Here it is on it's own - I used a topcoat on my ring finger but the rest are still a bit bumpy!


I then added two coats of Hell'o'ween. The glitters came out really easily, but the skulls took a bit of fishing, and then it was a bit tricky to get them facing the right way up! There was a bit of an uneven finish due to my 'prodding' of the glitter etc, so I used two coats of Sally Hansen's Insta-Dri to smooth everything out.

On my ring ringer I used the pink and white Barry M nail-art pens to draw a pink skull to match the skull shapes, and then dotted on some glitter from Hell'o'ween. This was also topcoated.


What do you think? I really like the outcome - I love the little flashes of bright pink from the skulls, yet I think this polish is pretty and pastel enough to use all year round, not just at halloween, which is fab! Like all Nail Lacquer UK polishes, this was so unusual and I loved applying it and I'm loving having it on my nails. Also, the charm on this one is FAB, I loooove skulls at the moment :-D

Saturday 26 October 2013

Halloween Nail Art Challenge - I Vant To Suck Your Blood

Hello!


For day two of the Halloween nail-art challenge, the prompt was "I vant to suck your blood"! I thought about doing vampires or bats, but I didn't really have much time. I ended up just doing a simple "bloodied ends" manicure, which seems to have been the popular choice today! I used my nude Models Own colour as the base for this (arghh forgotten the name??!) and a Seventeen polish for the red blobs. Not very pretty, but fits the prompt! 


I've already started on a new Halloween manicure using my Halloween indie polish from Nail Lacquer UK, which will be my mani for tomorrow. It won't fit in with the prompt for tomorrow, but it's still Halloween-y so keep a look out for my post. :-) Here's the graphic for the halloween challenge if anyone wants to have a go!


Friday 25 October 2013

Halloween Nail Art Challenge - Trick Or Treat

I love Halloween and really wanted to get involved with some halloween nail-art in the week leading up to it, so I've decided to take part in a challenge, suggested on the British Nail Bloggers FB page. We can dip in and out of this when we want, which is good as I'm working every day this week so my nails can't be too extreme, which is a shame because I was looking forward to doodling skulls etc all over my nails! Will have to try and think how I can keep up with the challenge yet keep my nails subtle-ish.


Here's my nails for day 1: Trick Or Treat. I've cheated a bit for 2 reasons - one because I've used my mani from yesterday as a base, and 2 because it's not really specifically "trick or treat"!! Could I be cheating much more!? I wanted to draw sweets over the top, but I tried and it didn't look like a sweet! :-( So I decorated my nails with pics of things we used to hang up at the door to scare trick-or-treaters - spiders and cobwebs! I also added some more glitter (Turquoise is Not Dead - Nail Lacquer UK) to add more green/black into the mix. I used the Barry M nail art pens for the doodles.

  Here's the prompts for each day (credit to Kerrie) - hopefully I can do at least some of them, and anyone feel free to join in :-)


Thursday 24 October 2013

For the twill of it, rainbowed


Last week, I was putting on my new boots when I discovered a bottle of beautiful Essie inside one of them! After a minute of utter confusion - do I own this and I forgot?! Did I accidentally shoplift it?! Did I steal it from a friend?! I knew I couldn't already own it because I can't afford to buy Essie, haha. Seeing my confused face, my boyfriend then tells me he saw it featured in the newspaper in the week, in a piece about new Autumn polishes, and had bought it for me, and hidden it in my boot as a surprise - strange but AWESOME :-D I felt special. 

Anyway, the polish he bought me is For The Twill Of It, a kind of duochrome metallic polish... in the bottle it appears to go from green to purple. Beautiful! I tried it out last night, and actually forgot to take pics before adding glitter! But I thought it looked ... different from in the bottle - much more subtle. It was also quite brush-stroke-y.... not as smooth as I expected. It was very metallic-looking, kind of a gunmetal shade unless in certain light. 

I decided to top it with something, and reached for I Will Rainbow On You by Nail Lacquer UK. I think this pretty, colourful, packed glitter will go with almost everything due to the fab mix of colours, and I think it really brightened up the base, and you can still catch glimpses of the purple/green shimmer under the glitter. I think it looks quite interesting! Here's a few pics in different lights as I struggled to capture the true shade/shimmer of this!


What do you guys think? :-) 

Wednesday 23 October 2013

Dublin - Guinness Nails


Hello! I've just come back from spending two days in Dublin for my boyfriend's birthday. I've never been to Ireland before and it was really fab! One of the things my boyfriend wanted to do in Dublin was go to the Guinness factory - you saw how it was made, got some samples etc! So here are the nails I did to match, as he suggested :-)


Friday 18 October 2013

Brony Me: Nail Lacquer UK

Hello!

I wasn't going to change my nails today because they were still looking lush, but I've had a day off with not much to do and I couldn't resist as I still had untried bottles of Nail Lacquer UK to play with! So this is Brony Me, a beautiful glitter topper that really pops! I was drawn to this in AJ's Etsy shop straight away because of the colours - I adore pink and turquoise, and mixed in with the yellow, black and white it looked amazing! Also, I loved the different sized pieces, and it seemed really dense - full of pieces, not loads of base and hardly any glitter.


I wasn't sure what colour to layer this over, as it already featured most of my favourite colours. I decided to use all 5 of the colours it contained, to see what looked best so I know what to use in future applications. These are all the colours I used:

Hot Pink by No7, Guava gelly by Barry M, Lavender Cloud by Sally Hansen, Limited Edition Yellow by Barry M, BK matte black (the only black I have, I didn't pick matte for any other reason!)

I used two coats of each of these in a different order on each hand. I then began to apply Brony Me - and got a fab surprise... I'd forgotten about the awesome black hearts in it! I of course saw the swatch on Etsy when I bought the polish and loved the hearts, but when I received it you can't really see them in the bottle as they're mixed up with everything else and I completely forgot they were there. But when I started to apply this, they came out lots, and really easily - no 'fishing' required! I applied a couple of coats on each nail, trying to evenly distribute the pieces of glitter, which wasn't too difficult at all but did require a little bit of prodding, which I expected. 

And I looooove it! I can't even decide which colour it looks best over. I adore the turquoise, yellow and pink against the black base, but then of course you lose the lovely, unusual black hearts, so I think it looks best over the white (although over the white you don't see the little white shards)...what do you guys think looks best under this beauty, or would look good?

Left Hand:


Right hand:


I still have a Nail Lacquer Halloween polish to try, with fab little pink skull shapes in it - very excited to play with that and see how it looks - just gotta decide on a base colour, and I'll be applying it a little nearer to Halloween. 

You can buy Nail Lacquer UK polishes here. Go!

Thursday 17 October 2013

Sparkler: Nail Lacquer UK


Hello!

Tonight I've got another beautiful Nail Lacquer UK polish to show you. A lot of new ones were released this week and they are all stunning, but this one is actually a little bit older and has been in the shop for a while - and I've had my eye on it for ages! I told myself I wouldn't buy it until there was a few more I wanted - so a few days ago I finally bought it and also got two more from the newer range. Can't wait to try them out!!! Look how pretty!!


The one I'm wearing today is the middle one, called Sparkler. It's soooo pretty. I love the tiny neon pink and blue pieces, and I like that all the glitter is the same size so it looks subtle - I wore this today for work and didn't get any negative comments from any managers!

I've layered two coats of Sparkler over bases of pale pink and pale blue, and I love it over both.


Soon I'll be showing off the other two polishes, I definitely want to wear them both ASAP! I think Brony Me (the bright coloured one) at the weekend, and Hell'o'ween (with the skull) nearer to Halloween.

Wednesday 16 October 2013

Tartan Attempt

Hello!


Some art using the Barry M nail art pens today... not played with these for a while! My black had gone all gunky and I was going to get a new one, until my friend Jenny gave me hers as she'd not used it much. I wanted to try tartan, and had a look at a good few designs on google before I started. I already had my base colour of Utopia from yesterday, and picked a dark and light pink to use in the design, to make it a bit different from the traditional red. Using the two pink polishes and the black and white nail art pens, I came up with this!


A few people have told me it looks a bit like Burberry, which I wasn't going for. I kind of like it, but am annoyed that I made the dark pink lines too thin on my fingers - I prefer the way it looks on my thumb. Ah well, it was fun to do, and I did it in little bits in between announcing trains today, which gave each bit a good chance to dry before I added the next bit of detail. It's all topped off with a topcoat to keep it sealed in!