Hello!
These nails are kind of halloween themed, as they look a bit bloody and vampy! I created this gradient using four different polishes - all Nails Inc. I don't usually use classic reds, but for this they were perfect! I used:
Vodaphone Red (That I got last year in a goodie bag at London Fashion Week!), Tate, Chester Sq and the black Kate Spade one that I got free in a magazine.
I started off with two coats of the brightest red, and then used a make-up sponge for the gradient. I had to dab each nail about three times to build up the colour how I wanted it. I made such a mess - to avoid this you can put tape around your fingers, or paint a layer of peel-off glue, but I couldn't be bothered to do either of these things!
Once
it was fully dry, I finished with two coats of topcoat - I use Sally
Hansen's Insta-Dri. This smooths out the gradient and blends the colours
more.
Hello!
I tried something a bit different the other day - something I've wanted to give a go for a while now! I've seen this called a flip mani, or an Louboutin Mani - after the famous black shoes with the red soles.
I painted my nails like normal with the black Kate Spade Nails Inc polish - two coats. I then used a barry M red gelly shade to paint the underside of my nails. This took a bit of precision - it was so hard to get it far enough down without getting it all over my fingers - it took a while, and a bit of careful cleaning up! It also took a few coats to build up the red, as the black coming through from the other side of the nail darkened it a lot.
I was really happy with the results though - they looked so striking!
On Fridays, if we both have time, myself and Laura from Naileymabob decide on a theme and both create a nail look based on whatever we've picked. This time, we decided to do things slightly differently; we decided to pick a mani by each other and try to re-create it!
I spent some time going through Laura's Instagram, and came across loads of manicures I wanted to recreate. However, I had to consider that I'm back at work for a 7-day stint from today so I had to rule out some of the brighter and bolder designs, and go for something in paler, more subtle shades.
The manicure I picked to recreate was this one, done 12 weeks ago according to Instagram. Me and Laura live at different ends of the country so hardly get to see one another, but I did actually see this mani in real life when we met up and I remember really loving it - it looked so stylish and clever!
I know that Laura used a gold glitter from Freckles Polish for the chevrons, but I didn't have anything similar really - the only full-coverage gold glitter I own is a chunky, textured one called Charm Bracelet by Seventeen. I do love this polish but wasn't sure how it'd work underneath a smooth polish....
For the peach, I initially wasn't sure if she had used Peach Melba by Models Own or the slightly oranger Papaya by Barry M....I settled with Peach Melba because I love it! After doing the mani and looking back on her Instagram again I realise that I think the polish actually was one of the Models Own 'Polish For Tans' shades - ahhhh didn't even consider that at the time!
The first time doing the chevrons went SO WRONG! I started off with a base of the glitter, and when it was dry (I added gelous to smooth it but it was still pretty rough!) I applied chevron stickers. This is where it started to go bad! Due to the textured glitter, the chevron stickers wouldn't stay stuck down and kept lifting off. Also, the peach (which I was using over the top) wasn't thick enough in one coat to create neat chevrons. All in all it looked rubbish so I ended up taking off the two middle nails and starting again!
This time, I started with a base of peach and added the gold chevrons over the top. I didn't want to do it this way as Laura had obviously used the gold first and I wanted to stay true to her mani, but at this point I didn't have much choice! I also added more Chevrons than Laura did as my nails are a bit longer.
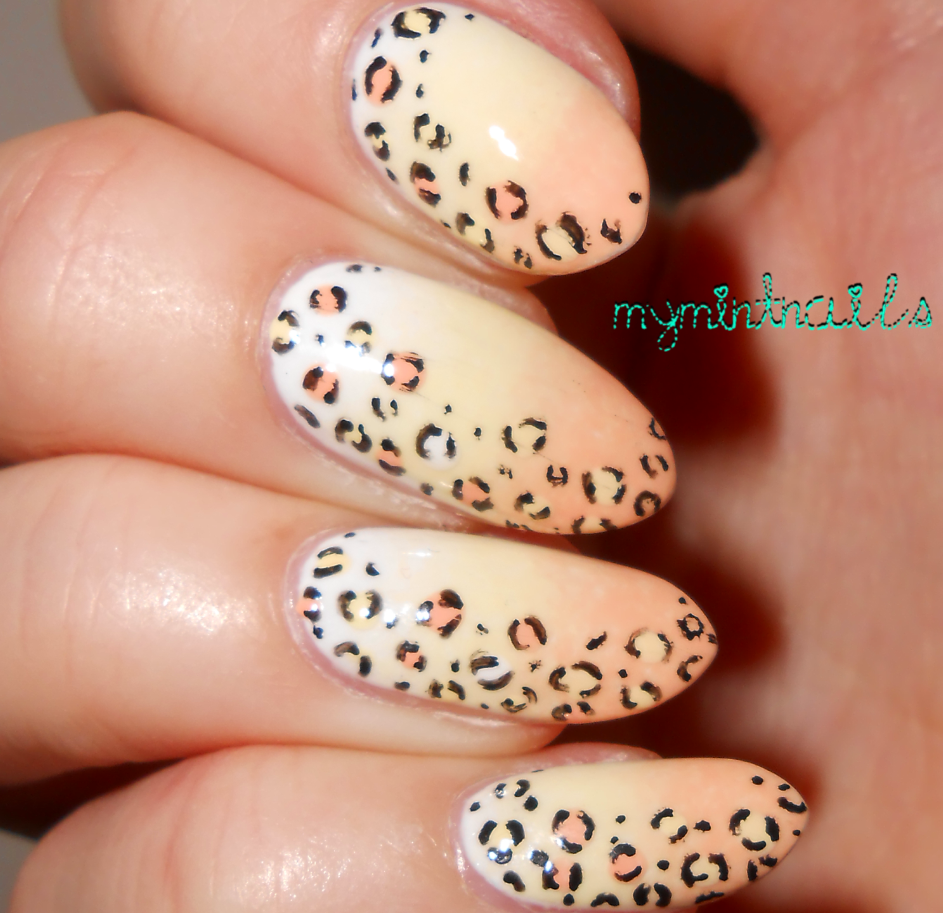
Above you can see the mani of mine that Laura recreated - my gradient leopard print! I love her version and how it looks on her nails. We didn't tell each other until just now which mani we had picked to recreate, and it turns out we both recreated the ones we had worn on the same day back in summer. We are so psychic! Here's the original pic from 12 weeks ago of us wearing the manis together.
And here's my finished 'recreation' mani! I even copied the hand pose ;-)
Hellooo!
I have an absolute stunner to show you today. Barry M recently released a new collection of six really glittery polishes, called the Glitterati Collection. I saw swatches of all these on other blogs, and although I thought I'd like the pink one best, on the nail the purple one definitely seemed the most impressive.
I treated myself to it this week, and here it is. It's called Fashion Icon.
I applied a base coat of purple (the limited edition Barry M brought out over summer) just so that I wouldn't have to put on loads of coats of glitter - this usually results in a really thick layer that chips easily. I used two coats of glitter over the purple base but I could have got away with one. I didn't topcoat - I thought it dried reasonably smooth and not as gritty as I expected!
This polish is so amazing. In some lights it almost seemed to have tiny lights inside it; it shimmered and shone so much. The glitter is purple, but with a really strong blue shimmer, as well as multi-coloured-looking holo glitter scattered through it. I couldn't stop looking at my nails all day - it was so hard to capture in pictures, but I think the one I put at the top of this post does it best. Here are a few others I took as well:
You can pick up this polish for £3.99 in Boots, Superdrug and Tesco.
Sooo I just can't leave a plain gradient alone! Last night after wearing my 'candy corn' gradient plain for a day (see previous post) I decided to add some leopard print. I can't get enough of leopard print designs lately, and I definitely think a lot of practice is improving my leopardy designs.
To mix it up a bit, I decided to do a kind of crescent of leopard print down the side of each nail rather than cover the full nail. I used Peach Melba and Banana Split (Models Own) for the dots and outlined them with the black nail art pen, and finished with another coat of topcoat.
Slightly work-inappropriate but I loooove these!
Hello!
I created these nails after being inspired by lots of Candy Corn nails around on Instagram at the moment with it being close to Halloween. Living in England we don't have candy corn, but I love the colours of it in pictures! Candy Corn goes from white to orange to yellow, but I changed the order of the colours in this gradient so they would blend better.
All my polishes are Models Own - Snow White, Banana Split & Peach Melba. These blended so beautifully! <3
I used my usual method - I painted my nails in the lightest colour which in this case was white. When this was fully dry, I painted the three colours onto a make-up sponge and dabbed the sponge onto each nail, re-painting the colours onto the sponge when needed. Each nail took about three or four 'dabs' with the sponge to build up the colour. I finished with a topcoat to smooth it out.
The last pic was taken in an American sweetshop in my local town centre - although I didn't buy these because this little bag was £6! They do look cool and pretty though!
Hello!
Here are my nails ready for back-to-work today. I picked out three nude/pale shades for this design, which I've seen in a lot of places and really wanted to recreate.
The base is Utopia by Models Own - I go back to this again and again for a lovely pink-toned nude shade. This was two lovely coats.
Once this was fully dry, I applied straight nail vinyls (or you could use striping tape) to section off a triangle at the bottom of each nail. I painted these pale pink (Rosehip, Barry M) and then removed the vinyls. Once this was fully dry, I applied new vinyls in the opposite direction, and painted the triangle with glitter (Duchess, Barry M).
The main thing here is to WAIT between layers. I gave enough time between the nude and the pink layer, but after I'd applied the pink I was too impatient to wait and tried to apply the nail vinyls when the base wasn't fully dry - it felt dry to the touch, but once I pulled up the vinyls, the polish slightly pulled up underneath - arrghhh!!! I tried as best I could to press them back down and topcoat them so it was less obvious, but I'm still so annoyed as the lines now aren't as neat as I wanted. Grrr. So the moral is - have patience!!!
Hello!
I've done some Halloween nails - I know it's not Halloween yet but there's been spooky nails all over Instagram for the past few weeks and I was desperate to do some myself - I love Halloween!
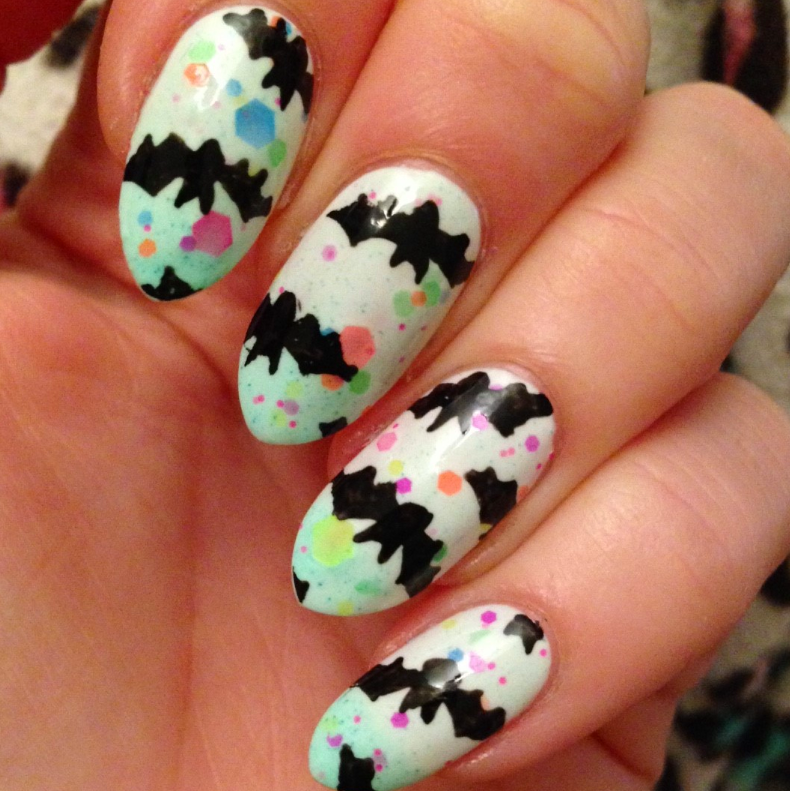
I had a lot of different designs in mind, hopefully I will get the chance to do one or two more, work permitting. For this one, I decided to start off with a base of Minty Madness by Polish Me Silly. I bought this gorgeous thermal polish a few months ago, and it's so pretty - perfect for Halloween I think. It goes green when cold and white when warm. In this mani I've used two coats of white, then two coats of Minty Madness.
Once this was all dry I used the Barry M nail art pen to freehand these bats over the top - I practiced the shape on paper a couple of times first so I knew what I was drawing! They're not all perfectly even but I like the overall effect. And I can't stop looking at my nails to see what colour they are!
Here's a few more pics of them in varying stages of warmth - the pictures tended to bring out the white, although they are more usually green as my hands are usually cold!
Hello!
I did these nails as I was going to the races over the weekend and I wanted something different and glam, but reasonably quick and easy to do as I didn't have much time. I always go for studs/gems for a special occasion as I think they really stand out, and they're not something I'd wear every day.
I decided to wear my Polish Me Silly multichrome, Obsession, again. It's so gorgeous! I then added some rhinestones that had a similar colour-shift, and they matched really well.
I used a base coat of black, then just one coat of Obsession. I stuck the studs on while the polish was still wet, picking each one up using a dotting tool with a bit of blu-tac stuck on the end! I finished off with a topcoat to seal them in - I did lose a few studs over the course of the day but due to the random pattern of them it wasn't too noticeable.
I loved these nails, and more than once people asked to see them and were amazed by the colour shift! I was constantly tilting my hands to demonstrate them to people, haha!
Hello!
Ever since I tried doing smaller-than-usual (for me anyway!) leopard print on my nails, when I did my Leopard Print Triangles last month, I wanted to try it again but on a bigger scale! I had a play about and came up with this design.
The base is Peach Melba, by Models Own, which I looooove. Here's a picture of it on it's own! So creamy and yum <3
Once this was fully dry, I added the leopard print using the Barry M pink nail art pen. I just tried to draw tiny circles, either using two or three lines to make each circle. The result was a bit haphazard but it doesn't matter too much with leopard print.
I taped off two sections at the bottom of my two middle nails of each hand to leave as negative space, to make the mani a bit more interesting. I added studs to finish off the look!
I really loved this manicure and was sad to take it off - it kept chipping :-(
Hello!
Another design from earlier in the week that I've only just had time to show you.
The base for this was Oval Plum, from the Models Own Diamond Luxe collection. This is definitely my favourite shade from the three I purchased from the collection.
I used the Barry M black nail art pen to freehand the lined design, and finished these off with a stud in the middle of each.
I loved the look of these, definitely good for autumn/winter.
Quick post for today to show you a manicure I wore during the week.
For this one I used three Barry M gelly polishes - Chilli, Pomegranate & Rhossili.
I started with two coats of Pomegranate. Then when it was fully dry, I taped off triangles and filled them in with Chilli. Once this was dry I used a dotting tool to add one dot on each nail using Rhosilli.
The overall effect was quite neutral - the colours were all so similar that from a distance they blended in, but up close the pattern was visible. Next time I try this I think I'll use more contrasting colours, because I do like the simplicity of the pattern!
Hello!
As soon as I saw the new range of false nails by Elegant Touch, which is called Lily Loves inspired and created with Lily Allen, I loved them! I don't wear falsies, obviously, and I usually don't really like how they look as they can look plasticky and fake. But recently I've seen some funky ones that have fashionable nail art on them - there's Lily's range, and the House of Holland ones, and WAH have brought some very cool ones out too.
I loved the London Skyline ones the most, and immediately thought that they were something I'd like to attempt myself.
I used Rhosilli (Pink) and Malibu (Blue) from the Barry M Matte collection - I didn't pick them for that reason, just because I thought they matched the design I was trying to replicate. I painted my nails pink, then sponged on a rough gradient with the blue. I didn't really try to blend the two colours because they weren't "blended" on the false nails.
I then drew on the designs on each nail using Barry M's black nail art pen, and topcoated when finished!
Here's some pics - my right hand came out best (as I'm left handed) but that's got my silly short index finger nail so apologises for that - I've also included a pic of my left hand, which isn't as neat as I did it with my non-dominant hand!