Hello!
A few weeks ago, I won a competition ran by Superdrug/Barry M on Instagram. I was expecting to receive the new Speedy-Dry collection as my prize, but when it came I got so much more! I did receive the full speedy-dry collection (9 polishes) but I also got the three new spring gellys and the new plumpy topcoat. I was thrilled! But on top of all of these gorgeous polishes, I also got a massive range of make-up brushes (which I've passed on to my sister as I don't really wear a lot of make-up) and some make-up bits including a cheek contour kit and two gelly lip paints. I've kept the two lip paints because the colours are gorgeous, and my sister has got the other bits. All in all, a FANTASTIC prize that must have been worth quite a bit. A lot more than I was expecting and it was great to be able to share some of it with my sister as well!!
So I was eager to try the new gelly shades. I'd actually already purchased Cotton (the white) but I'm glad to have another because it's a perfect white, and I go through white polish quite a lot as I often use it in nail art. The two other shades I'd resisted buying as I thought they were quite similar to gelly shades I already had. But they're absolutely beautiful and I'm so glad I now own them - they are actually quite unique and not too similar to any colours I already own.
The pink is called Fondant (love that name) and it's kind of a muted pastel pink, with a bit of a purple tone to it. Much more dusky and pigmented than the other pale pink gelly I have, Rosehip. The blue is called Sky Blue (not as imaginative a name!) and I'd thought it was going to be like Huckleberry and Elderberry, but it's not. It's much brighter and a really gorgeous shade of blue, lovely for spring.
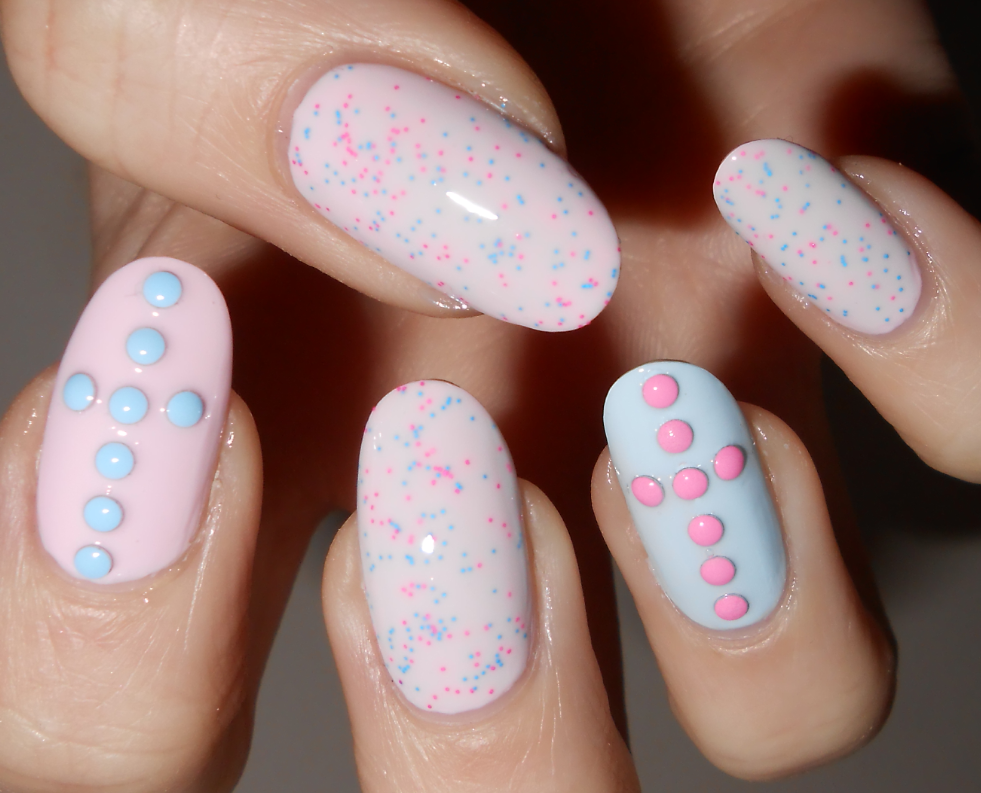
I created these nails as I'd not done flowers for a while and they're easy to create with a dotting tool. I added a stud to one flower-middle per nail to make them more interesting. I also added a gradient on the other nails as I wanted to see how these colours would look blended together. I'm really pleased with this mani, I think it looks really Spring-like!
Hello!
So I know with new polishes I often see the question "Do they stamp?". Well, I'm not into stamping when I do nail art, mostly because I'm not very good at it! What I do enjoy (as you'll probably know if you read my blog regularly) is gradients. So as soon as I saw those three paler HyperGel shades by Models Own (reviewed in my last post) I knew I wanted to try them out as a gradient.
I wouldn't necessarily have put all three of these shades together in a gradient - I knew the pink and blue would look good as they were both so pale but wasn't sure about including the peach as it was a bit of a darker colour. However I went ahead with all three just to see what they would look like. At first I thought it looked awful, but I persevered and I'm really happy with the result!
For gradients it helps if the polishes are really pigmented so you don't have to sponge on loads of layers to build up the colour, so these hypergels were perfect.
I used my usual method - started off with two coats of the 'base' shade (the lightest of the colours to be used in the gradient usually) which was Powder Blue. Once dry (I used a fast drying topcoat then waited overnight) I painted the three colours (the other two are Long Beach Peach & Paradise Pink) onto a small wedged make-up sponge, and dabbed them onto each nail. I did this a few times, moving the sponge slightly higher/lower each time to blend the colours. A topcoat smoothed it all out.
It looked lovely on its own but I felt like adding something and I've not used my pretty studs for ages! I'd just bought a new stud-wheel from Poundland which had these gorgeous big silver diamond shapes in, so I used those. On an accent nail on each hand I added some pastel studs in matching shades to the gradient, then some gold studs to finish it off.
I really like these!
Hello!
Quick post today to show you my most recent nails. I got a bottle of Raspberry Daiquiri by Freckles Polish for Christmas in a Secret Santa swap I took part in, and I love it! I'd actually admired this polish for ages so my person chose really well for me. I was eager to use it in a manicure, and was further encouraged by a nail art competition that Julieann from Freckles Polish is running at the moment.
After a lot of thought on what I wanted to create, I came up with this design. I knew I wanted to pair Raspberry Daiquiri with another holographic polish, and I immediately thought of Princess Sabra, a lovely dull gold by a-england. I decided to do some roses, inspired by this manicure I did last April, which I recently picked as one of my favourites from the year. I paired this with some simple gold studs. I really like the result!!
Hello!
I'm so excited to show you this mani because I love it so much! I only got to wear it for two days sadly, but I was really pleased with it. This is a mix-and-match mani I came up with based around this gorgeous mint green shade which is of course Sugar Apple by Barry M.
For my index and little finger, I created a simple glitter gradient using a gorgeous, dense silver glitter I have by No.7. Sadly after I'd done this manicure I had to throw it away because it'd ran out! I really want to get another bottle though as it's fab for gradients.
On my ring finger, I used some silver triangle studs I got from Born Pretty Store - another item I was sent to review. I had this design in mind and luckily they fit nicely in a row! I stuck them down onto wet polish and topcoated to hold them in place.
On my middle finger I did some simple leopard print by adding blobs of Sugar Apple to a white base. Once they dried I added the silver outlines using a nail art pen.
On my thumb I did a simple gradient using a make-up sponge with the two shades, and topcoated with a holo sparkly Barry M polish to finish it off.
I was so happy with the outcome and wanted to keep these on forever!
Hello!
Ever since I tried doing smaller-than-usual (for me anyway!) leopard print on my nails, when I did my Leopard Print Triangles last month, I wanted to try it again but on a bigger scale! I had a play about and came up with this design.
The base is Peach Melba, by Models Own, which I looooove. Here's a picture of it on it's own! So creamy and yum <3
Once this was fully dry, I added the leopard print using the Barry M pink nail art pen. I just tried to draw tiny circles, either using two or three lines to make each circle. The result was a bit haphazard but it doesn't matter too much with leopard print.
I taped off two sections at the bottom of my two middle nails of each hand to leave as negative space, to make the mani a bit more interesting. I added studs to finish off the look!
I really loved this manicure and was sad to take it off - it kept chipping :-(
Hello!
Another design from earlier in the week that I've only just had time to show you.
The base for this was Oval Plum, from the Models Own Diamond Luxe collection. This is definitely my favourite shade from the three I purchased from the collection.
I used the Barry M black nail art pen to freehand the lined design, and finished these off with a stud in the middle of each.
I loved the look of these, definitely good for autumn/winter.
Hello!
This week's BFF Friday theme is: Fishscale nails! Myself and Laura of Naileymabob both made an order in the past few weeks from She Sells Seasells, who supplies fab nail accessories like studs and vinyls. When chatting, we realised we'd both ordered the new Fishscale vinyls, and were both eager to try them out, so decided we'd both create a manicure using the vinyls somehow, and this would be our theme.
Obviously with them being fishscales, I wanted to create something that made me think of the ocean. Luckily, I'd also ordered some seashell studs which are soooo cute, so I used these too. This is what I came up with!
I used Greenberry and Guava and a bit of Prickly Pear gelly polishes by Barry M. On all my nails except my ring finger nails, I created a water marble using these three shades. I was quite proud of this as I've never really done a successful water marble.... and I definitely won't be trying it again for a long time, so much messing about!!
For the accent nail, I started with a base of Greenberry (two coats) and let it fully dry. Can I just say, Greenberry is the most beautiful polish ever! <3 anyway, once it was FULLY dry, I stuck on the fishscale vinyl, painted over my nail with Guava, then used tweezers to remove the vinyl.
Firstly, I was very impressed that the vinyl covered my whole nail - I have had several products before in the past like stamping plates etc that claim to cover a full nail, but because mine are quite long they haven't.... but these vinyls were definitely long and wide enough to work really well!
Something I found difficult was actually getting the vinyl on and off the nail. Due to it being quite a complex shape, I struggled. When removing the vinyl from the backing paper, some of the little 'scales' that were meant to pop out of the pattern didn't, and I had to use a pen to press them out - which was hard because I didn't want to rip or stretch the vinyl. Also when removing it I had to be careful not to stretch it and mess up the still-wet polish. I did manage though, and I think I'll be a lot better at using these next time round having learnt how best to do it!
I wish I'd used more contrasting colours as the watermarble and fishscale patterns are not too obvious unless you look closely - although I do think you can see the patterns more obviously in real life, so that's okay!
Here's some pics with and without flash to try and show the marble and fishscale off!
Hello! Time for another edition of BFF Friday, where myself and Laura of Naileymabob pick a theme and both create a mani. Laura picked the theme this week and it was Stud Crazy which I thought was fab!
I took inspiration from Polish All The Nails who creates all sorts of crazy detailed manis using stud/glitter placement, with whole nails being covered in studs like in the example I've linked to above. I tied this idea in with my new polish from Pretty Quirky which is called Milky Joe and created a stud-filled accent nail to match the polish.
After I uploaded the pics I realised I had neon yellow polish (which I used to fill in the gaps where studs wouldn't fit; the base shade was originally white!) all over my stud finger which kind of ruins the look - it wasn't really visible in normal light,and I'd already taken these off before I checked the pics - rubbish! So - sorry about the mess!
On the whole I'm pretty disappointed with my interpretation of this theme, I've definitely done better crazy stud nails in the past and I think I should have gone for something like this again!
I do love Milky Joe though, I used two coats with a bit of placement needed over a base coat of white. I love all those neon pieces! <3 You can buy Pretty Quirky polish here!
You can find details and more pics of the mani Naileymabob did here - definitely have a look, I adore this mani especially the triangles of studs and that fab accent nail - that was more the look I should have gone for!
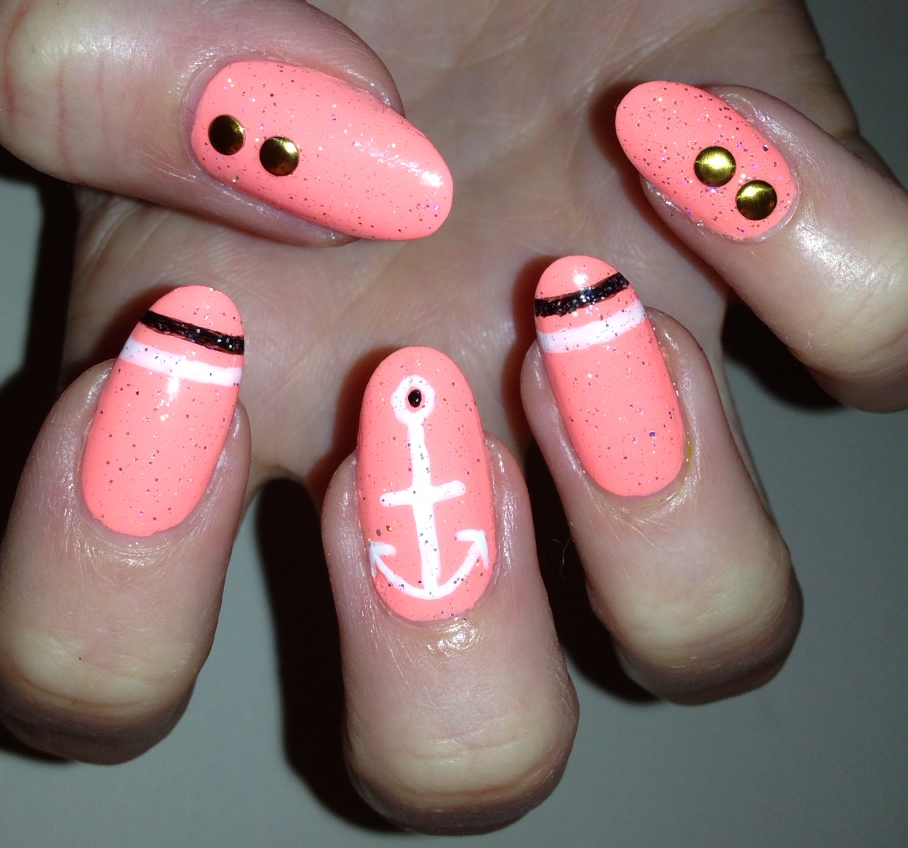
Hello!
My nails today are a bit random! I wanted to do a nautical/anchor theme after realising it was an easy design to do with a nail art pen. However I didn't really want to use blue and white because I've seen it so much before in nautical manicures, and bright blue isn't my favourite nail shade. Instead I decided to pick a colour I was more keen on, so I selected Beach Bag by Models Own which is a lovely neon orange/peach shade. Very summery!
After two coats of this, I added the anchor and stripes with my black and white Barry M nail art pens, and then some studs from a stud wheel I got from River Island (in the sale!) I also added some holo glitter (Barry M) that I won in a giveaway from Rebecca at Lanes Lacquers - I love this as it's quite subtle but adds an extra something to a manicure!
I'm not sure what I think of this mani, it seems a bit random, but it'll do until I am back to work! Why is it that I am full of design ideas all week while I'm at work and can't try them out, but once I have some days off my mind goes blank?! Haha. Hope you're all having a good week x
Hello! Really looking forward to showing off my nails today. These were inspired by a pair of jeans I saw in a magazine, that were from Topshop - here they are:
I really liked the simple pineapple print, and wanted to recreate this. I spent a few days thinking of how to make the mani more interesting, and eventually came up with this design last night. I used Key Lime and the limited edition summer Yellow from Barry M, as well as Sinful Colours Snow Me White and coloured studs from Born Pretty.
I'm really pleased with how these turned out, and gutted that I can't keep them on longer - back to work tomorrow so got to go back to plain! I might be recreating this design again in summer, or at least using that pineapple in future manis now I know I can do it!
Hello!
Today is BFF Friday with Naileymabob and this theme was decided by me. We were both to pick one Indie polish to use in a manicure. We would then add one (or two, as we decided earlier today!) accent nails that complement/match the indie polish. As usual, we don't discuss specific ideas, we just agree on the theme, then come up with a manicure each. As I write this I've no idea what Naileymabob has come up with, can't wait to see!
Earlier this week I was in Tescos, and I accidentally just bought two of the new Barry M Gellys! I totally don't need them, but they were so pretty I couldn't resist, especially at 2 for £6. I loved the pale minty green, but I have a shade practically the same that's really good (Pepperminty by Ciate) so left that one on the shelf, and picked up Rose Hip (pale pink) and Huckleberry (pale blue). I used them as the base for this manicure - in fact, I wore them on their own this morning at work, before I added the indie! They have such a lovely finish after three coats - compared to the hypergels though they're quite watery in consistency, but doesn't change the finished look!
For my BFF mani, the Indie I picked to use was Sparkler by Nail Lacquer UK. I've loved this polish ever since I bought it, but don't wear it enough! I picked it for this manicure as I thought the colours matched with the gelly (which I didn't want to take off after one day!) really well. I applied Sparkler on my thumb, middle finger and little finger over the pink gelly polish. The other two I left plain - my index finger was pink, and my ring finger was blue from my earlier manicure. To fit with the brief of adding accent nail(s) that matched the polish, I added pastel blue and pastel pink studs, to match the glitter in the polish (okay I know the glitter in the polish is actually bright pink/blue but I thought brighter studs wouldn't go with the 'pastel' look of the whole manicure!!)
Here's the outcome - to say I just decided on this a few hours ago and haven't had it planned for ages, I think it's turned out well - I really like it! I'm hoping I can wear this to work tomorrow and just hide my hands, haha.
And a few quick pics of my plainer gelly mani before I added anything, I really love these colours, and the finish! Especially the blue, which I didn't expect to love so much <3
Check out Naileymabob's BFF manicure here!
Hello!
Quick manicure to show you today. Unfortunately my Ciate Dolls House polishes seemed to chip really quickly so even though I loved that manicure, I took it off today and replaced it with this.
I used one of my new Kiko polishes, number 298. This is a sheer, shimmery mint green kind of colour - so pretty! I layered two coats of this over two coats of Pepperminty by Ciate - the two colours matched really well!
I then added some studs, in different shapes and colours, to spice things up a bit! I liked the clean look of this manicure, and I really do like this Kiko shade - really nice for spring, although I think too sheer to wear alone, I reckon I will always use it layered over a more opaque polish.
Hello,
These nails are not very original, but this was a manicure I came up with during the week. First of all, I wanted to try out another Hypergel, so I picked Naked Glow. This is the nude shade, and I love nude polish. It's also fab because at work, eye-catching nails aren't really encouraged, so I'm always looking for nice nude shades. Here it is before I added anything. I do think, as shown in the second pic below, that it's not as dark or as brown-y as shown in the swatch on the bottle lid. This is a bit annoying because I already have a really similar nude shade (Lychee by Barry M) and thought this one might be a bit darker. I still like it though!


I painted my nails with two steady coats of this polish, and didn't have any issues with application. Like Cerise Shine, it has such a smooth and shiny finish! The only problem with a beautiful finish like this is that any tiny imperfection, like a scuff or nick to the polish, or a tiny bubble or lump in the application really stands out - to me, anyway! Also, I can't just leave my nails plain any more- I must add something! So I picked up Southern Lights, which is another of my new Models Own goodies. I used this polish to create a glitter gradient on my nails - one of my favourite quick-and-easy looks. This polish is beaaaauuutiful, but a bit thick to use in a gradient I think. I can't wait to use it as a full mani, though! It gives such good coverage!


I also added an accent nail using some pastel-coloured studs I got from Born Pretty Store ages ago, and never actually got round to using despite them being so awesome! I picked a kind of nude/orange shade to match the polish, and a pale blue to match the glitter, and stuck them on into a wet topcoat, with a further topcoat to seal them in.
I really like these nails, and was really chuffed when Models Own posted my photo of them on twitter, after I'd posted them to Instagram yesterday. Yay for social media - I got a lot of likes and even a few more twitter followers! Very happy!