Thursday 31 January 2013

Monochrome Static


Another trip to the newly discovered discount nail varnish shop today had me leaving with this gorgeous mix! It's called Salt n Pepper and is by w7 - a very inexpensive brand, I think you can also buy it in Primark? It's a really big bottle and cost me £1.99. Had to try it straight away. I love it! It reminds me of tv-static, hence the title.


In these photos I've applied 4 coats - two or three looked fine but I kept going cos I loved how it looked with some bits of the tiny black particles layered under the white polish. I love how it looks a lot like the stuff some of the more expensive brands are coming out with at the moment. Not sure I'll get away with this at work though, it's a bit in-your-face! 


Edited this post to add: I've realised what this polish reminds me of! The inside of a dragon fruit!! Random but true:


Tuesday 29 January 2013

Buried Treasure


I named this post as I did as my nails at the moment look like sparkling treasure! I love them! Recently I was in my local town centre and walked past a discount beauty shop called Zest as I have done hundreds of times... I never bother going in for a look as I don't really bother with make-up/hair extensions etc, and I have always kind of assumed that cheaper brands won't be as nice as the real thing. However after finding Sally Hansen in Poundland I decided to have a quick look at their nail varnish selection. They had loads for 99p and £1.99 - most of the brands I'd not heard of, but there were some fabulous colours. I limited myself to two 99p glitters, thinking that if they were no good, I'd not spent much on them. One of them was this one:


...Never heard of this brand before but I loved the mixture of different glitters - small gold glitter, then medium blue chunks, and big red and pink chunks. I thought it looked really different. Once at home I was stuck for what to use as a base under this - there are so many colours already I didn't want to over-load it! I was first going to use pink, but then settled on gold - not sure why!

I used two coats of a cheap gold varnish for the base (so cheap that the bottle is unbranded - think I got it in a set years ago? But it was the colour I had in mind) ...and then two/three coats of the glitter on top, prodding it about a bit so the bits of big glitter were scattered evenly across the nail. I finished with two coats of seche vite fast drying topcoat to make them all shiny and smooth.

I adore this look! I think I like it because it's hard to see imperfections - it doesn't matter if the base coat isn't perfect, and the glitter is meant to look randomly scattered. And someone at work has already asked me to pick up this glitter for them as they think it looks so nice. Completely worth 99p!

Below are a few pics I took in different light - they're so sparkly that they always look different - I can't stop peering down at my nails at work :-) I had to include the last pic as the glitter on my little finger is actually sparkling in the light!


Saturday 26 January 2013

Week 5 - Striped Nails


Week 5 of our mashed-up year-long challenge was to create striped nails. And when I was given these two Essie polishes by a generous colleague earlier this week I really wanted to try them out, and thought they would look pretty together!

My plan was to kind of create a striped green-lilac-green-lilac along my fingers, three stripes to each nail, using masking tape to create the lines. Here are the two colours before I added the stripes - pretty!


I love both these colours - I actually love them better like this, I wish I hadn't added anything extra, but I was attempting to fulfill the challenge! The colours are Navigate Her (the pale green) and To Buy Or Not To Buy (the lilac). I've really struggled to capture the true colours of these in my pics - and I took loads! They are really pale, but without a flash they look even paler and washed out, and with the flash they look way brighter. I've tried to pick the best three pics to use in this post!


To create the stripes, I began by putting two little pieces of masking tape down each nail, leaving a section down the middle.I added two coats of the contrasting colour, then removed the tape. However, the lines weren't very neat, and when I removed the tape it kind of distorted the lines between the colours, and they were not as crisp as I wanted. So I decided to freehand over them to tidy them up a bit. Still not happy at all! I love these colours, but don't like what I have done with them because it's not neaaat enouuugh arghhhh.
  I may try another design later this week using my striping tape, but I can't get the hang of keeping it neat when the tape is peeled off, whether I'm using masking or striping tape. I've read that it's best to do it when the polish is still wet, but this doesn't seem to go well for me either. Maybe I just need to practice!

I've also just bought some gorgeous CHEAP sparkly polishes from a discount shop in my town, which I'm dying to try out as well. Watch this space!


Wednesday 23 January 2013

Dorien Grey: Studded


So after hearing good things about poundland and Sally Hansen varnishes, I decided to head into town yesterday to see if I could pick up any bargains! I managed to get my hands on the following...


1. Dorien Grey Sally Hansen Polish
2. Nail art pen thingy - Sally Hansen
3. Nail art decoration wheel
For a pound each! Yeaaah. The grey polish was the only Sally Hansen one they had, and to be honest if I wasn't looking for Sally Hansen and knew it was a good brand I wouldn't have given this bottle a second look. It had gone a bit "separated" in the bottle, and the bottle it's self was a bit marked - it didn't look good! But as I knew the make was good I decided to risk it for a pound. And it was SO worth it - this is the most beautiful shade! I created this manicure with it and some studs I got from www.sparkly-nails.co.uk.


 I love it! I have had these studs for a while but couldn't decide which base colour to use with them, but as soon as I got this grey I knew it would work well! And I was going to a party last night so it was worth the effort. I definitely recommend a trip to poundland/poundworld and that you try and purchase this shade.

Monday 21 January 2013

Week 4 - Orange Nails

Time for another weekly challenge post (a made-up year-long challenge with my awesome friends). This week's theme was Orange. I wasn't sure what to do until last week when I came across a cling-film manicure tutorial! I really wanted to try this out as I'd not seen anything like it before. Here are the results, and the method...


I started with a base coat of Orange Soda by 17. Here's the base on it's own - such a lovely colour! There are some flaws here like the little bump in the middle nail that would do my head in if I wasn't doing anything else to my nails, but as it was just the base colour it didn't matter about mess! This is two coats.


After waiting for the base colour to fully dry, I then took small balls of cling film. I painted over one nail with the darker orange, which is Coral Romance by Rimmel (gorgeous colour again!). I then took the little scrunched up ball of cling-film and dabbed it over the nail, making the top coat all patchy. And that's basically it! I was going to finish with a top coat, but I decided I liked how textured the nails looked.


The tutorial I had read said you needed one ball of cling film for each nail, but I didn't find that I did - you could easily use the same ball on about 3/4 nails (or more).

The Verdict: I like the effect, but I think for a more striking look, the colours used should be more contrasting - like a pink and a blue or something. You can't really see the effect on this light orange/dark orange combo unless you look closely.

I also have a bit of a personal OCD-ish type thing when it comes to manicures that are supposed to look messy. I much prefer neatness, so I think they will annoy me! I already miss my black studded matte nails, which were still looking pristine :-(


Let me know what you think of this look, have you tried it? Do you want to?

Also, please check out my friend's nails - they are doing the same challenge as me and have both produced something fab! 
Kay's orange nails
Bob's orange nails 

Sarah x 

P.S - forgot to mention that just as I finished this and was putting my stuff away, I spilt a cup full of nail varnish remover over my nails and laptop! Thankfully neither got ruined - manicure was undamaged and none went on my laptop screen or in the keyboard but a corner of the plastic got all peeled and gross-looking as the nail varnish caused the plastic to react weirdly.... ahh disaster! (hehehe)


Saturday 19 January 2013

Updated Matte


A quick update today - wanted to show these off! I'm new to this matte polish, and obviously you can't add a tough top-coat as you'd undo all the matte-ness... so after 24 hours of wear, my manicure (see previous post) was looking a bit marked and dented. I hate to keep noticing big imperfections, so decided to add another coat of matte tonight. Before I knew it I'd added these little gems - I've wanted to try this kind of studded pattern for ages, and I just went with the urge! Love them... wonder how long they'll last...

(not long I expect, as I'm looking forward to our challenge week 4!)

Sarah x

Friday 18 January 2013

Messing with Matte


After being sent a link to some beautiful matte nail art, I decided to hunt some of this polish down and test it out. I found a cheap bottle in Boots, by Rimmel - £4.95! And I bought it with my Boots points, so double Yay! I was desperate to have a play, so I painted over my pink glittery thumbnail to see how well it worked. The matte polish works brilliantly, but don't use it over glitter! It kills the glitteryness! So I decided to try and recreate the look I had seen online. Here's a set of pics to show what I used...


The look I had seen used a dark polish, but the only dark one I own is this Nails Inc very dark blue, called Motcomb St. This is two layers - see how shiny!


Then I added the matte polish. The brush is thick so it's easy to apply in a few swipes! The only problem was that the brush got slightly stained navy blue from the polish. Maybe I didn't leave the base colour to dry for long enough as I was impatient to see the matte!


I finished off by painting over the tips of each nail with the Nails Inc colour. In normal light it really does look black (which I wanted) but I've included a photo I took with the flash so you can see how it's actually really dark blue.


Let me know what you think! X

Wednesday 16 January 2013

Girly & Glittery


I do love pink! I've created today's manicure as my polka-dot creation kept chipping and it was irritating me, so decided to take it all off and start again. I had a look at all my nail varnishes, and these pinks caught my eye. My Barry M glitter is pretty new, and the pale pink came in a set I got for Christmas. These are the varnishes I used:


1. No.7 - Glitterball
2. Glam - pale pink
3. Barry M - Rose Quartz Glitter

I've created glitter gradients before, and loved the effect. I love how you don't have to be too neat and exact, yet still can create a fab look! When I've had a go at this look in the past, the glitter has always been at the tip of my nail, fading away towards the cuticle. I've seen on other blogs where people have done this the other way round, with the glitter starting at the cuticle and fading away up the nail, so thought I'd give this a try!

I have to mention how brilliant the pink base coat I used is! It came in a set I got for Christmas. I didn't expect much of the polishes, but this pink is a stunning colour, and gives fab coverage. It applies really smoothly and evenly, yet isn't too thick. It's definitely the nicest pale pink I own, including ones from 17, Barry M and Nails Inc. It just goes to show that you shouldn't be a brand snob!! This is 3 thin coats of the pink on it's own with no topcoat or anything... so shiny!!


I also love this glitter from No.7, which came as part of a set. It has loooads of glitter so is great for creating a gradient. I used it underneath the Barry M glitter to make it look more glittery and dense at the bottom of each nail. The Barry M Rose Quartz is so pretty. I love the mix of big and small glitter, and the pale pink colour.

I finished this manicure off with a layer of top coat to smooth it out. Really pleased!


Sunday 13 January 2013

Week 3 - Polka Dot Nails

Yay - finally time for week 3 of the HTV nail art challenge, polka dot. I've been looking forward to actually doing some challenge nails, but I didn't really have a set idea for this week. Until today I was just going to do pink with white spots, until I saw similar to this design I've done when I was googling. Thought it looked fab so thought I would try it! 


I'm semi-pleased with the result. I love the effect, but there are some imperfections that are going to annoy me, like the diagonal lines not being straight and the fact that the topcoat slightly smudged some of the dots. I'm pleased that the dots look reasonably even as this is what I thought I would have the most problem with!
Here's a step-by-step photo guide to how I did this. Masking tape to create the divide, and a dotting tool for the spots! (Oh - and the black nail art pen also has a brush, so I used this as it's the only black I have!)


Friday 11 January 2013

A few reviews

I had to simplify my nails as my manager at work isn't keen on bright colours and patterns. Part of our uniform is dark pink so I decided to go with Ruby Gem by 17 so I could at least say I matched! This is two coats with topcoat. I've posted so many pics because my camera and my phone wouldn't fully capture the beautiful colour! It's not as bright as the first pic, nor as dark as in the last! These are three pics of the same polish though...!


I love this colour so much. It's exactly the colour I want to buy a car in... and the Seche Vite over the top has made it super shiny. 


My next little review is on 17's glitter crackle top-coat. I bought this a while ago and didn't really get on with it, but thought I would give it another go. I'm afraid my opinion hasn't changed! I think it's way too heavy, and although if you look closely you can see the cracks revealing the colour underneath, from a distance you can't really see the effect. I think this might by the glitter not allowing the polish to "crackle" effectively? 


Tuesday 8 January 2013

British Glitter


Mid-week nail art!

  I bought this glitter polish from Claire's Accessories last week. I've never bought a polish from there before but this one really caught my eye - red, blue and pale pink glitter chunks and tiny specks of silver glitter. I tried one coat of the glitter over 17's 'Heartbeat' - a pale blue, and I really like the outcome!


Monday 7 January 2013

My Supplies!

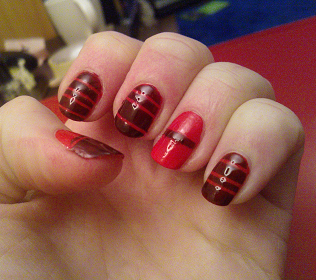
I'm not at work until tonight, so I've had another day to myself... I've resisted doing a new nail-art design as I'd like to keep these stripy red ones at least one more day! It is already starting to peel off though, and I can't stand for it not to look perfect - so probably will do new nails tomorrow!

So instead of doing new nails, I thought I'd show off my supplies for nail art. First, my polishes...


Obviously the square ones are Barry M (used to have a lot more from a while back, but had to throw some away due to them getting all dried up and gloopy! So these ones are my newly purchased ones, including some awesome glitter, some Gelly and some chameleon)
The silver topped ones to the left are Nails Inc, which a colleague generously gave to me (knowing my obsession) when she was having a clear out! They're mainly shades of pink and red. 
The small ones at the front with black and silver tops are all by 17. I love this brand, the colours are great, they dry quickly and give really good coverage, and they're really cheap too! 
At the back is my Ciate Caviar set that my fiancee got me for christmas. Some fab colours in there but I know it was expensive so I've yet to use it-  I think I will save it for special occasions! I love it.
At the back is my Seche Vite and my Sally Hansen topcoats which are both great. The Sally Hansen has lasted forever, and the Seche Vite is sooo shiny!
The rest are various sets/individual polishes I've bought or had given to me. It's great to have a big selection of different colours/brands! 

Next, my 'tools'...


Most of these are just basic household items used to create different effects... the masking tape is for stripes and sectioning, the sponges are for gradient, the straw is for creating a "splatter" effect. 
The eyeliner is for picking up gems/sequins to stick onto nails! The small nail-art tape is from ebay. The little stack of glitter to the right is from Primark. I've only tried using this once and it didn't work very well! The gold/black nail art pens/gems are from topshop. They're brilliant and well worth the £7 for the two. The silver/red pens/gems are from New Look - only about £3 which was brilliant just for the gems! The pens are not as good though. 
The most expensive thing here is my glass Leighton Denny nail file - it's brilliant though, as it isn't as rough on nails as cheap emery boards but files really well leaving the nail really smooth. Worth the money!


I also have these nail-art brushes which were also cheap on ebay, but I've not really been able to produce anything pic-worthy with them yet - I find them really fiddly, and the nail-art pens easier to use. I'll have to practice...

Sunday 6 January 2013

Week 2 - Red Nails


I've just bought some nail art tape so was eager to try it out for this challenge, to create something a bit different! I picked two of my favourite shades of red, both by 17 from Boots.


I love these polishes as they're so shiny, and smooth, and dry quickly! They also have a big fat brush which makes it easy to stay neat and apply your polish quickly. 


I painted my nails with the brighter red, and left them to dry completely. I then put little strips of nail art tape across my nails, making sure it was pressed down flat. I added a coat of the darker red and left this to dry completely. I then peeled off the tape to reveal the striped design. I finished with a top coat of seche vite to seal the design.