Showing posts with label Indy's Indies. Show all posts

Wednesday, 27 November 2013

Elf Love - Indy's Indies

Hello!

Today I've got a fourth xmassy indie polish from Indy's Indies to show off and review! This one is the most festive of the lot, I think! It's called Elf Love which I think is a really cute name too. 

Elf Love is a mixture of red, green and gold glitter pieces, in different shapes and sizes. It's a lovely variety - all the different pieces look fab together. I especially love the gold circles! I decided to layer it over black, so started with two coats of my new black Nails Inc polish I got with Glamour magazine.

I then added two dabbled coats of Elf Love. The smaller pieces of glitter come out really easily, the larger ones you have to fish for. The only slight issue I had with this polish was that the big red hearts sometimes clumped together - so you'd either get none or loads! This wasn't a problem though, as a bit of a nudge with the brush would separate them out! 

Here's some pics. It's so Christmassy! :-)


If you want to buy this (quick, before Christmas!!) or any of the other fun and festive polishes from the range at Indy's Indies you can do by clicking here!


Saturday, 23 November 2013

Crushed Candy Cane - Indy's Indies


Hello,

I've got another Christmassy Indy's Indies polish to show off today. This is Crushed Candy Cane, which is a mixture of little red and white shards in a clear base. It's so cute and christmassy, and looks exactly like a crushed candy cane, really fab name for it!

I was thinking for a while what to layer it over. Sarah from Penny Pinching Polish produced a fab manicure with it over black, which looked great, but I didn't want to copy! I eventually came up with using pink as a base. Not Christmassy in its self, but I really wanted to see what it would look like.


I started off with two coats of a pale pink by Color Club, topped with a flaky shimmery topper, also by Color Club. I don't know the names of these as I got them from TKmaxx and they came nameless! I think the shimmer makes the pink look more Christmassy/wintery. Here they are before I added Candy Cane - I must use this Color Club flakie more, this is the first time I've used it after getting it in a set months ago. It's so pretty!


I then added a gradient of Crushed Candy Cane to the tips of my nails, except my thumb which I covered completely. This was a couple of dabbed coats to get the shards to spread as I wanted. I love how fun this polish is, like the snowman one I reviewed a few days ago! And it really is Christmassy... I want to try it over green next for maximum Christmas-ness!


If you want to buy this or any of the other fab polishes from Indy's Indies, you can find them on Etsy here.

Thursday, 21 November 2013

The Snowman - Indy's Indies

Hello again!

Second post of the day, but I decided to show off one more Indy's Indies polish before I am back at work tomorrow. This awesome polish is called The Snowman, for obvious reasons! It looks like a mushed-up snowman in the bottle with all the big white circles, small black dots and orange shards. I think it's genius!!


How awesome!? 

I began with a base coat of white, with two coats of Cinderella by Sinful colours (a pale sparkly blue) layered over the top. I then applied two coats of The Snowman, again with a bit of prodding to get the pieces not overlapping and spread semi-evenly across the nail. To bring the manicure together I added an accent nail of a snowman's face, using my Barry M nail art pen and a bit of orange polish! 

I loooove this polish. Can you tell?! It's so unusual and cheerful (and a tiny bit sadistic if you think of it as lots of snowmen all mushed up and shoved into a little bottle, hehe) ....but still so awesome. 

The white circles were really easy to get out of the bottle, the orange shards too but they were more reluctant to come off the brush and go onto the nail due to being smaller. The black dots I couldn't see against the black brush so couldn't really place them, they just came out wherever!


If you would like to purchase this polish for the winter season, head over to Indy's Indies on Etsy, where you can buy it as a mini or full size bottle. There's also some other xmas/winter polishes, including What's Your Favourite Colour? that I reviewed earlier today. 

What's Your Favourite Colour? - Indy's Indies

Hello!

I've got a series of pretty posts to come up. I recently bought five Winter/Christmas polishes from Indy's Indies, which in case you didn't already know is a UK indie polish brand by the fab Danielle. She mixes all these polishes herself and has come up with some fab, glittery combinations for the Christmas season. Here are the polishes I bought, all mini-versions (you can get full-size too) so I could try out more for my money!


(L-R, The Snowman, Don't Eat Yellow Snow!, Elf Love, Crushed Candy Cane, What's Your Favourite Colour?)

(L-R, Don't Eat Yellow Snow, Crushed Candy Cane, What's Your Favourite Colour? Elf Love, The Snowman)

Aren't they pretty?? Each one is different, and they've all got really unique and gorgeous glitter combinations. I'm aiming to spend the next week posting a review and pics of each polish in turn.

The first I tried out and wore yesterday is What's Your Favourite Colour? 
I spent a while deciding what colour to layer this over. When a glitter polish is all different shades, it's hard to pick a bright colour to go underneath. If I wore it over yellow for example, the blue/red/green bits will really pop, but you wouldn't be able to see the yellow bits. So I decided to just go for black. Plain, but I thought it'd really make the glitter pieces stand out. And it did!


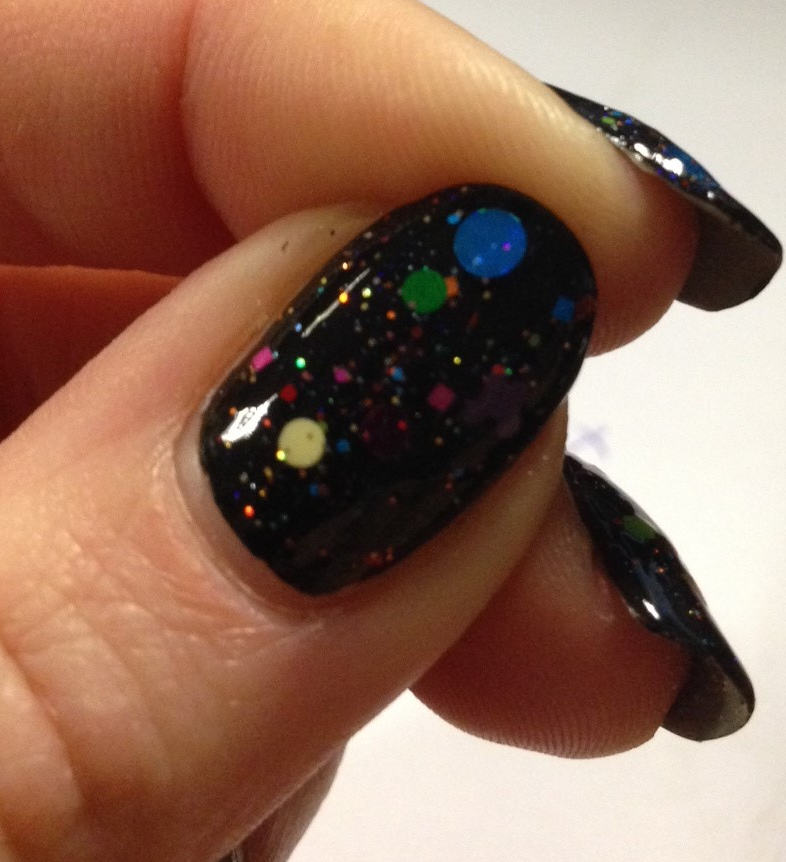
This polish was brilliant to apply. Every dip of the brush brought me some more sparkly surprises! There are sooo many different colours and shapes in this bottle, and you don't really realise how much until you start applying it. As well as the tiny, multicoloured glitter, there's flowers, snowflakes, stars, butterflies, squares, circles of all different sizes, hexes and stars. In all different colours, and both matte, shiny and holographic glitters. Wow-eeee! 

It was really easy to apply and I didn't need to 'fish' for glitters, however due to me wanting a lot of big pieces in a range of colours and shapes on each of my nails, I did have to pick and choose which bits I wanted to use and position them accordingly. I am wearing two coats with a bit of placement of the big pieces in all these photos. I've also used a topcoat.

My favourite glitter pieces were the little flowers and stars, and also the biggest holographic circle glitters, that caught the light amazingly. The tiny glitter mixed in really added to the sparkle.

All the gitter pieces lay flat on my nails, I didn't have any problems with bits poking up, even with the shards and stars.

I had some fab comments from shop assistants on my nails yesterday when I was out shopping - every time I got my purse out at a till they'd mention them! One girl especially said they were amazing, couldn't believe they were my own nails and called over a colleague to see. They were really amazed when I said I didn't stick on all the glitter myself, that it was a polish containing all the pieces already!


This one turned out to be my favourite nail, I loved the big snowflake and the different glitters.


My thumb also looked cool with this yellow flower and the green star!


I also loved how the big blue holo glitter at the top of my other thumbnail kept catching the light!


As I mentioned, I will be posting a review for each of the other new Indy's Indies polishes I got, along with lots of piccies. Hopefully they will all be up in the next week or so, one a day, so keep a look-out for those! I know it's not Christmas yet, but I wanted to get the reviews up so that people would have a chance to see what they were like and buy them if poss before xmas!

Thursday, 7 November 2013

Balloon House!


Hello!

As soon as I saw this fab Indie polish swatched on other blogs, I knew I wanted to try it myself! Balloon House is made by Danielle and you can get it at her fab Etsy Store, Indy's Indies. She currently has Balloon House in stock, as well as some really pretty Autumn and Christmas polishes, one of these being a shimmery version of Balloon House, called Baubles. Go see!

For this manicure, I started with two coats of Models Own Valerian, the blue from their recent Velvet Goth collection. This is a really deep glittery blue, and I picked it because it's so dark and  I wanted the circles in Balloon House to really pop over the top. 

When adding the Balloon House, I had to coax the circles out of the bottle sometimes, but sometimes the brush would be loaded! I found it worked well to get the circles to stick around the rim of the bottle, then you could dip in the brush to pick out whichever one(s) you wanted. To apply them evenly(ish) across the nail and to stop overlap you did have to place them a bit, which is usual with large pieces in indie polish so it wasn't a problem. I took a while to apply these because I wanted a lot on each nail, for them to be well spaced but still random-looking, and for a good mix of colour on each nail. 

I finished off this manicure with a few generous coats of topcoat to smooth it all out. The circles aren't too thick and they'd have been fine without a topcoat as they weren't sticking up or anything, but I prefer a smooth shiny finish.

I looove the rainbow of colours included in this polish, it's so unusual and so happy! I especially love the mustard yellow and the pink circles. So pretty. I wanted these to kind of look like bright fireworks against a dark night sky, as I'm going to see a display tomorrow. I think it works!