Yesterday my boyfriend took me to see my first football match at Wembley - England v Ireland! I'm not really into football, but it was a really good experience to go and see what it was all about. And the stadium is immense! To show my support, I did my nails.
This is two coats of Lavender Cloud (Sally Hansen) and then I put on the glequins one-by-one onto a wet top-coat. I sealed it all off with two more coats of Sally Hansen's Insta-dri.
By the end of the day, odd glequins had started to come off, mainly round the edges of my nail. It was really annoying, but you couldn't really tell from a distance, and the majority stayed on! Here are my nails enjoying the match (with a few glequins missing by this point!) :
Eww, that title sounds gross! I've named this blog post as I did because basically, I was going to do a "jelly sandwich" mani, where you have a layer of colour, a layer of glitter then another layer of colour, so the glitter is sandwiched inside. However when I got to the last stage, I chickened out after one nail!
I think the yellow I used is a little thick, cos it really covered up the glitter a lot, just in one coat. And I much preferred it all sparkly and visible. So I didn't do the rest of my nails with the top coat of yellow.
I used Chit Chat's multi-coloured glitter. I've had this for ages, I got it from poundland. And I'd seen it used in a fab mani my friend Kathie did - I just still never got round to using it myself. Now I have used it, I'm really pleasantly surprised! You get loads of glitter in each coat, big chunks and small pieces and they spread really well across the nail - you don't need to do much prodding to get it where you want it. In the pics I've used two coats, but only out of curiosity to see what it'd look like.
The yellow is Miss Sunshine by Accessorize. Sparkly fingers! This was just a quick mani for tomorrow, as I am planning to change them again tomorrow evening for a day out I have planned on Wednesday! Oh well - more manis, more blog posts...
I created this mani today to go with a dress I wore to my cousin's little boy's christening earlier today. I've had this dress ages but only worn it once - it's pretty though! Here it is with my finished nails.

I definitely wanted to use my new bottle of Sally Hansen's Loves Me Not, a beautiful shimmery dark purple that shimmers coppery colours in the light. So I started with one coat of this. It's sooo dark, on the nail it looks practically black, even in one coat, and doesn't shimmer as nicely as in the bottle. It didn't matter because I'd already planned to do another glitter gradient, as the one I had the other week when I went to a wedding got lots of compliments. For this one, I used silver (no7) and gold (Barry M) glitter to create a gradient half-way down each nail, then pink glitter (w7) on the tips of each. On an accent nail, I used studs from my Born Pretty stud wheel to create a studded nail on each hand, to go with my studded shoes. It's all topped off with Sally Hansen's Insta-Dri.
Hello!
As you've probably seen in an earlier post, I got a handful of polishes from Claire's Accessories a few days ago due to them being £1 each! I pondered for ages over which to pick up, but as soon as I saw these two I had to have them. There was a blue as well, but it was similar to a speckle polish I already have.
On the receipt they're just called Pink Speckle and Grey Speckle, even though I think the grey one is more brown. I was desperate to try them out together, so came up with this simple gradient. Both the colours are so pretty, and so perfect for spring/summer. I especially love the grey/brown shade. (apologies about my gross dry skin, I definitely need to make more time to moisturise! I have in the 2nd pic but not in the first...)
I acquired this polish during my week away from my fab friend Naileymabob. She raves about these polishes, and though I don't know much about them I've always admired the beautiful glittery combinations in them when she's posted swatches and reviews on her blog. I especially liked this one, and luckily she had a spare and we could do some negotiation!
Beauxbatons Academy is a beautiful mixture of white, blue and yellow glitter pieces of differing sizes in a whitish base. It looks gorgeous on! As with most glitters, it wasn't the easiest to take off, but I still love it. It makes up for the rubbishness of the white Barry M sequin effect.
In the pic I've just applied three thin coats to a bare nail. On my thumb, I tried it over pink - I think I'll experiment more with colours underneath next time I wear it!
Now I have to decide what to do with my nails today. I suddenly have about 6 polishes I want to try out, aaahh!
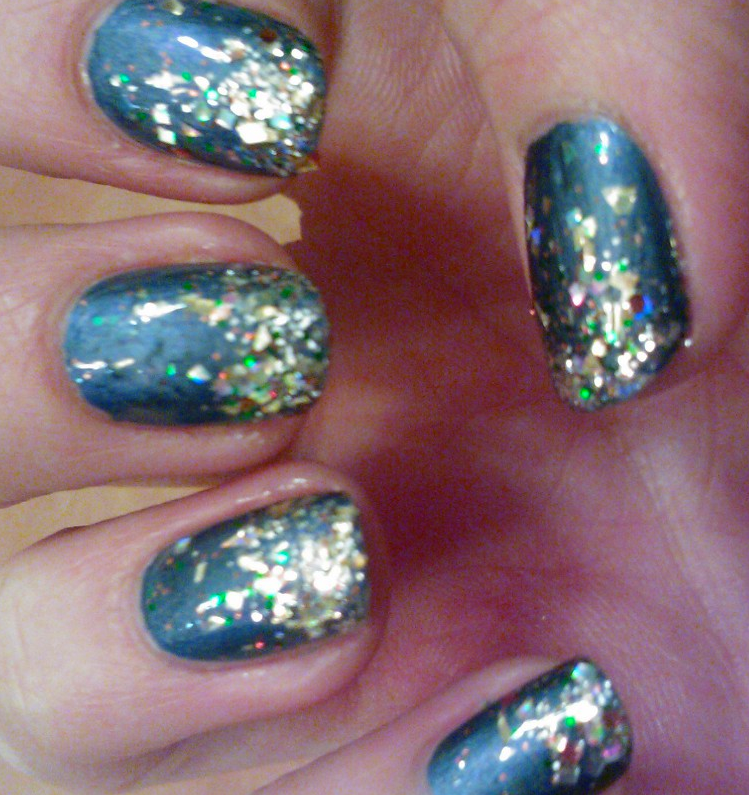
A quick blog post to review Model's Own Mermaid Tears. This is the purple one from the Splash collection and looks absolutely beautiful in the bottle, as do all of the other colours.
However, putting it on is a different story. It's a nightmare! I applied this polish over a base of Barry M's Prickly Pear and Blueberry.
The jelly-like base the glitter/foil pieces are suspended in is really thick and gloopy and gunky - unlike any polish I've got. It's like wallpaper paste or something! It's really hard to get any of the foil pieces onto the nail without putting a massive amount of the goop on too. Then you have to prod it around so it's sitting right, which just makes the goop more goopy. Ahhhh it's so gross and messy and difficult! And cos it ended up being so thick, it took an age to dry, even with a top-coat.
Here's what it looked like - not too bad, but it felt really thick and horrible, and I took it off almost straight away. Don't think I'll be using it again which is a shame, because I really loved the other two Model's Own polishes I bought. Meh!
Hello!
Posting this primarily to let you guys know about a fantastic offer I stumbled across in Claire's Accessories today. All their polish was £1!!!!! This was all of their bottles, including crackle, glitters, sprinkles, topcoats etc. They're usually £2.25, which is good anyway, so I was super happy. I was quite restrained and treated myself to five. According to the poster, this was 'while stocks last' but I doubt they'll last long so get yourselves there!
I've also been on a fab mini-break to Cardiff with my friends this week. We all love our nails, so I did acquire some stuff while we were there, including a massive bottle of acetone from Sally's (we don't have one here in York!), a lovely Sally Hansen from poundland called 'Loves me Not' and a brilliant Lac Attack (a trade with my brilliant friend Naileymabob) from the Harry Potter collection called Beauxbatons Academy. Here's a piccie of my newest additions:
And a close-up of the Sally Hansen because it looks fab and sparkly in the bottle, and also the two 'sprinkle' polishes from Claire's - they're both beautiful - never seen them before but they were in the offer so I didn't even have to think about picking them up.
Also, I had to have pretty nails over my little break, but I forgot to take a good quality pic - duh! Here's a couple of pics from my phone. I used w7 Spearmint as a base, to go with the greeny glitter bits in Model's Own Disco Inferno (aka my new baby!) ... I did an accent nail using born pretty square studs.
I'm a bit behind as I've been away, but I'll shortly post my review of Beauxbatons Academy, My new Model's Own Splash polish and some of my newer stuff.
As promised, another mani with Models Own beautiful gold glitter, Disco Inferno. I know this isn't very adventurous, and I did toy with the idea of doing a few nails with the glitter and a few with studs, but in the end I just went with glitter on all nails, because I wanted to show it off. I'm not disappointed!
This is one coat of Disco Inferno over two coats of Barry M's Lychee.
Sooooo shiiiiiiiny!
I created this mani for a wedding party I went to last night! My dress was yellow with blue flower details, and I wanted to create something to match. I didn't go for yellow cos I thought yellow dress+yellow nails would be a bit too much! So I went for navy-blue nails, with glitter tips. I used:
* Blue magnetic polish by Seventeen (because I realised too late I didn't actually have a good navy polish - my Nails Inc one looks black! Also I didn't use the magnet!)
* Glitter Ball by No7 - a fab dense silver glitter that works really well in glitter gradients
* Disco Inferno by Model's Own - a gold glitter with specks of bronze and green, and different sized glitter pieces.
I used layers of both these glitters to create the gradient. OMG I love Disco Inferno so much, I couldn't stop looking at it on my nails! The colours and shapes of the glitter are amazing and remind me of treasure. My nails sparkled all evening.
Sorry about the quality of the pics, I didn't have a camera with me. I'm going to use Disco Inferno again tonight in another manicure.....and I'm soooo tempted to get all the other colours!
Hello!
Here are my nails tonight. I love doodling with the Barry M pens!
I treated myself again today... I've been lusting over Models Own for months now, but have never bought a bottle due to the cost. I had another browse of the stand today, and as it was three-for-two (I like my offers!) I decided it was about time I added some to my collection. I then spent an agonising amount of time choosing what I wanted. In the end I went for a complete mix. A neon polish - I picked the green (Toxic Apple) because I felt it was the most unusual. A new 'flaked' polish - there is a proper name for these but I can't remember it. I saw swatches on another blog earlier this week and loved the way the shimmered! I was really stuck between the blue and the purple, but I picked the purple in the end because there was a bigger contrast between the colour of the polish and the colour of the flaky-bits. And finally I wanted a glitter - I was going to pick Ibiza Mix, a multi-coloured glitter, but I eventually settled on the gold glitter as I thought I'd end up using it more, and I loved the different sized/coloured glitter pieces. So there we go - I hope I've justified my purchases!!
So tonight I painted my nails with the neon green. I started with a base-coat of white to help the green stand out. But after three coats of Toxic Apple, the polish was still a bit un-even and streaky. I'd be interested to try it on a bare nail to see how opaque it is. Anyway - this didn't really matter as I was planning to get busy with my nail art pen (Barry M). I doodled a tribal design over all of my nails, using various ideas from items of clothing and other tribal nail art I'd seen and liked, including some of these fab patterns from Nail Wish. I topped it all off with a coat of Insta-Dri - my bottle is running low again! :-(
I love these nails, but unfortunately I can only keep them on for tomorrow - I'm going to a wedding on Friday and these so won't go with my dress, lol. I've got some pretty (but simple, as I'll have to do it in the hotel beforehand) nail-art planned that'll be more wedding-appropriate. Then after that I can try out my 2 other new Model's Own polishes - yey!
More pics of my neon tribal design.... here is my right (good) hand again:
And my left (non-dominant!) hand:
And another two pics with the flash - it reaaaally brings out the neon!!!
Edited to add that I saw this in Boots earlier! I knew their stands were empty for some reason, but didn't know this was why! :-( Wonder what's up...
Really quick post to show you what's on my nails at the moment. I'm not keen but I needed something simple for work. Today I wore Barry M's Pomegranate (pink). So shiny! It had started to chip at the tips by tonight, so I freehanded french tips in the only other dark gelly I own - Plum. I added a topcoat because these dark colours always end up marking bits of paper at work - oops!
I will be creating something nicer and more spring-like soon! x
I've had this idea in mind for a while, but haven't yet tried it because I thought it would take ages as it involved so many polishes! And I wasn't quite sure how it'd turn out.
For this look, I used two coats of white (Sally Hansen's Lavender Cloud) and let it dry. I then splodged on a range of pastel colours - some I just splodged around with the brush, and some (the darker colours mainly) I dabbed over with a sponge.
I used:
Blueberry (blue), Papaya (orange) and Prickly Pear (purple) - Barry M Gelly
Miss Sunshine (yellow) - Accessorize
Spearmint (green) - w7
Unnamed Pink - Glam
I finished off as usual with a topcoat of Sally Hansen's Insta-Dri to smooth it all out. I've still got some cleaning up to do around the cuticles, so apologies for the messiness in the pics! Still not sure what I think of this look - not sure whether it's come together well or not. It definitely looks better from a distance rather than close up. Hmmmm
So I went into Superdrug yesterday on the hunt for the new Barry M sequin effects polishes! I'd seen mixed reviews - actually, mostly bad reviews, but I just had to see for myself. I'd decided as the 3-for-2 Barry M offer was over on the 7th May to just treat myself to the white sequin effects. But when I got in, it was 3-for-2 on all cosmetics! So I had to get three. Obviously. Here's what I bought, because you can mix brands, and I've had my eye on this Revlon polish for a while. It's called Girly, and I thought it'd be a good comparison to the sequin effects. Not cheap at about £6.50, I only justified getting it because it was part of the deal. My third polish was yet another Gelly. I picked up Grapefruit to add to my growing collection. Here are my goodies:

I couldn't wait to try them out, so while sat in Starbucks I quickly applied 2 coats of the Revlon polish on most of my fingers, and an accent nail on each hand with 2 coats of the Sequin effects. Sorry about the quality of this pic, I took it on my phone:
So - my initial thoughts on the Sequin Effects polish first. I don't like! Like others have said, it's so gritty and textured. It'd look beautiful if it was smooth! And adding a second coat just seems to clump it even more, and makes it look uneven and ....gross! So I wasn't impressed initially.
The Revlon was better, although I wasn't keen on it over a 'bare' nail, even with more than one coat. I did love the different sized and coloured glitters - such a lovely mix and a fab colour scheme. I love pink!
I decided that when I got home, I'd layer the polishes over a base colour so they stood out more. I layered two coats of the Revlon over two coats of Barry M's Prickly Pear (purple gelly) and the Sequin Effects over two coats of Sally Hansen's Lavender Cloud (white). On one hand, I added two coats of sequin effects, but on the other hand (first pic below) I just stuck with one as it looked better without the glitter all overlapping. I'm much happier with how they look now. They're both definitely layering polishes!
Hello!
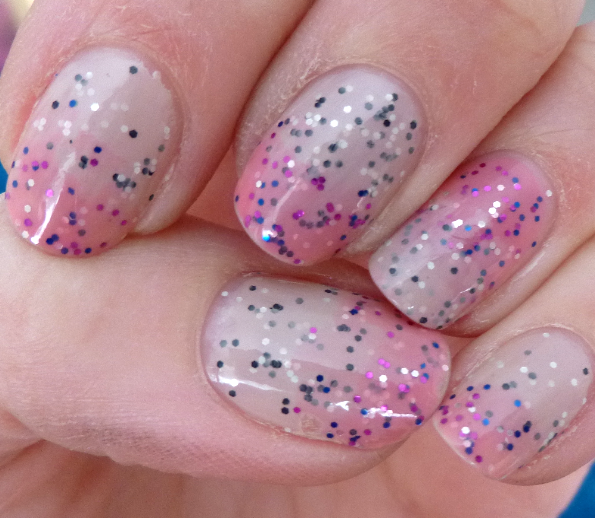
I called these circus nails because that's what all the colours remind me of. I love these, I think they're my favourite creation ever! So many pretty colours! Can't stop looking at them. I have had these on about 36 hours now, including with a busy day (at the zoooo!) yesterday, and only about 5 glequins have fallen off. Score!
I used Miss Sunshine by Accessorize (the yellow) and Endless by Color Club (the pink), the latter of which is from my new Color Club Kaleidoscope mini collection. It's very similar to my other favourite pale pink, which is good! Anyway, I used two coats of each, most nails yellow and an accent pink on each hand.
I then picked up my set of 12 glequin-colours that I bought for an absolute bargainous price from Born Pretty, and tipped a little of each out onto a magazine (so they didn't go everywhere). It's quite hard to just tip out how many you need - with a few colours I ended up spilling loads! But there are SO many in each pot, there's no need to worry about running out.
I used the end of a small dotting tool to pick up a random colour from the pile and placed them around the edge of each nail, on top of a wet top coat. I finished with another coat of top-coat to seal them in. People have commented that it must have taken ages, but it was actually quite quick! Here's some more pics, sorry about the amount, but I wanted to show off the shinyness! Also, my nails are much shorter than in my last blog post, I filed them down to make it easier to practice with my contact lenses. I actually don't mind them this short.
Lastly, I spent a fab day at London Zoo yesterday with some awesome friends, most of whom did their nails for the occasion. Naileymabob's are the pink and green leopard print, and Kathie's are the white with black outline. So much prettiness!