Quick post today!
I saw this nail design in Fabulous Mag (that comes free with The Sun on Sundays). It was worn by model Laura Whitmore in one of the photos of her accompanying an interview, and I noticed the nails immediately! After having a quick google, I found out that the nails were actually done by The Illustrated Nail, who is a nail artist I've always followed/admired for her bold, perfect designs! I can't seem to find the original photo from the magazine online, but here's a quick pic I snapped on my phone to remind me of what I wanted to do:
I recreated this look using Malibu and Mango by Barry M. I bought Malibu especially with this design in mind as I don't own a really bright blue, and I'm certainly not disappointed by this beauty of a colour, it's lush! The matte finish is really interesting, although I reckon I will always use it with a topcoat as I did here.
See my previous post to see how to do half-moons neatly!
Hello!
Okay, this mani turned out way brighter than I expected! I always forget how bright these beautiful Barry M gelly shades appear on the nail - I do love it (and hope my work does too...... :-S )
To
create this look, I used Papaya (orange) and Grapefruit (pink). I also
used some 'Reinforcement Rings' that you can use to strengethen
hole-punched paper! I bought these from Boyes, for just over £1 I think.
You can get them in WHSmiths but they were quite pricey in there, so do
have a look in discount shops that have a stationary section if you're
after some!
I started off with two coats of Papaya (above!) and left this to dry. I actually wore my plain papaya mani to work today as I love the shade, and also didn't have time to add any nail art last night! Therefore when I came to apply the reinforcement rings, I knew my nails were completely dry (which they need to be).
I did each nail one by one, and started by cutting one vinyl ring in half then peeling off one half, and sticking it carefully and as straight/evenly as possible onto the base of each nail. I then painted over in Grapefruit, and immediately peeled off the ring. I just did this with my fingers but it might have been easier to do with some tweezers!
Once dry I added a topcoat to add a shine and to make the join between pink and orange look more seamless. I wish I could add some neon studs or glequins to these, but I will have to save that for another time when I'm off work!
Hello!
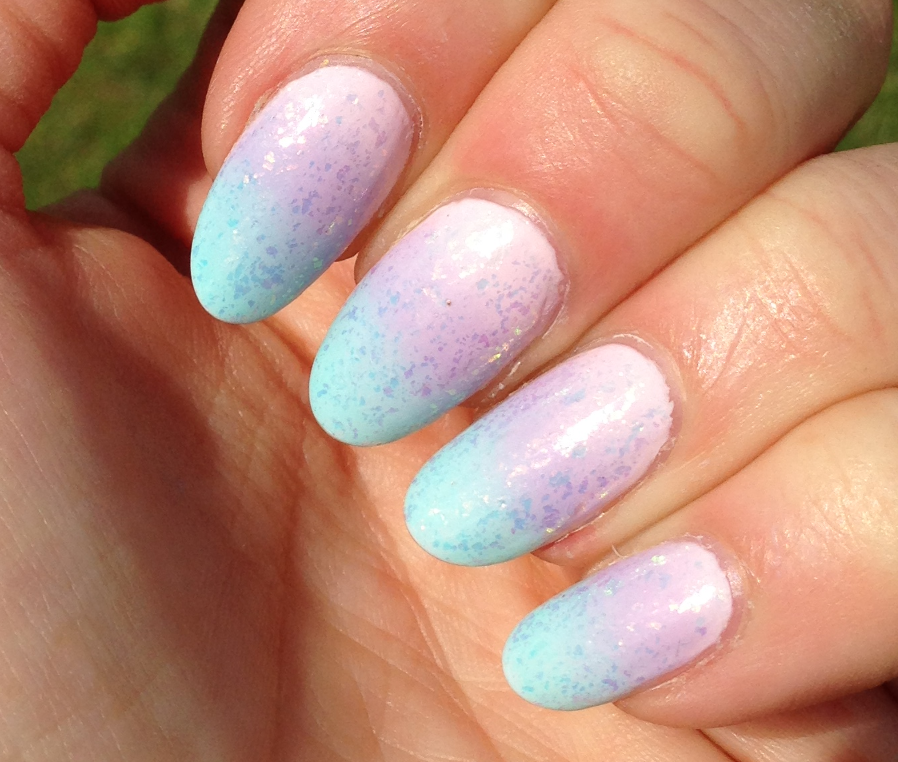
This week for BFF Friday, myself and Laura decided we would do a gradient, as we're loving them at the moment! We wanted to use pastels, and we decided to go for green, pink and purple which worked really well as a combo for Laura last week and I wanted to try it out myself! The only rule was that we had to use these three shades (pastels) and create a gradient, but we could do this however we wanted.
I decided to recreate Laura's gradient from last week as it was so gorgeous! She used pink at the base, purple in the middle and green towards the tip. I used these colours, that coincidentally matched my necklace!
I used my usual method of starting with a base shade of the lightest colour, in this case I picked Rose Hip (Barry M). I then used a make-up sponge to apply the gradient, sponging on a few layers to build up the colours.
To make my gradient a bit different and so it wasn't a direct copy of Laura's, I used a topcoat of "Mermaid" which I bought yesterday from Urban Outfitters. I've always loved looking at the polishes in Urban Outfitters, both the fab choice of colours/glitters, and the chunky square bottles, but thought £6 was a bit steep. However they had some on sale this week... my sister treated herself to a lovely pale purpley-blue that's really opaque in one coat, and I got Mermaid, which is a beautiful iridescent flakie. For £3!
However, applying this made my gradient almost impossible to photograph, and I got so annoyed! 'Mermaid' goes all sorts of beautiful colours but I found it hard to capture, and when I did it kind of hid the gradient! I reckon it'd look better over a block colour rather than a gradient. Here's the best pics of a bad bunch, in different lights...
Hello!
My manicure today was inspired by a bag I saw someone carrying at work. I have no idea where it was from and didn't get a pic or anything, but I do remember thinking it was a design I'd like to try on my nails. It was blue and white, one side spotty and one side stripey, with flowers down the middle separating the two prints.
At first I was going to do each nail with half-and-half spots and stripes, with roses down the middle, but I thought this might be too time-consuming, and end up looking too busy. Instead I decided to do the main design on my middle finger as an accent nail, and do the nails either side it as spots and stripes.
I used:
Sinful Colors - Snow me White (for the base)
Color Club - blue ...doesn't have a name on it (for the dots and stripes)
Barry M - Grapefruit (for the roses)
Barry M - white and pink nail art pen (for the detail on the roses)
For the stripes, I used nail vinyls from She Sells Seashells - I used these ones that are just straight strips - so much easier than trying to cut pieces of tape to the same thickness! I applied them over the white base, painted blue over the top then removed the strips with tweezers.
For the spots, I used a dotting tool that I won via Naileymabob from Models Own. I find when using a dotting tool it's easier to blob a small amount of polish onto some scrap paper and then dip the dotting tool in this rather than in the bottle - it's easier to see what you're doing and to control how much polish you pick up. I've never really done a successful dotting tool mani before but I like how these spotty nails turned out and I definitely want to try more colour combos.
For the roses I blobbed on random dots down the centre of my middle nail, using the brush from the bottle of Barry M's Grapefruit. Once dry I added detail with the nail art pens, then topcoated all my nails with a fast dry topcoat!
Here's some pics of them in the sun! ....apologies for my tiny baby nail on my little finger :-(
Hello!
I decided to do these nails after seeing a cute seahorse print on a top while wandering around H&M. I immediately snapped a photo as I thought it was something I might be able to create on my nails. Here's the top (on a mannequin not a person!):
I decided to do a seahorse accent nail against a blue background, to make this a kind of under-the-sea themed mani. At first I wanted to do a gradient but I've done so many recently, I didn't want to be boring. Instead I decided to put blobs of different shades of blue/green polish onto a sponge and dabbed this all over my nails (over a base of very pale blue). I kept repeating this until I got the effect I wanted. Here's the polishes and sponge that I used!
(Greenberry, Huckleberry, Sugar Apple, Blueberry)
This created a really cool tie-dye/print effect. It's really hard to see on most of these pics as I had to use the flash - it's probably most obvious on this picture I took at work, along with the seahorse I'd doodled on a piece of scrap paper as practice:
I used the Barry M nail art pen to draw the seahorse and colour him in. He looked too black though, so once he was dry I went over once more with the sponge and the blue shades. He then looked too faded (!!) so I outlined him in black!
I decided to add some glequins/glitter pieces to the other nails as they looked a bit plain. I always see the mani in the top banner of my blog (above!) which is pastel pink and yellow with a circle of glequins around the edge of the nails, and I still love it! So I decided to recreate this, but just do the base of each nail. I used five slightly differing colours - I have little pots of lots of shades that I got from Born Pretty. I put them on using a dotting tool and sticking them onto a still-wet topcoat, and finished with another to seal them in.
Hello!
I wanted to try out a vertical gradient, so I started off on a white base and sponged on pink (Pink Veneer, Models Own) and Miss Sunshine (Accessorize). After a few layers I decided the yellow wasn't bright enough and replaced it with the brighter yellow LE Barry M. Here's the gradient, I was told on Instagram these look like Fruit Salad sweets, and they soooooo do! yum
After a day, I decided they were looking like a blank canvas for nail art, so I decided to add some leopard print. I picked nude and white to create the spots, because I wanted to keep my nails relatively pastel/pale so they wouldn't stand out too much at work. I think it would have looked better with a brighter colour and black outlines rather than white, but that would have been too noticeable!
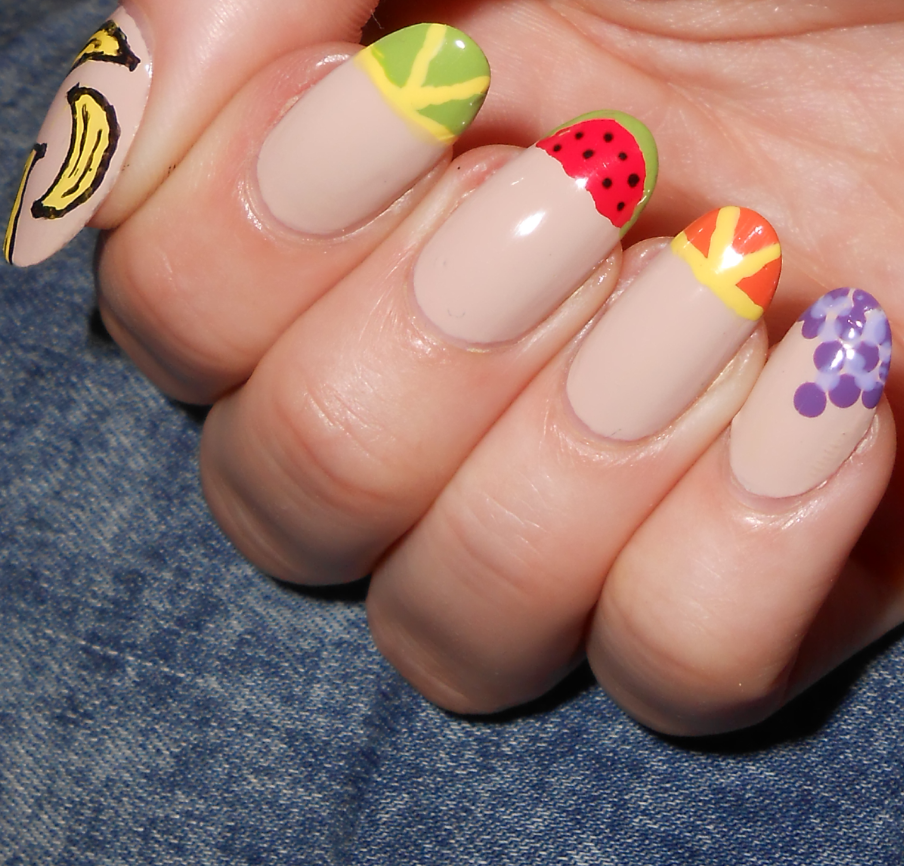
Another fruity design! I did these nails a couple of days ago while I was still off work. These came from an idea I'd had about doing watermelons on my nails with the watermelons being in 'halves' rather than wedges like I previously did. I then thought that the 'curve' of the watermelon edge would fit against the curve of my oval nails. I decided to do a different piece of fruit on each nail and even drew myself a little guide on paint!
I started off with a base of Lychee (Barry M) and once dry, I used tape to create the coloured 'slices' at the top of my nails. The edge wasn't as straight as I wanted though, even using the tape, so on my other hand I just freehanded the tips. I used various different polishes (mostly Barry M!) to add the details. I am so bad at using a nail-art brush to add details, I'm so messy! I soooo wish Barry M had more colours of the nail art pens!
I finished with a topcoat - I used Nails Inc which is really shiny but doesn't dry quite as fast as Sally Hansen's Insta Dri. I don't know how pleased I am with these, I think they looked better in my mind but I do like the bananas on my thumbs!
Hello!
I 'broke up' from work today ready for 5 days off - I work shifts and get five off every three weeks, working lots in between so I'm really ready for this weekend off! Also, I need to keep my nails relatively plain and simple for work - it doesn't necessarily mean no nail art, but nothing super-eye-catching. Which means that as soon as I finished this afternoon, I came up with THIS:
Yaaaay, bright summery nails! I got the idea for these watermelon nails from @naildesignsbyjulie over on Instagram. (and if you want to follow me on Instagram, I'm here!) Julie made a quick tutorial vid for these, so I could see exactly how she'd done them.
I decided to use yellow as the base, this is Barry M's summer Limited Edition Yellow from last year. Love this shade and how bright and pigmented it is! I then drew on triangles using Shades by Models Own. This is a pinky/coral shade, but over the bright yellow base it has turned kind of orange - I forgot this yellow bleeds into any light colour put over it - damn! Wish I'd used a pinker pink! Anyway, I drew these triangles using a dotting tool. I then added green 'peel' also with the dotting tool (Greenberry, Barry M). My Barry M nail-art pens provided the black and white detail. I topcoated with Nails Inc Caviar Topcoat - I love the shine on this!
Here's a pic of the polish I used before I decided to add the white detailing:
And a few more pics of the finished nails! They are sooooo bright (and look a bit like pizza slices) but on the whole I'm pleased!
Hello!
Two manis in one to show you today, that I did yesterday. The first one I created using both my new MoYou Nails stamping plates (sent for review) and my new Chevron Vinyls (bought from She Sells Seashells).
I used Naked Glow (Models Own Hypergel) for the base, two coats. Once dry, I stamped my little finger with a detailed pattern image from one of the MoYou plates, using Passion Fruit (Barry M). I found it quite tricky to get the stamp at the angle I wanted, and for it to cover my whole nail and it took several attempts, but it's all good practice! Unfortunately the 'large' images on the plates I got are too small to cover my whole nail, as they're too long! I will have to look at buying some extra-large ones because I do love the effect it creates.
I love the patterns on the plate, they're so pretty and intricate, and I'm looking forward to trying out more of them in different ways so keep your eyes peeled!
On my index finger I turned to my zig zag vinyls as I was so eager to try these! I decided to stick a row of six straight onto my nail, fully covering it, then peeled every second one off to make sure there was an even gap between each one. Not sure if this is how it's 'meant' to be done but I don't think I'd have got them even if I'd placed each one separately! I painted over my nail with Passion Fruit then removed the vinyls carefully with tweezers. I left it to dry before topcoating but it still smudged slightly - as did the stamp - booo! The smudging does look worse in these pictures than in real life though!
On the rest of my fingers, I took some of my gold circular studs, but didn't think these really matched, so I laid them on a bit of ripped-off newspaper and painted them with Passion Fruit too. Once these dried I stuck them to my remaining nails using wet polish to attach them, and topcoated to keep them in place.
I loved this mani, but as I was at work today, I decided it was just too bright, so after wearing it for the afternoon I reluctantly removed the studs and the chevrons and started again on all these nails. I re-painted them with Naked Glow, and once dry I added pointed french tips with Passion Fruit. For this, I used a small nail art brush (pictured above) but actually worked out I could have just done it with the brush in the bottle (as I had to re-do one just now after the polish cracked at work when I trapped my finger - was lucky my nail didn't break!!!).
Here's the adjusted mani, which is definitely less 'in your face' and I do like the simplicity of the tips, and the way the red looks sooooo bright against the nude. I love this colour combo! And I had to keep the stamped little fingernail as it took ages!
Hello!
I was at a complete blank the other day as to what nails to do. I'd tried some nail art and failed, so went back to basics again. I also was bearing in mind that I needed plain-ish looking nails for work. I was actually kind of inspired for these nails by Maleficent - I saw the film last week and although you expect her nails to be black/green and talon-like, they were actually a gorgeous oval shape and a pretty nude shade - I thought they had a sparkle to them at the cuticle but I don't think they actually did - I was still inspired by this concept though! I only noticed as there were a few close-ups of her hands holding things and it's not hard to notice her nails on a big cinema screen!
I painted my nails with Lychee by Barry M, one of their first Gelly shades, which I'd forgotten how much I loved! Utopia (Models Own) and Naked Glow (Models Own) were ones I'd purchased more recently so used more often, but Lychee is lovely. I applied two coats of this, then dabbed a glitter gradient at the bottom of each of my nails using Rose Quartz (Barry M again). I finished with a topcoat to make it all shiny!
I think this was a really clean and simple look, that was quite neutral but made a bit nicer to look at with the addition of the glitter. Here's some pics in various lights as it was difficult to capture the proper colour!


.JPG)


.JPG)


.JPG)