Hello!
Today I have some pastel tribal gradient nails to show you! I sat down to do my nails last night, but was uninspired - the few things I started off trying didn't look good or went wrong, so I fell back on my go-to nail art - gradients! I know I can do gradients, so I knew I'd at least get something decent looking!
I picked four of the new Barry M Speedy Quick Dry polishes to use, in green, blue, pink and yellow. I used my usual sponging method to create the gradient. As the polishes are quite light in colour it took quite a few coats of sponging on each nail before I was happy with the coverage. The fact they dry fast meant I had to work fast as well!
Once the gradient was finished, it looked really pretty but plain. I've often had gradients like this on my nails with pastel shades, so wanted to spice this one up a bit.
After a bit of thinking I decided to add a tribal / aztec pattern to my nails. I made each nail slightly different. I think my favourite pattern is the one on my middle finger but I think they all look quite good together! The pattern was done using a Barry M nail art pen.
I finished off with a coat of Sally Hansen Insta-Dri to make them all shiny and smooth! Here's the finished product:
Hello!
As soon as I saw this design I knew I wanted to give it a go! I saw a version by a nail artist called Elaine on Instagram. When I read what she'd written about the design, it turns out she was inspired by another artist who was inspired by another artist etc! I think the original design was done by NailStorming.
Anyway, I decided to use a pink background, as it's my favourite colour. I used 'In A Heart Beat' from the new Barry M Speedy Quick Dry collection that I recently won! This is a lovely pinky-peach and I applied three coats. Regarding the quick-dry part, it does dry reasonably fast but I still used Insta-Dri over it as I needed it to be fully dry/hard before I used nail-art pens over the top.
The flower and petals were drawn using my black Barry M pen, and filled in using three other Speedy Quick Dry pastel shades, using a dotting tool. Once dry I went over the black again to neaten the shapes up.
I'm pleased with these although they look better from a distance - up close the hearts are quite uneven and I'm not 100% happy with the flower. They are fun though, and lovely for Spring!
Hello!
I posted this to Instagram and Twitter yesterday but have only just had time to write up the blogpost today. Myself and Rebecca from Lane's Lacquers planned to do a Mani Swap recently, where we both decided to pick a manicure done by each other, and then recreate it. Rebecca does a ton of gorgeous, bright designs and I always find myself thinking; 'I want to try that!' every time I see her new creations.
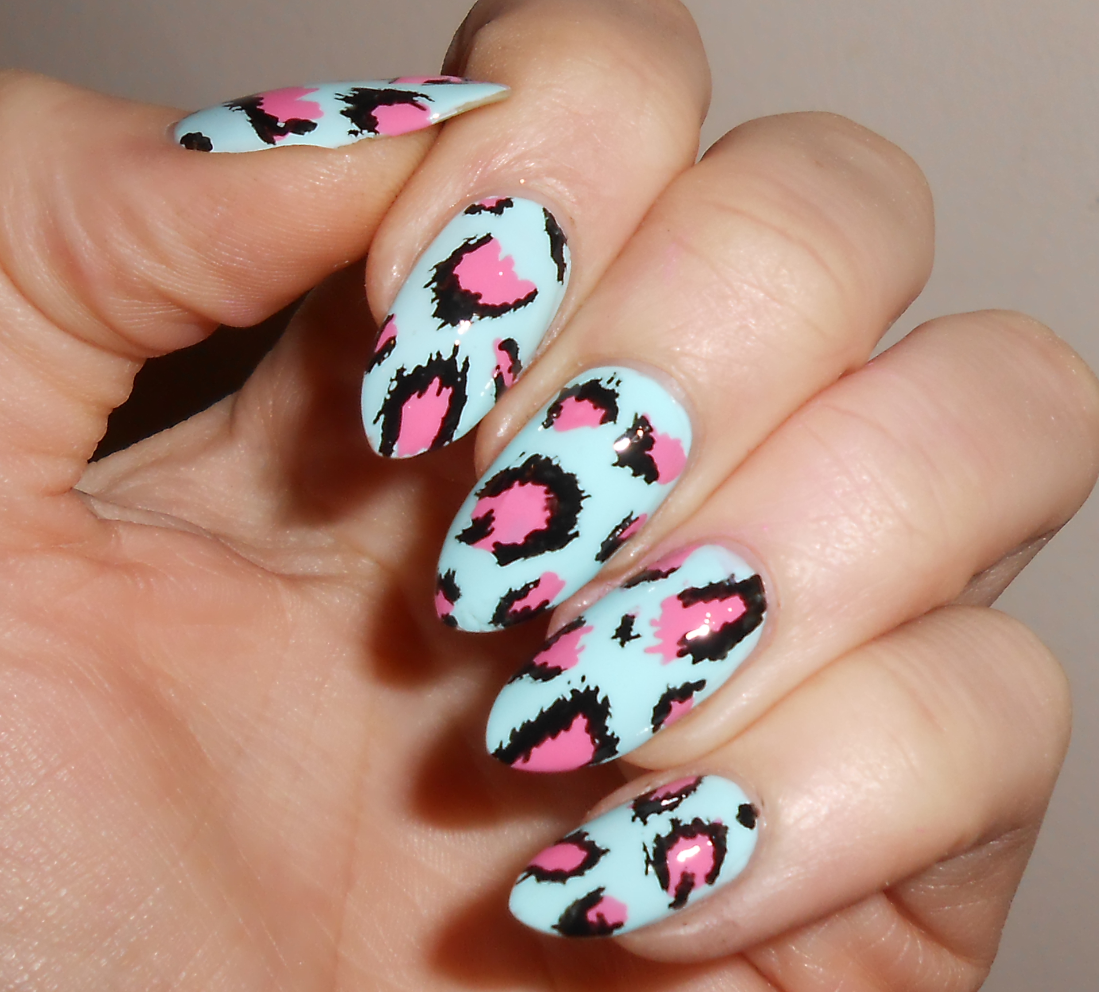
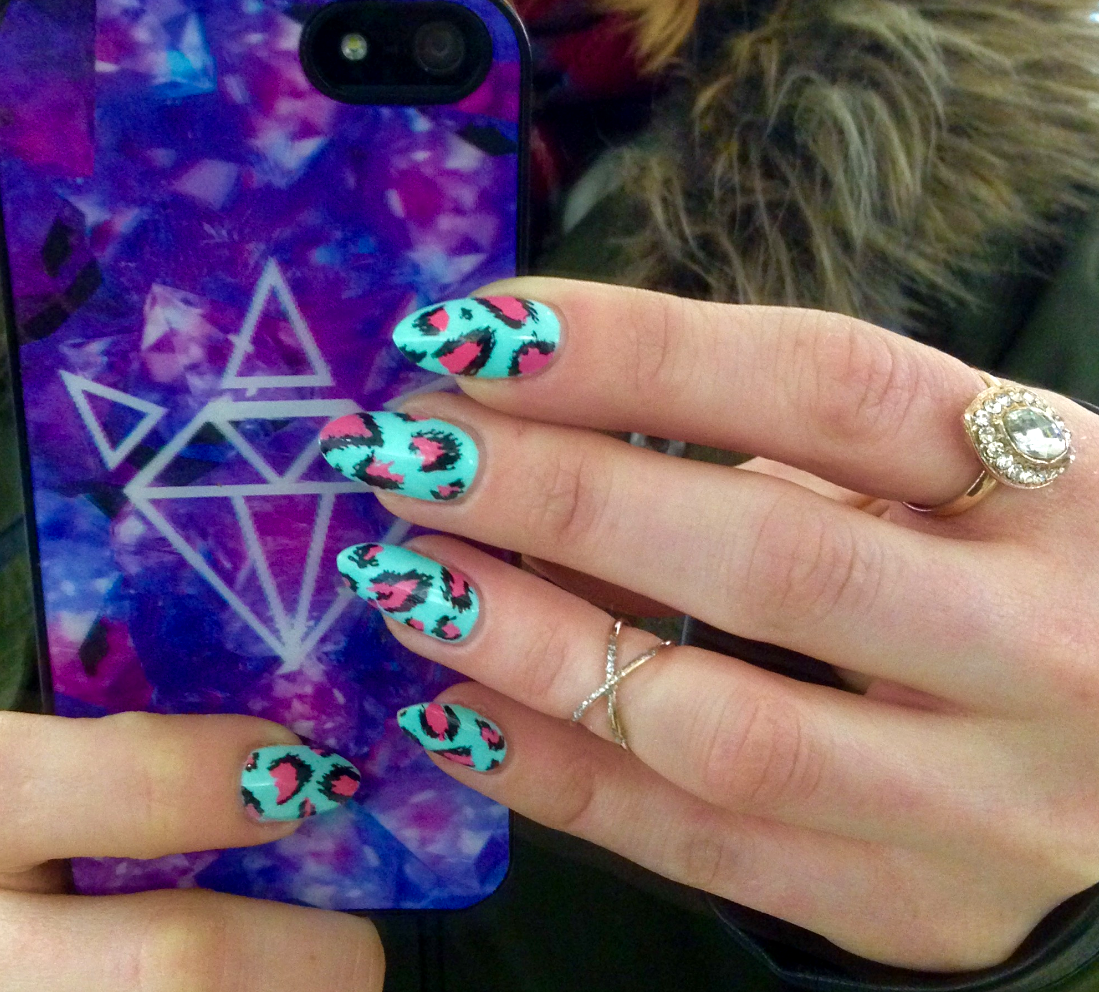
It took me a while to decide which manicure to recreate, but in the end I chose one with a mint/pink colour-scheme (my favourite!) and a brilliant bold Leopard Print design. I've done leopard print a lot before, but usually I keep the print really tiny, so I wanted to try this bolder design.
I began with a base of Sugar Apple by Barry M, two coats. Once this was fully dry (it needs to be or the nail art pens will pull/dent the polish) I used the pink and black nail art pens by Barry M to doodle on the design. I worked with a copy of Rebecca's nails in front of me and tried to copy the print from each nail to make sure I achieved a 'random' look like she had. I finished with a topcoat of Sally Hansen Insta-Dri.
I loved the bold outcome of these nails, and got loads of nice comments about them. Several people even asked if they were transfers or stickers as they loved the pattern so much! Here's a photo of the design on each hand, and a bonus one I took with my new phone case!!
You can view Rebecca's blogpost here where she shows the Cath Kidston-esque rose print mani of mine that she recreated. I think she's done a perfect job!
Hello!
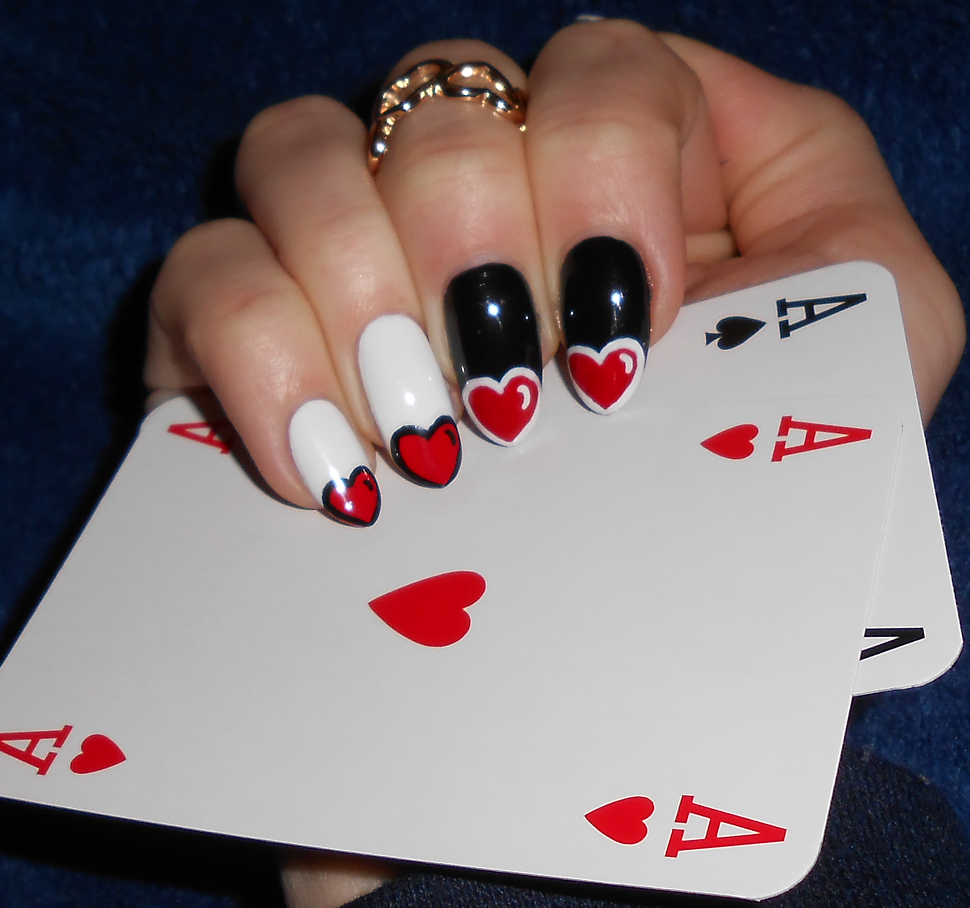
Okay, this is going to be the last time I do this design I promise! But when I had the striped version on my nails a week or so ago I wasn't very pleased with the neatness of my stripes, and I got thinking whether the design would look good without them. I decided to use black, white and red as I thought they'd look really striking together. I couldn't decide whether to do a black base with a white outline around the heart, or a white base and a black outline. So in the end I decided to do both!

I used the Kate Spade Nails Inc black, and my new Barry M white, Cotton. Let me just say that Cotton is beautiful and perfect, I'm so glad after it took me a while to find/buy it. The red is my beautiful Dior polish that I got for Christmas. I've described in more detail the steps I went through to create these nails in my other post (link above) if anyone wants further info on how to do them! Here's a picture I remembered to take mid-way through the design... (on the black nails I did the heart first in white before going over it with the red to make the red stand out more!)
I loooove the overall effect of these when finished, I think they're much better and 'cleaner' looking than my striped ones. I can't stop looking at them! For an extra dimension to these I also added gold underneath the tips!
Last year I came up with a striped design with hearts on the tips of my nails. This look was perfect for pointed tips as the point fitted with the point of the heart, and they were so much more effective than I thought they would be! Here are the original ones from back in September.
I decided that as it's Valentine's Day at the weekend I would re-create the design, with different, slightly lighter colours.
I started off with a base of Banana Split by Models Own. I can't gush about the fruit pastel collection enough - the formula is so smooth and creamy and lovely, the colours are so delicate and then there's the bonus of the subtle fruit-sweetie scent once the polish is dry! Anyway - I started off with two coats of this, then topped with Insta-Dri to help speed up the drying process. Here it is on it's own because I love it and want to show it off!

Once it was fully dry I used a pink Barry M nail art pen to freehand the stripes. I'm a bit annoyed because they aren't as neat and even as I'd like, I should have used nail vinyls! Anyway, I then roughly drew on the heart shape at the end of my nails and coloured it in using Peach Melba by Models Own. I topped with Insta-Dri again (I always do this before adding anything with the nail art pens as it needs to be fully dry!!) and then went round the outline of the heart again with a white nail art pen. I did this a couple of times as the white pen doesn't show up as well as the black. I also added a little 'shine' line to each heart, which I didn't do last time but I like!
One more coat of Insta-Dri (which reminds me, I need to buy more!!) and I was done.
Hello!
If you follow me on Instagram you'll probably be sick of seeing my NTAs photos, but I've only just had time to write up a blog post!
So on Wednesday night me and my mum and sister and a couple of friends attended the National Television Awards at the O2 in London. We also queued up for access to the red carpet, so saw some of the TV stars going in! It was a really fun (but cold) day, and I thought I needed some glitzy nails for the occasion.
I definitely wanted to use gold, and after looking at a logo for the NTAs I decided I wanted to copy the letters onto my nails. I started off with a base of Sand Dune by Ciate. This is a shimmery gold. I then added a gold glitter gradient to the tips. I sponged on the glitter - I'd not tried this method before but had read about it being done by other nail bloggers. I tried it and it was very effective - much better glitter coverage than just painting it on with the brush! The glitter is by Barry M.
Once this was all dry, I carefully drew on the letters using my Barry M black nail art pen. This is totally my favouritest nail-art tool EVER! I filled in the letters using a gold/bronze shade called Goldie But Goodie using a dotting tool. When dry, I went over the black again to neaten up the letters. On my little fingers I attempted to draw the actual award!! Here's the outcome, with some extra photos of the event!!
Hello!
I've been so busy this month that I've not been posting here as much as usual, although I have still been doing my nails! I've also been enjoying opening my Ciate Mini Mani Manor advent calendar. All the polishes have been so pretty, although I've not had a chance yet to try out most of them. As well as polish, I've got quite a few bottles of loose glitter, and the other day it was some nail-art stickers. Everything is very pretty and xmassy!
I created this mani a few days ago using two of the polishes I got from the advent calendar. The hot pink (Cupcake Queen) is beautiful, but this pink glitter (Candy Cane) is definitely my favourite from the calendar so far - it's just stunning!
I also used the Nails Inc Kate Spade black, and the black and white nail art pens. I changed them a bit after a day as well - I thought the pink spotty index nail looked a bit too bright, so I swapped it for a black with pink spots. Both versions are below!
I wasn't really sure about the outcome of these, I thought they were a bit random and not the right colours to be Christmassy, but I've had some really nice comments on them while I've been wearing them!!
Also, it seems that some days in the advent calendar, it differed which polish people received - I kept seeing on Instagram/Twitter people posting swatches or bottle-shots of what they'd got and they were sometimes not the same as what I'd got - does anyone know if there was a bit of random placement going on?
Now to decide what nails to do for Christmas day - I don't know!!!
Hello!
Some more festive nails. I started these with no real idea of what I wanted them to finally look like, but I really like the outcome!
I started off with a gradient using three scattered holo polishes - Princess Sabra (gold) and Rose Bower (pink) by a england, and Amazon Rainforest by Magic Goose polish. These blended really well and created a super colourful gradient that I loved!
To make these a bit more festive, I added a snowflake design using the Barry M black nail art pen!
Hello!
My
nails today were totally inspired by Olivia from Pastille Beauty, where
I've started to go to get a gel pedi done because they last for ages. I
went earlier this week, and Olivia's nails were amazing - she'd done
them herself with gel polish, and I was so impressed by how tiny the
roses were, I loved the whole look in general and told her I was going
to recreate them!
Liv's nails:
For
my version, I used Barry M Rose Hip for the pale pink base, and the
flowers are Cerise Shine by Models Own. I used a dotting tool for them,
then added the leaves with Barry M Cardamom. This was the bit I was
worried about because I'm rubbish at using nail art brushes! I can't be
neat and accurate with them, so the leaves are more like blobs, but I
suppose they're so small it doesn't really matter. I added the black
detail to the roses with my Barry M pen.
I topcoated with Sally Hansen insta-dri to make them all shiny!
The
flash on my camera has washed the colour out on these a bit, especially
in the pic with both hands in, but they're the best I can do at the
moment!!
Everyone needs to go and follow Olivia on Instagram now to see more of her creations, and we will hopefully be doing more mani swaps in the future :-D
Hello!
I was inspired by one of my favourite jumpers for my nails today!
I've loved the graphic patterns on this jumper since I bought it last year from River Island. I was wearing it the other day and decided that the three different patterns would look fab on my nails, so I gave it a go today.
I started with a base of Cerise Shine (Models Own) on my index fingers, Barry M (Summer limited edition) pink on my ring fingers and Snow White (Models Own) on all the rest. I let this dry for a few hours, then when I had some spare time this afternoon I sat down in front of the TV with my trusty black nail art pen from Barry M.
I copied the patterns onto my nails - the grid on my index finger and the stripes on my little finger and thumb (to match the cuffs and hem) were simple enough. It was a bit more difficult to do my two middle fingers, but I'm quite pleased with how they came out!
I topped with Sally Hansen Insta-Dri and cleaned up around the edges.


.jpg)