Hello!
I had a lovely Christmas, and hope everyone else did too! I got lots of great presents, plus a few bottles of polish! I don't usually ask for polish as I've got so much already it's hard for people to know what to get, but I got some fab stuff from some friends who know me well enough to know what I need/like!! I got a glittery polish from Topshop that came in a mini bauble to hang on the tree (thanks Bob!), a pink holo polish from Freckles Polish (that I'd actually been wanting for ages - thanks SecretSantaNina!) and the Ciate Chalkboard Nails set (thanks Kathie!).
I also got two of the new Dior polishes from my boyfriend. I'd pointed them out in a magazine a month or so ago but then forgot about them, so I was so excited to open them up on Christmas day! I got 'Shock' which is a bright red, and 'Golden Shock', a gold flakie. They're both stunning, and I don't want to put them away because I just want to be able to see the bottles all the time!
I tried them out yesterday, and came up with this manicure. I used the red on all my fingernails except my little one, which got two coats of a gold polish ('Goldie but Goodie') by China Glaze. I then topped them all with the gold flakie. This took a bit of work to get the flakies spread evenly - you had to load the brush up with quite a lot of polish, and then dab on more flakies into any bare patches! I finished off with a generous coat of Insta-Dri by Sally Hansen to smooth out any sharp edges on the glitter.


I then decided to go a step further (as I thought the flakies over the red was a bit too predictable to do with the two polishes!) ...and add gold underneath my nails - I've heard this called a flip mani, or Louboutin nails (when it's done with black and red anyway). I just used the brush from the bottle of my China Glaze gold, and carefully painted on two coats of gold under each nail - luckily they're quite long so you can see a lot of it. I then used a little brush dipped in acetone to clean away any of the gold that got onto my fingers in the process!
Hello!
I've just opened the last door of my Ciate advent calendar; the Mini Mani Manor. I've loved opening this calendar every day of December and getting new nail goodies every day! Here's the fully opened calendar:
I love all the polishes in there, my favourite one is definitely Candy Cane, the pink glitter featured in my last post:
I'm not so keen on all the pots of loose glitter (there was about 6 or 7 in total) - they're so pretty, gorgeous colours, but if I want glitter on my nails I'll just use a glitter polish - much easier and quicker, with way less mess to clean up! I will have to think of a way of using the glitter pots though, they are lovely and I don't want them to go to waste.
In number 24, there was an extra special treat of a full-size bottle of polish - this bottle looked massive after all the minis! It turned out to be a beautiful holo glitter with different sized pieces, called Celestial. I decided to use it for my mani that I'm going to wear on Christmas day. I decided against nail art, and just picked my favourite nail shade, mint green (I used Sugar Apple by Barry M) and then one layer of Celestial over the top. Wintery and glittery!!
Hello!
I've been so busy this month that I've not been posting here as much as usual, although I have still been doing my nails! I've also been enjoying opening my Ciate Mini Mani Manor advent calendar. All the polishes have been so pretty, although I've not had a chance yet to try out most of them. As well as polish, I've got quite a few bottles of loose glitter, and the other day it was some nail-art stickers. Everything is very pretty and xmassy!
I created this mani a few days ago using two of the polishes I got from the advent calendar. The hot pink (Cupcake Queen) is beautiful, but this pink glitter (Candy Cane) is definitely my favourite from the calendar so far - it's just stunning!
I also used the Nails Inc Kate Spade black, and the black and white nail art pens. I changed them a bit after a day as well - I thought the pink spotty index nail looked a bit too bright, so I swapped it for a black with pink spots. Both versions are below!
I wasn't really sure about the outcome of these, I thought they were a bit random and not the right colours to be Christmassy, but I've had some really nice comments on them while I've been wearing them!!
Also, it seems that some days in the advent calendar, it differed which polish people received - I kept seeing on Instagram/Twitter people posting swatches or bottle-shots of what they'd got and they were sometimes not the same as what I'd got - does anyone know if there was a bit of random placement going on?
Now to decide what nails to do for Christmas day - I don't know!!!
Hello!
Some more festive nails. I started these with no real idea of what I wanted them to finally look like, but I really like the outcome!
I started off with a gradient using three scattered holo polishes - Princess Sabra (gold) and Rose Bower (pink) by a england, and Amazon Rainforest by Magic Goose polish. These blended really well and created a super colourful gradient that I loved!
To make these a bit more festive, I added a snowflake design using the Barry M black nail art pen!
Hello!
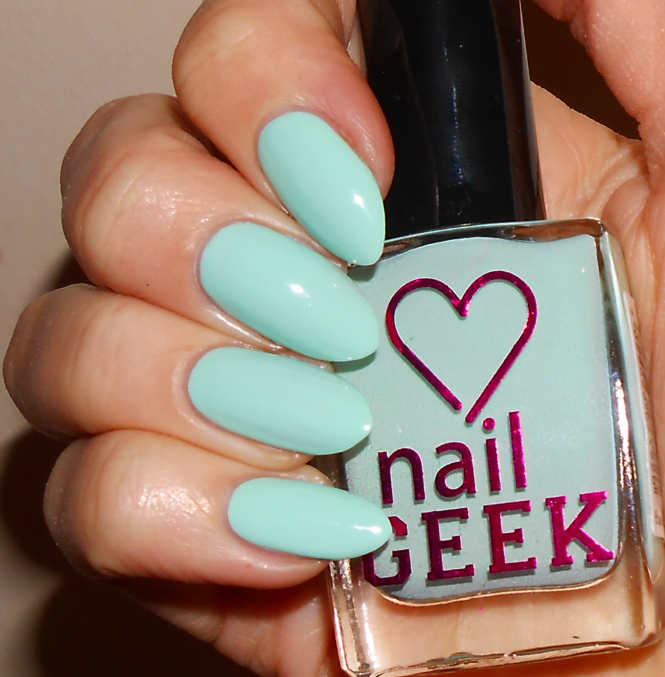
I created these festive nails a couple of days ago. I went for pastel colours as I was at work and pastel is less in-your-face. The three main colours (pink, purple and green) are Nail Geek polishes that I'd been sent to review (see previous posts for reviews!).
I did three coats of pink/purple on alternate fingers and left them to dry. I then used straight vinyls (you could use striping tape, or normal tape) to section off triangles on each nail. I filled in each with green, and added dots of gold and silver polish with a dotting tool to finish them off!
Hello!
I did these nails a few days ago as I wanted something wintery for when I went to Winter Wonderland in Hyde Park. I wasn't sure what I wanted to do - I was initially going to do a gradient with some snowflakes over the top, but I did that last year and wanted something a bit different. I eventually settled on this design.
I started off with two coats of Elderberry (the blue) by Barry M, and topped it with Sally Hansen Insta-Dri to speed up the drying process. I then left it for about an hour to make sure it was really dry.
I then took my zigzag chevron vinyls from She Sells Seashells.These are like stickers, and I used tweezers to put a set of five chevrons onto a nail, using the pointed tip of my nail as a guide. I then peeled off every second vinyl, and filled in the gaps with a silvery foil polish that I got in last years' Ciate calendar (and I'm loving this years' too so far!!) ....I removed the remaining vinyls carefully with the tweezers, then topcoated.
It took a while to do this design on all my nails but the overall effect is really striking, I love them!! The contrast between the reflective silver polish against the duller blue is really pretty and keeps catching my eye.
Hello!
I was sent another lovely batch of Nail Geek polishes to swatch and review again this week. This is Beauty Not Beast collection which is five pretty-pink-pastel shades. Here they are!
I started off with the palest shade - this is "Eu Natural" and is an off-white. I was really interested to see how this would apply as I'm always looking for a cheap white that gives good coverage. In the pic I've used three coats. This is a pretty shade but doesn't give full coverage even with three coats - it still looked a bit streaky, so this won't be my new "go-to" white polish unfortunately!
The second and third shades are sooo similar and it's hard to see the difference between them in my pics! They're both pale pinks. The slightly paler of the two is "Calming". In this picture I've used three coats, and it's still not fully opaque.
Here's the third one, "Ballet Shoes". Like I said, this is similar to the above shade, but I like it better because it built up much better in three coats and had a lovely finish!
This one is "Down To Earth", and has a shimmer through it - which I didn't realise from looking at the pics on the website. This one is really pretty, and this picture is three coats!
I've saved my favourite one for last. This pale purple is called "Sleep", and I used three coats again. The coverage and finish was perfect and I ended up wearing this one to work for a couple of days (very work-appropriate shade!) and got quite a few compliments on the shade.
These polishes sell for £1.99 each or £7.95 for the set of 5. I'd definitely recommend getting the purple, "Sleep", and the other collection I reviewed is definitely worth a look too as it had some gorgeous pastel green and blues!
Hello!
I did these nails inspired by my phone case! I'm constantly seeing pretty patterns that I want to recreate on my nails, and I choose pretty patterns for my phone cases all the time so.....yeah!
I've done galaxy nails before but not for a long time so I looked forward to doing them again, and I'm really happy with how they turned out!
I started off with a base of Blue Lagoon (two coats) which is one of Seventeen's Gel-look polishes. I bought this a while ago to go with a dress I'd bought but didn't end up using it, so this was my first time applying it - I really liked it, it was smooth with a shiny finish and a really nice dark navy.
I then tore a little bit from a make-up sponge and painted on a blue polish. I dabbed this onto my nails in diagonal lines. I then repeated with different shades of blue, purple and pink, but tried not to go overboard as I've sometimes spoiled a galaxy mani by adding too much! I also used a glitter polish to dab onto certain bits of the galaxy. The polishes I used for this are all Barry M and were Malibu (blue), Rhossili (dark pink) Elderberry (grey/blue) and this years' Limited Edition purple.The glitter is Socialite (dark pink, Glitterati). The white dots/stars were done with a white Barry M nail art pen, and then I topcoated with Sally Hansen Insta-Dri!
Hello!
Last week I was contacted by a cosmetics brand called Makeup Revolution. They have just launched a new range of polishes called Nail Geek and they kindly sent me some to try out.
The polishes come separately or in 'collections' of five. I chose the Cool Nails Collection to try, as they were a fab selection of blues/greens.
All the polishes here are shown swatched without topcoat (I did use base coat though) and I have mentioned for each how many coats of the polish I used.
I'll start with the paler shades. The first one I tried was "Peppermint" - I can't resist a mint green, and this one was lovely. This took three coats for me to be happy with the opacity but you could probably get away with two!
This one is "Dreams", a lovely pale blue. Again, I used three coats.
Here is "Clear Skies", a darker and more dusky blue than Dreams, but still what I'd call pastel. Two coats was fine for this one. This one is my favourite of the five!
On to the darker shades, this one is "Inbetween" and is a vibrant turquoise shade. This would actually look really nice with just one coat as it's so pigmented but I applied two just to make sure there were no streaks.
The last one I tried is "Live Fearless". It's more on the blue side of turquoise/teal. As above, one coat would have been fine but I added an extra one just due to personal preference.
Overall, I was so impressed with these polishes! Because they are so cheap, I wasn't sure what kind of quality to expect. On opening the bottle they did have a bit that 'cheap polish' smell, but that didn't really bother me - it wasn't overpowering or anything. They applied really, really nicely, and were very creamy and smooth. The paler colours needed 2-3 coats to be fully opaque which I would expect for any pale polish. The darker colours only needed 1-2 coats, and all of the polishes dried quickly to a smooth, streak-free finish. They were also so shiny without topcoat, which I loved!!
Another bonus was that the brush was sturdy and wide, which I definitely prefer. I also liked the large chunky rectangle bottles - they all fit together nicely in my nail polish box.
Finally, I had a go at some nail art using the polishes (and a nail art pen) and this is what I came up with! As these are so opaque and brilliant shades they're great for nail art - they don't need too many layers to show up. I only needed two layers of "dabbing" for the gradient on my little finger!
The Cool Nails Collection of five polishes is available for just £7.95 and at the moment you get an extra polish free when you buy. There's other collections available, or you can get the polishes on their own for just £1.99.
The different collections are here and the individual polishes are here - there are 45 shades!
Hello!
Around Halloween I won a competition ran by Barry M on twitter. They said my prize would be "a few goodies" - I expected one or two polishes or make-up items, and was amazed and very excited when it turned up a few days later and turned out to be the FULL Glitterati collection!
For those that don't know, the Glitterati collection was only recently released and consists of 6 brightly coloured glitter polishes that are really dense and packed full of coloured and holographic glitter. Here are all six of my lovely prizes:
I needed a quick nail update, but didn't have time to create any nail art, so I selected Socialite (the purple) and Starlet (the pink) from the collection to apply to my nails. The glitter is in a semi-transparent jelly-like base, and I'd read it took a good few coats to build them up to full opacity. I didn't want loads of layers of thick glitter, so I decided to match each polish to a similar shade to go underneath. I didn't need to look any further than my other Barry M shades. To go with Socialite I selected Rhosilli, and for Starlet I picked Grapefruit. Here are the four polishes I used, two coats of each on each nail, the glitter on top obviously!
These polishes apply quite thickly and you need to apply it slowly and carefully, perhaps putting more polish on the brush than you usually would, but once you've realised all this they were fine to work with, especially over a similar shade.
I looove this look, and my nails have had a few compliments after just one day! I think I love the pink nail the best - it's so vibrant and sparkly and I'd love to do a full mani in this colour.
I think that you could get slightly different effects with the Glitterati polishes (the ones I've tried anyway) depending on what colour you used as a base, or whether you used one at all. Swatches of these polishes I've seen on other blogs look a bit different due to no under-coat being used, but this is just a bonus as one polish can provide several looks!
I'll try out the others soon, and I'll definitely be returning to this collection over the Christmas season!