Hello!
I've created these gradient nails because everything else I've tried this afternoon has gone wrong! :-(
First I was desperate to try Sugar-Spun, but it ended up turning out way harder than I thought! I tried with a few different polishes but couldn't get either to go 'stringy' enough when I was trying to drag it across. Ahhh. I then tried a glitter gradient with a new polish, but there was hardly ANY glitter on the brush each time I tried to add a coat so that didn't look good either.
I needed something not too bright for work, so ended up creating this gradient with Barry M's Blueberry, Prickly Pear & the new pink SLE.
I usually just create a gradient by painting my nails one colour, then dabbing on the second colour with a make-up sponge, building up the layers from the middle towards the end of my nail. This time though, I followed nuthin' but a nail thing's tutorial and it's turned out so much better! The only thing I didn't do is start with a white base (because I only decided on a gradient once I'd done two coats of the purple!) but the rest of it worked really well, and I reckon would be even more improved with a white base. :-)
This looks a lot 'smoother' and blended in real life, and I'm very happy with how it turned out - hope it doesn't chip, but I reckon it will very soon :-(
Also, look at this amazing t-shirt I spotted while out shopping this week:
I've had this idea for a while now, ever since I bought this top! I know I keep doing aztec nails, but I love all the different colour combos and different patterns there are to re-create. I looove the colour and the pattern on this top, which I bought from my local branch of Republic before it closed down this week :-(
To create this look on my nails, I used two coats of Papaya (orange) by Barry M. I then used their nail-art pen to draw on different parts of the design from the top on each nail. I finished off with a matte top coat to make it look more material-y!

Loading InLinkz ...
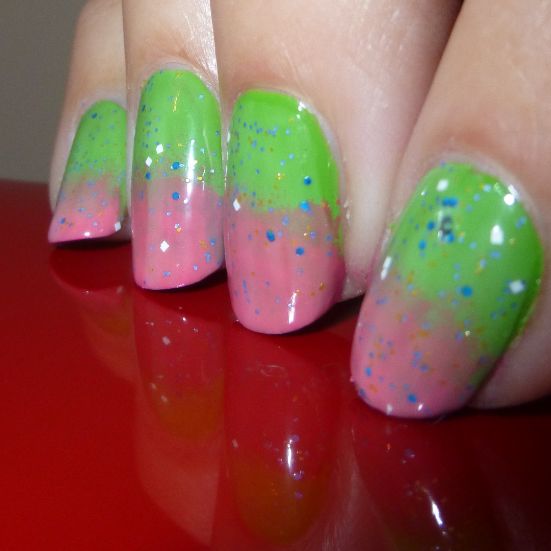
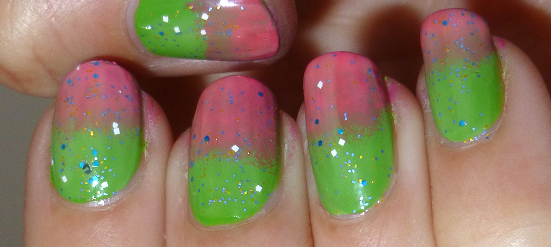
I don't really know what I've done with my nails here, or why! I've been wanting to use my new (poundland!) Sally Hansen polish for a while, but it's bright green! I've got two days off, so decided to use it tonight. I decided to put it together with a bright pink, kind of a watermelony look? I don't know!
Once I'd finished the gradient though, I wasn't really happy with it - although the colours looked good together they didn't blend very well and it looked a bit messy. So I decided to go over it with my lovely LacAttack glitter to try and hide the rubbish gradient. I'm quite happy with the result, despite it being a bit random. It's too late to change it now anyway!
The polishes I used were:
Beauxbatons Academy by Lac Attack (the white glitter)
Grass Slipper by Sally Hansen (greeen)
Grapefruit by Barry M (pink)
I mentioned in my previous post that some of my colleagues at work are into nail art too. Jenny doesn't have a blog but I feel some of her designs need showing off! She agreed I could share them to provide others with inspiration and ideas.
My favourite-favourite design is the first one. Love it! The rest are all awesome too, and my other faves are the textured Barry M with the cute little eyes and the orange/grey gradient.
I bought a beautiful new handbag this week. I've been looking for a light/pastel coloured one for summer, and found this beauty in the Topshop sale. I liked it better than any of the full-price ones, so I bought it. Yey!
My friend Jenny at work suggested I do matching nails, which I had to try - I love studded nails anyway, and haven't used my studs for a while.
I used a nude-y colour from Seventeen that I've had forever and it's called Forever. I thought it matched the bag quite well compared to all my other polishes of a similar shade. The studs are from Born Pretty, and I stuck them into a wet top-coat and sealed with another. The chain/zip type thing is a nail-sticker I got in a pack from Poundland, and my two other fingers have Model's Own's Disco Inferno glitter. A bit of a mixture!
So thanks again to Jenny for the idea, and I'll soon be doing a post featuring some of her own fab nail-art that needs showing off, so watch this space...
I bought Barry M's new gelly, Guava, last week and took the opportunity today. I was going to do a gradient, but I've done quite a few of those recently, so I decided to go for something I've not tried before - chevrons! As usual, I used the Barry M pens for the detail here.
Hello (I'm back!)
I returned from Corfu on Monday evening - we had a lovely time! On Tuesday on a trip into the town centre, I ended up coming home with two new Barry M polishes. I needed a new eye-pencil anyway, and as there was the offer to get the free Limited Edition polish if you spent £6 with Barry M, I thought I'd get the pencil and a polish to make the price up to £6 - I chose the new gelly, Guava. I then picked up the pink limited edition polish, just named SLE 2013 A. I think I just loved it because of the pretty lid! Today I've created some nail-art inspired by the zebra print lid, as I've seen others doing - fab idea!
Here is what I came up with:
I needed to use three coats of the pink to get this amount of coverage- I found it pretty sheer in one coat and it needed a bit of building up. I then turned to my trusty Barry M nail-art pens to create the zebra tips. I used the white pen to draw the french tip and fill it in. I did it with the pen rather than a brush for increased accuracy. I had to go over with the white a couple of times for proper coverage. I then topped with a quick-dry topcoat to make sure the white was completely dry before free-handing the zebra stripes using the black pen. My thumbs I had to leave plain pink, because I've had to cut them right down :-(
Anyway, I like these nails! I think I'll use them for this week's challenge, which is Inspired by Summer. The pink is very summery, and the polish is limited edition for summer, so I reckon it fulfills the challenge pretty well!
Here's a piccie of me & my boyfriend in Corfu, I caved after a few days of having bare nails and painted them bright coral, like my toenails!
Loading InLinkz ...
Hellooo,
Just a quick post to let you all know I'll be in Corfu for the next 10 days so there won't be any posts! I've made the hard decision (!) to go nailvarnishless on my fingers - my friends have said it'll give my nails a chance to breathe and recover - the sea/sun will be good for them, and the constant use of suncream will keep my hands moisturised. I wanted to paint them a nice bright holiday colour, but I knew as soon as one got chipped I'd be annoyed and I didn't want to take all my nail stuff with me!
Here's my naked nails, just with a coat of strengthener - as you can see, they're a bit flaky and gross, especially the thumb. This is why I always cover them up with polish - because they're minging - because of the polish - vicious circle!
I contented myself with just doing my toenails - this lovely colour is by Rimmel and is called Coral Romance (sorry for the feet pic!)
See you all in 10 days! X
I've really failed at doing our year-long challenge recently! Because I've discovered and bought so many new polishes in the last few months I've mainly been focused on testing them out and seeing what designs I could create. The challenges are good if you're stuck for ideas, but I've had lots myself recently.
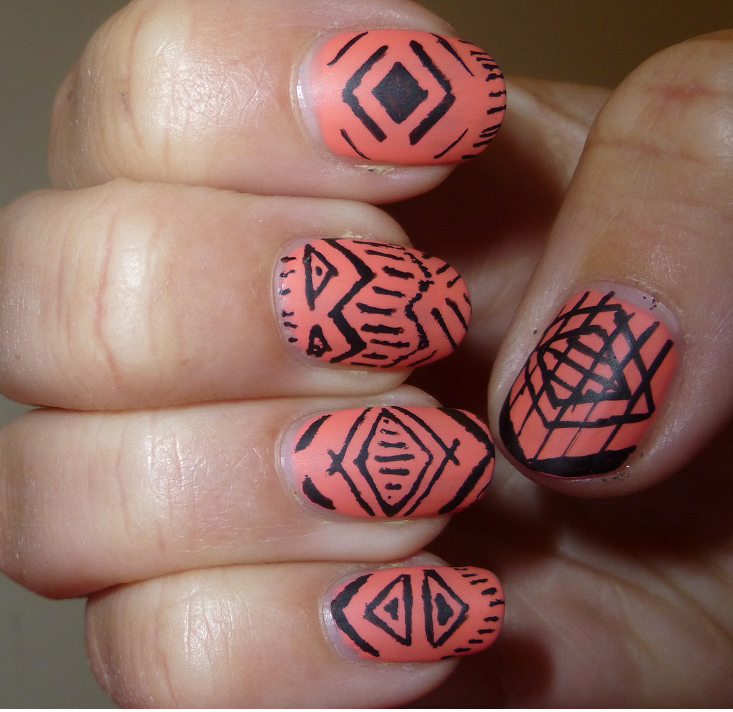
Anyway, last week was gradient week, and I did create a few gradients, without even realising that's what week it was. This week it's tribal print, which I'm really loving at the moment, due to how easy it is to do now I have the Barry M pens. I prefer doing patterns on my nails than trying to draw actual things - because I suck at that! Patterns and stripes and spots I'm okay with.
I came up with this design after seeing a really striking dress in Topshop. Here's a picture of the dress from their website:
I didn't buy it or even try it on as I wasn't keen on the style - the high neck etc. But I loved the pattern and immediately told my sister when we saw it that it would be fab for nail-art! So here is my take on it. I tried to take a different bit of the pattern for each nail, adding/leaving out bits I thought wouldn't work.
For the base colour I used Barry M's Blueberry. I know the dress is more mint green/turquoise, but I did my previous tribal nails over a green base, so I went for blue for these so they didn't look too similar. I used the white and the black nail-art pens to create the patterns, and used a topcoat to seal it all in.
I updated my 'car coloured' mani after borrowing the silver Barry M nail art pen from a friend. After a lot of thought on how to include the silver, I went for half-moons. I've never tried them before because I didn't think I could get them neat enough, but using the pens really helped. It was a bit harder on my left hand, but they looked quite good from a distance! I like this design, but not keen on the colours on my nails - I'm more into pastels and brights at the moment, not metallics.
I drew on the half moons, then went over them again once they'd dried. They still looked a little streaky when you looked closely (like in the pics!) but you couldn't really tell too much. Here's a second pic with the flash off cos they look a completely different colour in both pics and couldn't decide which one to pick!
I've done my nails tonight to celebrate my newest and most expensive purchase ever - my new car! I've lusted after this car for years, and have been saving up for years. This week, I finally exchanged my old Peugeot 206 for this beautiful thing:
Ahhh. I absolutely adore it, and cannot believe I finally own it! What a stunning car in a stunning colour. I can't believe it's outside my house, I keep checking to make sure it still is! Anyway, enough of the car-love, I had a look through my polishes to see if I had a matching one, cos I'm sad that way. I found these two polishes by 17 - the first one is called Amaretto and the second one is Ruby Gem.
I couldn't decide which one matched the car the best, so I went for a base coat with the Ruby Gem (the pinker one) and then two coats over that of Amaretto. Not sure if you can even tell the brighter pink is there, but oh well! They match the car pretty well:
I was going to add some silver somehow, to match the silver trim on the windows. I'll see if I come up with anything!
Here's a photo of me being happy with my new baby (note - it also matches the colour I write in!!) :
Oh okay, one last one of the car ;-) In the sunshine. Love love loooooveeeee
<3
I created these lace-print nails over the top of the gelly gradient I did yesterday. I followed a tutorial by the very skilled Megan which you can find here. I never thought I'd be able to do an intricate design like this, but Megan has broken it down really well. I think they look fab, but my boyfriend says they look christmassy! What do you all think? X