Hello! Time for another edition of BFF Friday, where myself and Laura of Naileymabob pick a theme and both create a mani. Laura picked the theme this week and it was Stud Crazy which I thought was fab!
I took inspiration from Polish All The Nails who creates all sorts of crazy detailed manis using stud/glitter placement, with whole nails being covered in studs like in the example I've linked to above. I tied this idea in with my new polish from Pretty Quirky which is called Milky Joe and created a stud-filled accent nail to match the polish.
After I uploaded the pics I realised I had neon yellow polish (which I used to fill in the gaps where studs wouldn't fit; the base shade was originally white!) all over my stud finger which kind of ruins the look - it wasn't really visible in normal light,and I'd already taken these off before I checked the pics - rubbish! So - sorry about the mess!
On the whole I'm pretty disappointed with my interpretation of this theme, I've definitely done better crazy stud nails in the past and I think I should have gone for something like this again!
I do love Milky Joe though, I used two coats with a bit of placement needed over a base coat of white. I love all those neon pieces! <3 You can buy Pretty Quirky polish here!
You can find details and more pics of the mani Naileymabob did here - definitely have a look, I adore this mani especially the triangles of studs and that fab accent nail - that was more the look I should have gone for!
Hello!
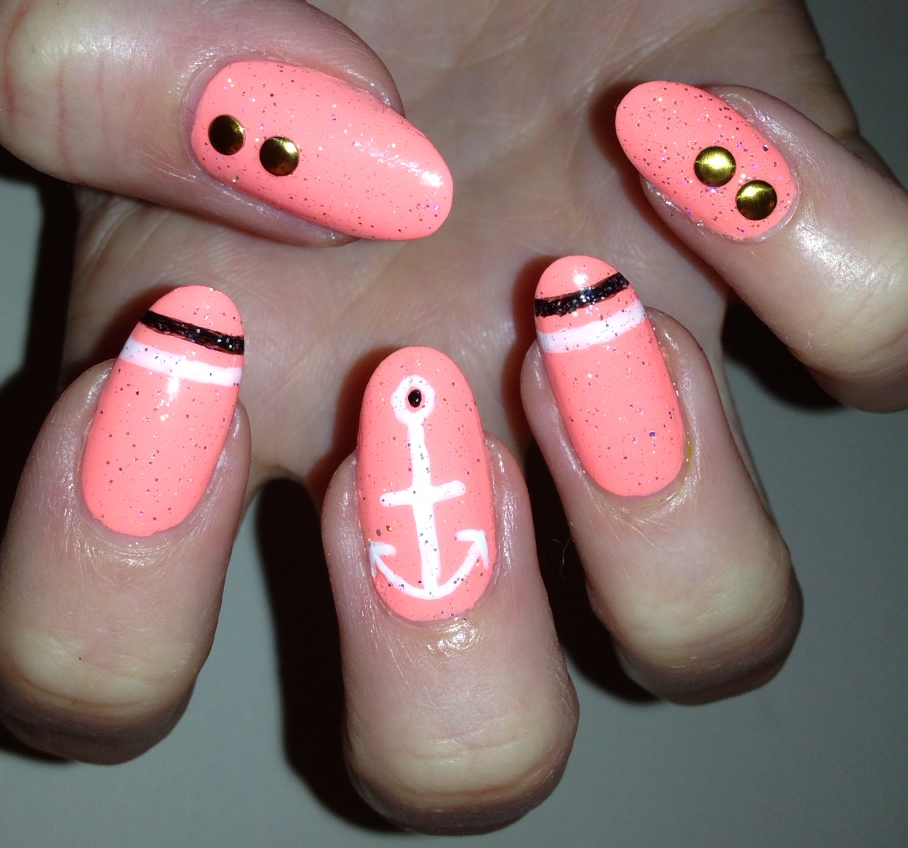
My nails today are a bit random! I wanted to do a nautical/anchor theme after realising it was an easy design to do with a nail art pen. However I didn't really want to use blue and white because I've seen it so much before in nautical manicures, and bright blue isn't my favourite nail shade. Instead I decided to pick a colour I was more keen on, so I selected Beach Bag by Models Own which is a lovely neon orange/peach shade. Very summery!
After two coats of this, I added the anchor and stripes with my black and white Barry M nail art pens, and then some studs from a stud wheel I got from River Island (in the sale!) I also added some holo glitter (Barry M) that I won in a giveaway from Rebecca at Lanes Lacquers - I love this as it's quite subtle but adds an extra something to a manicure!
I'm not sure what I think of this mani, it seems a bit random, but it'll do until I am back to work! Why is it that I am full of design ideas all week while I'm at work and can't try them out, but once I have some days off my mind goes blank?! Haha. Hope you're all having a good week x
Hello!
Another gradient to show today - gradients always make me happy! This time I wanted to create a full rainbow of colours. I selected pastels for several reasons, one because they seem to blend together really well, two because I'm at work and my nails can't be too 'in your face' and three because clean-up is always easier with lighter colours!
I picked Miss Sunshine (Accessorize) Sugar Apple & Huckleberry (Barry M) and Pink Veneer (Models Own). I also started off by using a pastel purple between the blue and the pink, but realised I didn't need it because the blue and the pink blended together really well creating their own shade of purple.
Sorry about the state of all the bottles in the folllowing pic, I'm so messy!
I used the usual sponge method, dabbing the sponge higher/lower each time to blend the colours. This took about three rounds of 'dabs' on each nail to get the colour to this level. I finished off with my new Nails Inc topcoat which I love! And I forgot to mention that before I began the gradient I started off with a base coat of the lightest colour I was going to use which was Huckleberry in this case.
This was really hard to photograph so I only have the photo at the top which is from my phone - my camera washed these out and they just looked white! They do look really nice in real life though, I'm really pleased with them :-)
Hello!
I've got such a pretty polish to show off today! This is Deva by Pretty Quirky which is a UK indie polish brand. Last week I treated myself to two polishes I'd seen swatches of and loved, and I was also lucky enough to receive a free mini polish of my choice as I was in the first 10 people to order after these new polishes were released. I bought Deva and Milky Joe, and got Village Idiot extra! <3
I decided to apply Deva first as I thought it was more work-appropriate. I started off with two coats of Rose Hip (pale pink) by Barry M. I then applied two easy coats of Deva. This polish applies like a dream, it's a perfect consistency and the glitter lies so flat and smooth against the nail, it's not big and bumpy like in some other glitter polishes I own.
In this mani I also used my new Nails Inc base and topcoat that I won in Grazia's Manicure Monday, and I was impressed with them. The base coat is thick so smooths out the nail but still dries quickly. The topcoat has a lovely shine and dries quickly, but doesn't feel as completely dry/hard in a short amount of time as my Insta-Dri. I also used the cuticle oil I received, which smells lovely!
Here's some more pics of Deva, sorry there are loads but it was so pretty I couldn't stop taking them! I adore the mix of big/small/different sized glitters and the red/pink shades. It's just so gorgeous!
Here's the link to Pretty Quirky's Etsy shop - go and look at the pretties!
Hello!
Exciting post today - I was contacted last week by MoYou nails and asked if I could review some of their stamping plates. I eagerly agreed as I've never actually tried stamping before despite seeing the method used on a lot of other blogs, and really wanted to give it ago. I was given a small selection of plates to choose from, and picked a plate with heart designs and one with cartoon eyes/faces and owls on. I also received a stamping polish (I chose black), a stamper and a scraper, as well as the 2014 MoYou catalogue which is full of lots more tempting plates and other goodies!
As I said, I've never tried stamping before so was a bit unsure of what to do and whether I'd be able to produce a decent manicure! For my first attempt, I began by creating a gradient using Guava, Greenberry & Sugar Apple by Barry M.
Once this had dried, I selected one of the designs from the 'heart' plate, and applied this to my nails. I found it surprisingly easy to do - you have to take your time and be quick an careful, but I managed to get the stamp to appear crisp and (nearly) full on each nail. I did manage to get the black polish everywhere though!
I finished with a shimmery topcoat to finish off the manicure, however I don't think I waited long enough for the black polish to dry and it ended up smudging slightly - this was my own fault because I'm used to my nail art pens drying almost instantly - I forgot this was actual polish and might take a bit longer, and I will bear this in mind with future manis!
I'm eager to try lots more manicures with the other designs on the plate, and am already considering buying some more plates that have larger patterns/designs on them for my longer nails. I definitely want to practice more so I can become better and more precise at stamping! I did find it easier than I thought though, and was impressed with the products I received.
Hello!
Quick post today. I've been playing around with the three 'polish for tans' polishes I have from Models Own as they're so summery and it's been so warm today so I thought they were ideal! My first mani didn't turn out like I wanted so I came up with these last minute.
I've wanted to try 'camo look' nails for a while, so tried it out with these three polishes (Shades, Beach Bag & Sun Hat). I created the pattern using a big dotting tool from my new Models Own nail art kit, won for me by the fab Naileymabob!
Only one pic as these were so difficult to photograph - eventually managed it using my phone!
Hello!
Here are the nails I wore over the weekend. I was inspired by banicured_ on Instagram to create this circle gradient - like a regular gradient, except you paint the polish onto the sponge in a circular shape and dab it onto your nails. I used neon colours for a summery look - a cheapy orange from a discount cosmetics shop and a neon yellow from Claires. Here they are, along with the used sponge!
Basically I just kept painting on the orange/yellow onto the sponge in the same pattern and dabbing it onto my nails one by one... I let them dry then repeated a few times until it was bright enough for my liking. I finished with a shiny topcoat.
I know the bottle says "UV" on the orange one but I didn't really take much notice - I'd bought it for the colour not for any special effect, and didn't think it'd work anyway with it only being about a pound, but when I went to bed my nails glowed bright glow-in-the-dark rings - awesome!!
I liked these from a distance, up close they look a bit blotchy and uneven. If I'd had more time I would have added a pattern over these but I didn't finish them until late - boooo.
Here's some more pics of them from over the weekend - very hard to photograph how they looked but here's two attempts - I especially like the one of them against the dark sky!
Also, I broke my little finger nail REALLY low down on Friday :-( I don't even know how I did it, I just noticed it was cracked, and it's really bad. I had a teabag repair over the weekend, which broke on the second day... I was away in London so ended up keeping it together with a plaster...
Now I'm home I've done another repair but don't think it'll last more than a few days! Arghhh why do nails break :-(
Hello!
Now I've got the hang of roses I think I'm going to use them in so many manicures - so simple to do and such a pretty result! This manicure was inspired by a range of manicures I've seen on Instagram - I loooove instagram and am constantly inspired by the really talented nail artists I follow.... I can spend hours browsing nail art designs!
So for this manicure, I started with a base of Huckleberry (pale blue) by Barry M. Once fully dry (I used Insta-Dri topcoat to speed this up!) I used the white Barry M nail art pen to freehand white stripes. My pen is running out a bit, so for my left hand I switched to a white striper polish to add the stripes. The effect was pretty much the same, except the stripes were less accurate (but more opaque!) using the striper.
Once dry (again helped with Insta-Dri - I used this so much in this mani!) I added pink blobs with Models Own Pink Veneer. Once this was dry (I'm now sounding like a broken record!) I added the darker pink details to the pink blobs (Pink nail art pen, Barry M) to turn them into roses, and little green leaves (Greenberry, Barry M) using a dotting tool. Another coat of Insta-Dri and some acetone to clean up the edges and I was done!
This seems like quite a lot of work, but it wasn't really - it was more waiting for each layer to fully dry before adding the next that was the most time consuming. This is the kind of mani that looks really rubbish right until you've added the final details and cleaned them up, so you have to really persevere right until the end. Here's a pic of these mid-mani so you can see what I mean - a bit of a state right?
And some more pics of them finished! I think like my first roses mani from a few weeks ago, these remind me a bit of a Cath Kidston print! Sorry some of these are only phone-quality, but my actual camera washed out the colours a bit so I thought you could see the detail more on the phone pics. First two are camera pics, the rest from the phone...
If you're reading this today (Mon 12th May!) and want to vote for these nails in Grazia's manicure monday competition, here's the link! Xx
Hello!
I tried some nail art the other day but it didn't go as well as I wanted, so I started again and went with something I knew I could do which wouldn't take loads of time - a gradient! I started with a base of Utopia by Models Own, two coats. This is still my favourite nude polish and I'm on to my second bottle because I actually used the first one up! The other shade is Sugar Apple by Barry M - I'm so glad I caved and bought this! I added the gradient using my usual method with a make-up sponge.
To jazz this up a bit I added a holo-y glitter topcoat which was from Claire's. I actually chucked it away after this mani as it'd gone really gloopy :-( But it was very pretty while it lasted, and shimmers yellow/green/blue in the light, which was really hard to capture in these pics!
I liked this mani - I was tempted to add some art or studs, but I think it was right that I just left it as a plain gradient - it looked nice! :-)
Hello!
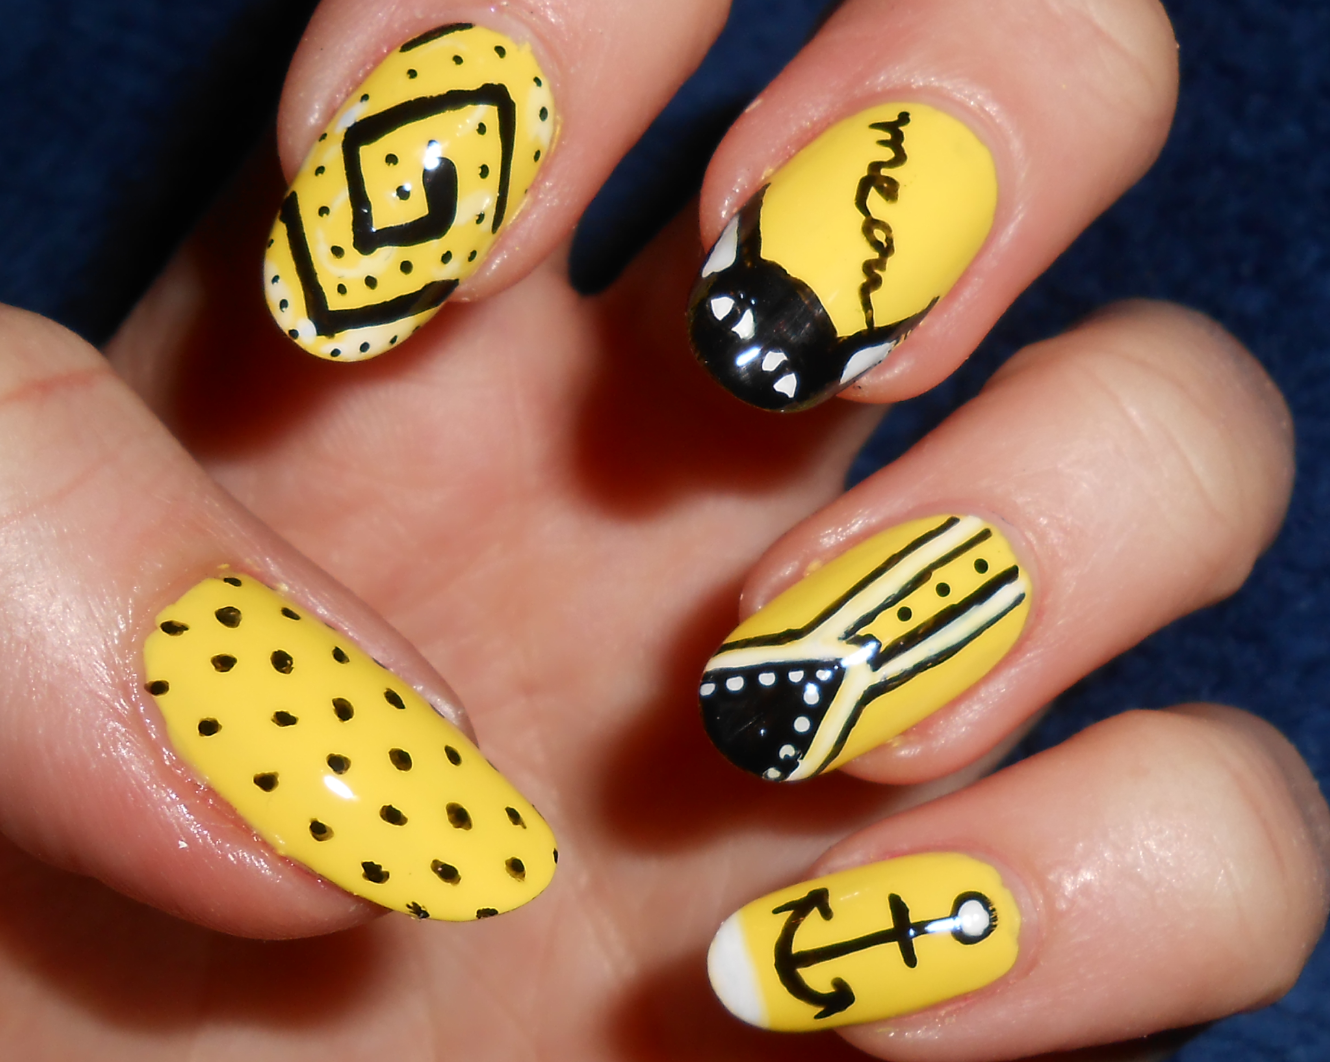
I had a day off yesterday, and wanted to do some brightly coloured nails. I painted them yellow - this gorgeous colour is one of Barry M's Limited Edition summer shades from last year and took just two coats.
I couldn't decide on one specific design, so decided to just freestyle a different design on each nail, inspired by various patterns and manicures that I like at the moment, just to practice my freehand and see what looked effective and what didn't. As usual, I used the black and white Barry M nail art pens for the designs, and a topcoat of Sally Hansen Insta-Dri.
Right hand:
Left hand:
Both together!:
I think my favourite designs are the eye (loving eye designs at the moment!) and my stripy outlined thumb from my right hand, and the anchor on my left hand. I'm definitely going to use the anchor design in a more classically nautical mani soon I think!
Hello!
As soon as I heard about the new Parfumerie collection by Revlon and saw the cute bottle design, I knew I had to treat myself to at least one! The Parfumerie collection is a range of scented polish with really unusual scents to select from. I read about a lot of the polishes on other blogs before I chose which one I wanted to purchase - I chose Ginger Melon both for the colour (bright coral/pink) and for the described scent (sweet and fruity).
Firstly - the colour and application. I loved the rich corally pink shade of this, so summery! I applied three coats and the colour built up nicely, but even after three coats you could still see my nail line and slight imperfections on my nails through the polish as it was very sheer and jelly-like. I didn't use a topcoat as this would have masked the scent.
The polish doesn't smell in the bottle - it has to be applied to the nail and be dry before it begins to give off it's scent. I was surprised by how strongly sweet this polish smelt - it kind of reminded me of fruity sweets like Skittles or Starburst, or like fruity bubble-gum. I do love sweet scented things - in Lush I will bypass all the products with subtle smells, or smells like mint or lavender and go straight to the products that smell like sweeties! However, this polish smell was almost TOO sweet - I did still like it though and couldn't stop sniffing it!
The downside is that as a topcoat can't be used, I got a lot of tip-wear and also the polish would leave marks on white things my nails brushed against, like paper and my white walls! Also I wasn't happy with it still being semi-sheer after three coats. But I did love the scented aspect and the gorgeous bottle design.
Still undecided if I want to buy more - when I was in Boots in Oxford Street last week there was a Revlon display with swatches of all the polishes on nail-sticks for customers to smell. Me and my friend had a lovely chat with the lady running the display, and took our time smelling all the different polishes and looking at the shades and discussing our likes and dislikes with her! I was tempted by a few - but it's difficult to choose one that both smells good and is a pretty shade - for example, I loved the smell of Espresso (coffee!) but it was just plain black, and I already have a black polish!
Here's a few more pics of Ginger Melon - Apologies, these are from my phone again as I didn't have time to take any on my proper camera!


.JPG)