Saturday 31 August 2013

Pretty Stunning In Peach

Hello!


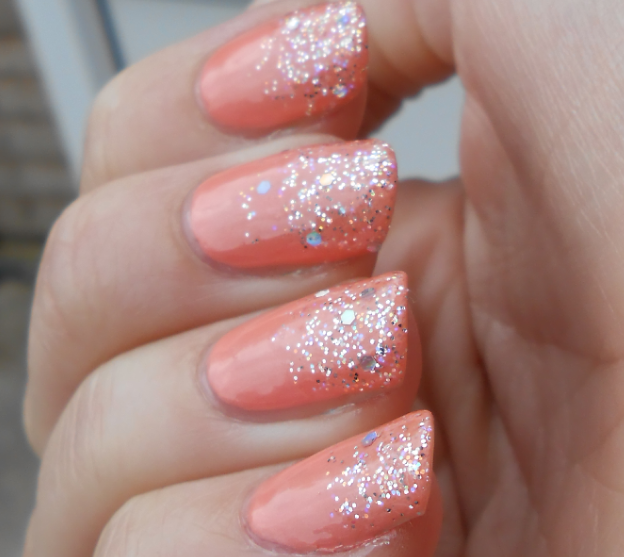
These are my nails today, I went for something quite subtle for work. For these nails I've used two new polishes. The base is two coats of Pretty In Peach by Seventeen. This is a beautiful pale peach/orange/coral type shade. I've had it a while after my sister passed it on to me, but not got round to using it until now. In the bottle it looks like it has a bit of a shimmer and that's what put me off as I've prefered more solid colours recently. But this is a beauty! Lovely colour, less 'in your face' than Barry M's Papaya that I've been using a lot. I do like polishes by Seventeen!


The glitter gradient is created using Revlon's Stunning, that I got as a birthday present from my fab friend Kathie. It's little silver glitter and bigger holographic pieces. These were quite hard to get on the brush as they seemed to be stuck round the edge of the bottle, but with three dabby coats I managed to get some here and there.


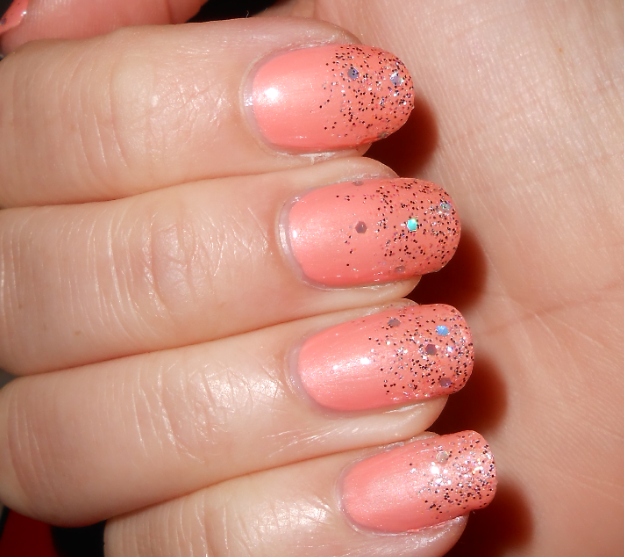
I then added a topcoat of Sally Hansen's Insta-dri to make them all shiny :-)


I think this look is a bit subtle for me, but would be fab for a wedding or formal do. Can't wait til my days off so I can play with neons and studs!! x

Friday 30 August 2013

Graphic Print Attempt


 Hello!

I was working on a design today to enter Nail Lacquer's contest. I didn't know what design to do, but wanted to try something new. This summer has been all about bright prints for me, tribal or bold shapes. I found this pic I took of a dress I saw the other week in H&M. I loved the bold colours in the print and took a pic so I could try and recreate it on nails. I don't think it went too well, as I cannot draw!! Anything beyond stripes/spots is too much of a challenge for me :-( Soooo I haven't entered this into the competition, haha.

I spend a while doing this and it did keep me amused for a good hour. Here's the dress that gave me the idea... I tried to pick a different bit of the design for each nail.


I picked out the nearest colours I had to the ones in the pattern. I didn't have a purple bright enough, and I wish I'd used a lighter blue! Here's all of the polishes I used, and my little practice design I did on paper first!


I used the black Barry M nail-art pen to draw the designs on each finger...


And then started filling in the gaps with the different colours, trying to stick to the design. I didn't use a little brush, just used the brush out of the bottle with each polish. I didn't need it to be too neat at this point as I was going to go over the black lines again at the end.


Once it was all filled in, I added a coat of matte polish as I find it's easier to draw on matte than shiny with the black pen.


And then I went over my lines again to tidy it up. 


I do like my pointer finger and my little finger, the other three are a bit rubbish due to me not being able to draw stars very well and the fact I smudged the bottom of the red star! But there we go :-) I took this off pretty quick, because I'd only done the one hand and I wasn't loving it.

Wednesday 28 August 2013

My Faves!

Quick post tonight because I don't have new nails to show - my Rainbow On You nails are still going strong <3

So I decided I'd share a quick pic of my "faves" box. I keep my nail varnish in three boxes and my tools (glequins, studs, brushes etc) in another. I don't sort the varnishes by colour or brand, I just sort them according to how much I use them, and this changes ALL the time. The other two boxes live down the side of the sofa, but the "favourites" box lives under my coffee table so I can get to it more easily. Here it is at the moment...


Quick run-down of what's in there... at the top there's all my Barry M gellys that I use all the time, along with my 2 LE Barry M's and my 3 glitters. In the middle are my sparkly Revlons and my Sally Hansens, including my much-used Dorien Grey and Lavender Cloud. The green I might have to move out of the box - I don't use that too much, but I only have three bottles of Sally Hansen and like to keep them all together! 

There's my w7 pastel green to the left of the Sally Hansens and I keep this here as I do a lot of mixed colour pastel designs and there's not a pale green gelly yet... There's my cheap neon orange to the left and my Model's Own neon green at the bottom, because they're summery!

Scattered about are my Claire's glitters, my Born Pretty Yogurt polishes and my new Nail Lacquer polishes, as well as a Lac Attack on the left. Lastly there's the Models Own discoball collection at the bottom - got these for my birthday and they're too beautiful not to belong in this box!

Tuesday 27 August 2013

I Will Rainbow On You - Nail Lacquer

Hello again...


Absolutely beautiful, stunning polish to show off today! This is I Will Rainbow On You by Nail Lacquer. As soon as I saw this on another blog I fell in love with it - so many glitters, so many colours, so many sparkles! You can buy it for £5.50 here. Go and buy it now!

After agonising which colour to put it over, I just went with black/dark, because I didn't want the base colour to be too bright and hide the glitter a bit.

So this is two coats of a really dark navy blue Nails Inc, that I always use when I actually want black because I don't have a black?!? (except today I got a beautiful matte black in the post as a surprise from my boyfriend <3 ....I did these nails yesterday though, before it came!!) ....anyway, two coats of dark navy/black. Once dry I added two coats of I Will Rainbow On You. One coat was definitely sufficient but I wanted moooree sparkles! I let that dry then added a topcoat of Sally Hansen's Insta-dri. Result = stunning!


I've had so many nice comments at work today, lots of people thinking these were shellac/minx/falsies/wraps and that they'd been done in a salon. Everyone loved the sparkles and I got asked more than once where I got the glitter polish from, and how I'd done my nails. My boss even said these were her favourite of all my nails that I've done. :-) so Yay! This is definitely going to be a polish I use lots, because I can't get over how stunning it is. <3 


Quick Update on the Colour-Change polish

Hello!

Quick post to update with further comments on the colour-change polish I showed you in the last post. The first day I wore this I LOVED it - I was constantly looking at my hands to see the colour of the polish and it did constantly change - with my temperature, the outside temp, washing/drying hands etc. I loved it! And most of the time they were kind of blue on the fingers and purple on the tips, which was a cool kind of gradient.


I really wanted to go on Born Pretty and buy the other colours, but the second day of wear was not so great. A weird thing happened where my topcoat started peeling off in strips! Not the whole lot of varnish, just the topcoat. That's never happened with any polish before - sometimes my polish peels, but the whole lot does, not just the topcoat. So it all kept coming off and ended up looking really tatty and gross. I decided to remove it at work because I can't stand messy nails, so I got out my nail-varnish remover pads I have in my bag. But they wouldn't touch it! :-( The polish stayed on. So I had to wait until I got home to scrub it off with acetone. Very weird.

So I'm not sure what my opinion is. I loved this polish and the effect it created, but I think its only good for one day of wear. And having to work really hard to get it off is a bit rubbish! Just things to know if people are considering getting a bottle!

Later tonight I have some fab nails to show you, I've been getting lovely comments all day but not had time to blog about them yet! Watch this space! Xx

Saturday 24 August 2013

Amazing colour-change polish!

Hello!

Today I have a really intriguing polish to show you. It's this one from Born Pretty, which is a "mood" polish - it changes colour when it's hot or cold. The one I purchased turns from blue to purple, but there are other colours available.

I've been waiting impatiently for this to arrive from Born Pretty as postage usually takes a good few weeks, but it was worth the wait. I painted on two coats, and the consistency was lovely and smooth, although the polish looks quite weird in the bottle, and on the nail when wet because it kind of has flecks of different colour in it. It dries to a more solid colour - kind of purple. 

I then went and stuck my hand in the fridge to see if it would change colour, but it didn't! I also tried putting my hand into cold water - no change. I was getting really annoyed until I thought to try with HOT water - and there was an immediate change! They went bright blue! So my hands must have been really cold to start with, haha. Here's some pics of the various colour changes...apologies about the wet hands but I needed to keep dipping in the water!

Two cold (purple) and two warm (blue)

All warm and blue...


Transitioning from hot to cold...


Dunking in hot....

Result of the dunking (repeated pic but I wanted this as my "top" pic as well!)


Amazing right?! I might just keep dunking them forever....

 
I then decided to brighten up the look by adding some neon studs, another new purchase that came in my Born Pretty order! Maybe I should have left them plain to really highlight the colour changes, but without a glass of water the changes are more subtle depending on your temperature/the temperature of the room. Anyway, here's what I added, and what the nails look like when they're room-temp/coldish...


Thursday 22 August 2013

Baby Peach Fingers!

Hello!

Sorry I've not posted for a few days, but my tie-dye manicure was still going strong after 5 days wear! I was so impressed - my use of nail envy, topcoat and trying not to pick at my polish is obviously paying off. Barry M shared the pic of my tie-dye nails on their FB page along with a link to my blog, and that afternoon I had over 1,000 views and gained some new followers - fab stuff! :-D

Today I've got a beautiful little polish to show you, made by UK Indie polish maker Nail Laquer . I've never bought any Indie polishes before, but there are so many beauties in her Etsy shop, and not too expensive either, which is always a plus for me! I picked up I Will Rainbow On You after seeing some beautiful swatches of it on Special Girl Nails, and then had a browse at the other polishes available. It was hard to choose just one more, but I eventually settled on Baby Peach (cute name right?!), which I'm going to show you today. It comes in an adorable dinky little bottle, and is just the right amount for me - I don't think I've ever used a polish right down to the bottom, so small polishes are the way to go for me.


This is three coats over bare nails, with a few coats of topcoat. 


I was really impressed with the coverage. I thought I would have to apply it over a peach-coloured polish to build it up, but I didn't need to as it's really creamy. The glitter pieces come out really easily and I love all the different shapes and colours, especially the little neon squares! I adore this polish and it's not like any other I own.

I've never ordered from Etsy before but it was so simple, and Nail Lacquer posted my polishes really quickly, and I definitely felt like a valued customer <3

There is no more Baby Peach left in the Etsy store at the moment as far as I can see, but it's "siblings" Baby Boy, Baby Girl and Baby Pear are still available, and they're also gorgeous, so go go go and buy! :-) x

Sunday 18 August 2013

Tie dye!


I'm loving tie-dye at the moment - such a blast from the past! Me and my sister tonight are going to a Popfest concert which features bands from The Big Reunion - S Club 7, 5ive, Blue, Atomic Kitten etc... we will be reverting to our teenage selves and I thought I'd do some tie-dye nails to kind of fit the theme.

As I said, I've wanted to do tie-dye nails for a while and wasn't really sure how to create the effect. I had a google, and lots of water marble techniques came up - I suck at water marble so didn't want to go down that route. I then found a technique where you painted stripes of coloured polish onto your nail then dragged a dotting tool through the stripes while they were still wet. I gave this a go but it totally didn't work - the dotting tool just scraped the polish off!

Sooo I decided to just sponge bright colours in random blotches all over my nails. Here are the colours I used, no surprise that they were all Barry M (over a base of Sally Hansen's Lavender Cloud - white):


 After the random sponging of the colours, this was the result...


I thought they looked okay, but didn't look tie-dye, really. And they looked kind of unfinished. I had another google and after looking at some tie-dye fabric, decided to add a swirl over the top with my white nail-art pen. And now I'm pretty pleased with how they look!


Saturday 17 August 2013

Update on the spikes / Sister's nails

A bit of a mish-mash post today! I wanted to post to update on my spiky nails from yesterday. I wore them for a night out, and then kept them on overnight and all day today. Last night I lost the bottom spike from each nail, but the rest stayed on pretty well, and I couldn't stop touching them!


Today, I accidentally scraped my nails across my arm and ended up with a little scrape....ahhh injured! Haha:


Sooo... spikes on nails are good for:
*Looking awesome
*Making a statement

 And not so good for:
*Doing your hair/washing your hair
*Hanging up the washing
*Stabbing your nails accidentally on your arms/face 

When I removed them just now, I saved the spikes and I definitely think I'll use them again - despite the wounds I just loved how different they looked. 

-----
Also, I saw my sister today, and she'd experimented with her new Barry M gelly polishes and created this awesome subtle gradient. I was so proud :-)


Friday 16 August 2013

Yellow Studded Spikes

Hello!


Today is my first of 5 days off work, and I'm going out tonight so I've celebrated with bright spiky nails! Ahhh I love these. I reckon I'm going to lose a few spikes though....

 For this mani I started with a base coat of Nail Envy. I think this has really strengthened and improved the quality of my nails since I've been using it under all my manicures (about a month)...  they definitely seem less bendy and flaky. I then painted two coats of the limited edition Barry M yellow. I've already used this waaay more than I thought I would! I then freehanded pink stripes on my index and ring finger on each hand, using Barry M ...erm.... the medium pink gelly - forgot the name now! 

Thennn I stuck the spikey/square studs on individually, using a dotting tool with a little blob of blue-tac on the end to pick up the studs. The fingers inbetween got a coat of the pink Models Own discoball polish. I finished off with a few coats of topcoat- Sally Hansen's Insta-dri. I especially tried to apply a lot to the nails with studs to try and keep them on!!


Thursday 15 August 2013

Phone Case Nails


Hello!

As soon as I got this phone case I knew I wanted to re-create it on nails! I've just had a doodle over the top of my ombre nails - Not sure it looks right to have such busy patterns over the top of different colours, but oh well, it amused me for half an hour! I tried to pick different sections of the pattern to recreate on each nail. I think my favourite is actually my little finger - simple but effective!

As usual I used the Barry M nail art pens :-) x