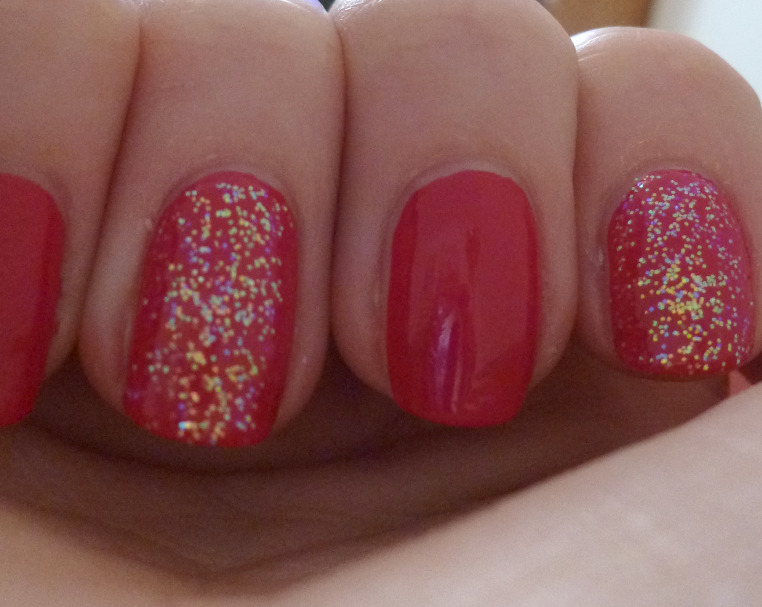
Quick post to show you tonight's nails. I've just bought two new polishes and wanted to try them both out. So here they are! The base is Barry M's beautiful Pomegranate gelly - OMG how have I not bought this before? It's such a gorgeous shade, and as usual for the gelly, soooo shiny. I can't stop looking at it!
Every alternate nail is covered with two coats of this fab holographic pearly glitter I picked up from the Claire's Accessories outlet shop in York. It's 30% off everything all the time, and the nail varnish is cheap anyway, so I couldn't resist this one. I think I paid about £1.60 for it. In these photos it's been hard to capture all the different colours it shimmers, but it's sooo pretty. I don't know the name of this- a fellow blogger mentioned recently that it's printed on the receipt when you buy it, but this just had a random code - maybe it doesn't have a name! I've not got anything like this, and I'm really loving it so far.
A few weeks ago, when I bought my pink Barry M nail-art pen, it was 3-for-2 so I picked up Blueberry (pale blue) and Prickly Pear (purple) gellys to make the most of the offer. I've practiced with my pink pen quite a lot, but I've hardly used the gellys, especially the purple. They're perfect for Spring so I thought I'd try and create something pretty!
Today I gave in and purchased the black and the white nail art pen. I'm so impressed with how they work, I couldn't resist! I wanted to use these, along with my pastel colours, to create a tribal-print mani like my amazingly talented friend Naileymabob. However once I'd done the purple and blue stripes outlined with the white pen, I decided to leave this mani well alone. A few times in the past few weeks I've gone over-the-top with detailing, and then ended up preferring my nails without all the embellishment!
I might add one tiny gem or stud at the bottom of each central stripe - but I'll do this tomorrow after I've washed my hair if I decide to do it, because washing hair always = lost studs! What do people reckon - should I bling this up a little or leave it simple?
I decided to have another go at cherry blossom nails! These were inspired by the 'skin' I have on my Firefox browser that I've had forever:
I started with a simple gradient using my unbranded pale pink and Sally Hansen's Lavender Cloud. I really loved this simple gradient and reckon it'd look fab in summer.
I then added the cherry blossoms using a brush and a dotting tool. I wish I had a brown nail-art pen, because as I've said before I really can't get the hang of using brushes - it just splodges on for me! Oh well - must keep practicing...
Hello!
I fancied having another play-around with my Barry M pen.
I painted my nails with Greenberry Gelly. Once it had fully dried, I attempted a paisley design, starting from my index finger. Then I realised I was rubbish at drawing and being neat, so gave up after one finger! I just doodled and tried out different designs on the other fingers. I've realised that simple things like spots and stripes do tend to look better!
I think the pink is a little bit too see-through, and I used a too-bright base colour. Maybe over white it would have worked better!
This design has already gone (as I only did one hand!) and I'm working on something else for this week's challenge, that I'll post tomorrow. :-)
Tonight's manicure was inspired by my friend & colleague Jenny, who had done herself a beautiful white-tipped french manicure for work earlier this week. In a spare moment, she tried using Barry M's Greenberry on the tip instead, to see what it'd look like. And I thought it looked fab! So that's what I went for today.
I decided that I wanted to add something else. I first tried adding a pink line on the 'join' with my new Barry M nail-art pen, but I didn't think it looked quite right - I couldn't get it as neat as I wanted, so quickly wiped it off before it dried (I love that you can do that!)
I then decided to add some studs. I am a firm believer at the moment that studs make everything better! My first idea was the little row of tiny gold studs, but I wanted a bit of variation. Using my wheel of studs from Born Pretty, I picked a little selection. I used a tiny blob of bluetack on the end of a dotting tool to pick each stud up individually, and stick it down onto a wet top-coat. This was quick and easy to do.
I'm pleased with this look, I'm just not sure if it's a bit over the top and blingy.... I do love it though! It reminds of Bollywood for some reason - must be the colour and bling.
What do you think? x
So I noticed today while leafing through Look Magazine in WHSmiths that they've used another of my submissions - YAY! :-D
I reckon they only keep featuring mine as it's easy - they already have a pic of my face! There are so many fab manis that have been submitted on the website, so this can be the only reason they keep picking mine. Still, it makes me happy!
Here's the original blog post for these nails if anyone is interested.
Woo :-D
Ahh - I've had to try to get something done for this week's challenge, before it's time for next week. I thought 'inspired by a colour' would be really easy - I could just do anything at all and say a colour inspired it. But I didn't want to cheat, I wanted to actually be inspired. Trouble is, I wasn't! I've been really busy with not much time for nails :-( My friend Bob prompted me by giving me a colour - gold. I had some exciting ideas for this, using gold glitter, my gold chain nail stickers and some gold studs. However, when I actually sat down to do them tonight I wasn't very inspired, and this is all I could come up with. I was conscious of not making them too OTT for work and I think studs/stickers etc would have pushed them over the edge. So I know these are boring and unoriginal, but they will do for the challenge. I will try my best to have something better for tomorrow to show you (not on this theme though - too hard!!)
Tonight I used a random unbranded gold.... I definitely need a better one - this one is way too sheer at 3/4 coats. For the gradient I used my Barry M gold glitter which is fab and a mixed hex glitter by Saffron which has pink, red and blue bits as well as gold chunks.
Hello!
I wanted another work-safe design - something neutral. But I still wanted to play with my pink Barry M pen! So this is what I came up with.
The base nudey colour is called Tip Toes and is by No7, a shade I rarely use but thought it would work well with the pink. I then used my pen to outline each nail. This was really hard to do with my non-dominant hand! The pink is a tiny bit see-through, so I went over each outline twice to make it stand out more. The pen dries really quickly so this was simple enough to do.
With the pen, you can top-coat almost immediately without it smudging, which is great because with the squeezy nail-art pens I end up waiting ages before adding a top coat, and then sometimes it still smudges! Here I've used Sally Hansen's Insta-Dry as usual.
Also, as you can see, my thumb nails have gone tiny! They were splitting and breaking and gross, so I just decided to cut them down and take better care of them as they grow this time. My nails really don't like my job either - in the winter they were better protected under gloves, but over the past few days when it's been warmer, I've been gloveless and the nails have been getting chipped all day long - sad times :-(
I did these nails this morning before work, and tonight they're all scuffed at the ends, with a slight chip to my index finger which had to be filed down. I thought I'd touch them up, and at the same time add a matte top-coat to try and hide some of the imperfections. I think it just ended up showing them more, but here's a pic anyway:
Sorry about the state of my hands, just going to moisturise now! x
I have gone back to basics for work tomorrow. I had no idea what I wanted to create, but I wanted it to be something simple, with muted colours. With this in mind, I started with a base of Barry M's Lychee... still love that colour! I then had a look at my other polishes, and Papaya, the orange gelly, stood out most. I used a make-up sponge to dab on a gradient.
In these pics, the 'join' and sponge marks are really obvious. In real life it appears to blend more seamlessly.
I was going to add some studs, but I didn't want to overload the mani. I might add some tomorrow if I can decide how, where and which ones to use!
I still need to do this week's challenge mani (inspired by a colour) but at the same time, keep it work-friendly. I'm not going to cheat and say this one is it, because it really wasn't inspired by a specific colour, just the need for it to be not too in-your-face. I'll have a think and see what I can come up with later in the week... probably going to be inspired by pink - because I love pink!
The pics also really don't capture how bright the orange is and how pale the cream is. Ahhh. Here's some more anyway:
Ask A British Nail Blogger: How do you store your polish?
I thought I would take a few quick pictures to answer this question! Firstly, I don't have loaaads of polishes, although since I began this blog my collection has been expanding rapidly, with new bottles bought more or less every week. By following other blogs I'm constantly learning about new brands, tools or accessories that I should look out for, and I'm trying not to let myself spend too much. I don't like spending more than about £3 on one bottle of polish - I'm cheap! I like 3-for-2 deals where I can get more for my money, unless it's something really special (like my new Sally Hansen Big Money!!)
I used to keep all my polish and tools in one box. I then acquired some polishes from a friend, meaning one more box, which I also started to fill up. Soon I had three boxes full, and more.... here is my stash:
This is what you're seeing left to right...
1. My 'boxed' kits. I've had these bought for me as people know my love for nail stuff! I don't buy expensive brands for myself so it's nice to get them as gifts. There's the Bling It On Feather set by Nails Inc and the Ciate Caviar set, both from my boyfriend. At the back there's a Rio Nail Art kit I got for christmas with a few useful bits in depending on what I'm doing!
2. This is my toolbox(/old biscuit tin)! I decided at the beginning of the year that I needed a separate box just for tools and 'extras'. In here I'll find my brushes, nail art pens, studs, rhinestones, striping tape, glequins, sequins, loose glitter, stickers, sponges and nail files, scissors, clippers etc. At the top are my base/topcoats which also live in this box at the moment due to there being no room in the other 2 boxes. And now I always know where to find them!
3. The pink plastic box used to be my only box! I now use it as a box for my favourite/most-used polishes. In it at the moment are all my new Barry M gellys, my Sally Hansen's, Seventeen, a few Accessorize polishes, and quite a lot of my glitters.
4. This is my over-flow box, containing polishes I'm not currently obsessed with. They're all useful colours and I use them occasionally in different art, but don't use them regularly. I've used the lid as an over-flow in this pic, these are usually just piled on the top when the box is closed.
So that's about it! I don't sort by colour or brand (although I like keeping my Barry M's all together cos they look nice!) because I don't have the room, and I also have so many different brands it'd be difficult to use that to sort them by.
^ I keep the toolbox and the box with my 'most-used' polishes under the coffee table in our living room so they're always to hand. The over-flow box is hidden behind the sofa, and the kits are in the bookshelf. Our house isn't massive and I'm aware that my boyfriend doesn't want my nail stuff everywhere, so I try my best to keep it neat and tidied away!
There are definitely some polishes in the 'rarely used' box that are exactly that - but I daren't throw them away in case they might come in handy in the future! I am going to try to be ruthless though - I don't really have the space to expand to a fourth box!
Have a look how other British Nail Bloggers store their stash (probably a lot more organised and neater than mine...)
Hello!
Yesterday I finally managed to get my hands on one of Barry M's new nail art pens. I know, a few days late to the party, but I've been at work and yesterday was my first chance to go shopping. I didn't want to get all the colours straight away as they're £4.99 each, so I decided to just go for the pink to see how it worked, before deciding if I wanted/needed the others. I have squeezy nail art pens in black, white and silver, but not in pink, so thought this would fill a gap!
As it was 3-for-2 in Superdrug on Barry M nail stuff, my sister persuaded me to pick up two gelly colours I've liked for a while but resisted buying because I have similar shades in my collection already.... Blueberry and Prickly Pear. So glad I bought them, so shiny, and lovely pastel colours for spring.
I took off my Spice-Nails last night, and painted my nails with the blueberry, with an accent nail on each hand in prickly pear. Beautiful colours! I waited til this morning before playing with the pen as I'd read your nails need to be totally dry before using the pen, which makes sense. I had no idea what designs I wanted to create, so just went for a bit of a mixture to test how the pen works. It's really different to a normal nail art pen! I know others have said this, but it just literally draws like a felt pen or gel pen. I kept realising I was trying to squeeze the bottle and press down for it to come out, but you don't need to do this. It comes out in a continuous, steady line and doesn't blob. Fantastic!
I found that the pink could be a bit sheer - it didn't give total coverage and looked a bit patchy sometimes. But I reckon this could be sorted out by adding a second layer once dry, or using it over a colour that wasn't as bright as my blue. But this is a very very minor point, and obviously won't be an issue with the black (and maybe the white)
I found as well that if you make a mistake, you can just wipe it off without messing up the nail varnish underneath. You have to be quite quick to do it before it dries, but it does just wipe off if still wet.
I loooove this pen. I now just need to think of lots of ideas in how to use it. It's definitely going to make my nail art neater, and I'm seriously going to consider getting one (or more!) of the other colours. In the photo at the top of this post, I finished off with a matte top-coat. Here's a few photos before I did so... my favourite designs/doodles are on my ring finger and little finger.
I've edited this to add another pic - finally got round to doing a design on my left hand too - much harder to keep a steady hand as I'm left handed!
I suddenly decided to do these nails today after one of my zebra nails got badly chipped at work so I had to take them off! Sad times, I did love them.
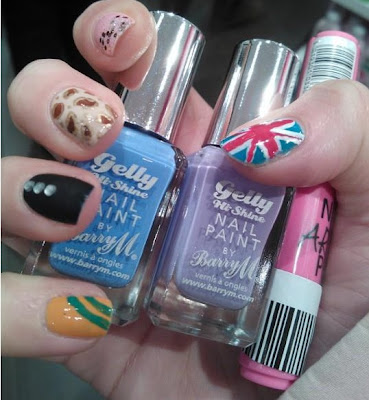
Tomorrow I am going to see Viva Forever in the West End with my sister. Excited! We love going to see shows, and we loved The Spice Girls back in the day, so it'll be fun to see something new but with familiar songs. Like I said, I wasn't planning on doing special nails for the occasion, but I needed to do something as the zebra was gone so here are my Spice Girl nails!
Obviously I've tried to base each nail on each Spice Girl (it helps that there were five!). I used so many polishes, here they are scattered all over my table, a complete mix of brands:
I think my favourite nail is the black matte one with the silver studs (Posh Spice) - might do this as a full mani one day. My least favourite is definitely the Union Jack (Ginger Spice) - my freehand/brush skills are shocking - I do try to keep away from using brushes and stick to nail art pens, but I didn't have a red nail art pen :-(
I think they look a bit of a mish-mash, but they will do for tomorrow!
Hello! Week 15 of our challenge asked us to create black and white nails. My grey studded nails from earlier in the week had lasted really well and I was sad to take them off, but they were starting to peel/chip slightly at the edges so it was time for black and white! I didn't really have any creative ideas so decided to go with something I knew I could do - zebra print! I've only tried this once before, but it turned out quite well.
I wish I had had more time to think of a better or more original idea, something new to try, but I've been working for 5 days and still have two more to go. I think these nails are totally NOT work nails, so I will have to hide them in gloves when I can for the next two days... they stand out way too much! Ooops. But I think anything on the black and white theme would.
For this manicure tonight I used two coats of Seventeen's white as a base (which I think is running out - boo) and my black nail art pen that I got from topshop to do the lines. It's really tricky to squeeze the pen and draw at the same time, and prevent blobs. My left hand (I'm left handed) is not great but I've included pics anyway. I've finished off with my matte top coat. It's smeared the black a bit, which I kind of knew would happen, but I wanted to see what they would look like matte! You can see before/after matte in some of the pics.
I can't wait for the Barry M nail art pens to come out, to see how they differ from the squeezy ones. I've decided I'm definitely going to buy the pink, and see how I like it. Exciting stuff!
My right hand with matte top coat:
My left hand without top coat and without as much neatness:
What do you think? Can't wait to see what the others come up with for black and white! X
I painted my nails grey (dorien, obviously) yesterday ready for my 7 days at work. My uniform is grey, so thought that this would be a nice neutral look. However, I've had some time today and couldn't resist blinging them up. I wasn't going to do much at first, as I still wanted them to look subtle. But once I had studded one nail, I had to carry on!
I love studs on nails! I'm so glad that I bought my little stud wheel from Born Pretty, because I've still got loads of different shapes and sizes to use in different designs. And there are so many, especially of the small ones like I've used today.
I stuck on each stud individually, by painting a thin coat of clear topcoat on the nail. I then picked up each stud using a dotting tool (a pen or cocktail stick would work too) with a tiny blob of bluetack on the end. If the stud went down in slightly the wrong place, I could nudge them slightly with the dotting tool to line them up as I wanted.
I created the gold gradient on every other finger using my Barry M glitter. I finished off with a coat of Sally Hansen Insta-Dri, and I might add a further coat on the studded fingers, to stop them pinging off! I've just ran my fingers through my hair and one got a bit caught, so I'll definitely be adding that second coat.
I do love this look! It might be a little OTT for work, but hopefully it should be okay.
Also I've been looking at KBshimmer polishes today, and I want them ALL so badly! They're so beautiful, but I can't justify spending all that money on my nails.... can I?