My nails today are refreshing and summery! I've wanted to use nude with neon for a while and I came up with this design - and I love it! I was initially thinking of adding a leopard print design either over the neons or over the nude, but I liked the 'fresh' look of them without so left them plain.
The base is Lychee by Barry M, and the two neons are Beach Bag (orange) and Sun Hat (pink) from the Models Own Polish For Tans collection. They're stunning colours! I did the chevrons using template vinyls from She Sells Seashells.
Hello!
Quick post today to show you what I'm currently wearing on my nails.
I used single chevron vinyls from She Sells Seashells to create the negative space. I used tweezers to place one chevron vinyl on each nail, then painted over the nail in black (Nails Inc, Kate Spade). Usually I remove the vinyls immediately, but this time I let the black dry slightly, then painted over the top part of my nail using Crowley by Pretty Quirky. This glitter is one of a one-off duo I won in a giveaway held by Pretty Quirky, and it's absolutely stunning! These photographs definitely don't do it justice. Crowley is a rich mix of different coloured tiny glitter, tiny flakies and just general gorgeousness.
I'm pleased with the finished manicure, it looks quite understated from a distance, but the negative space gives it an edge - and I can't stop looking at the pretty glitter under different lights! <3 I also can't wait to use the second glittery polish I got in my giveaway prize!
Hello!
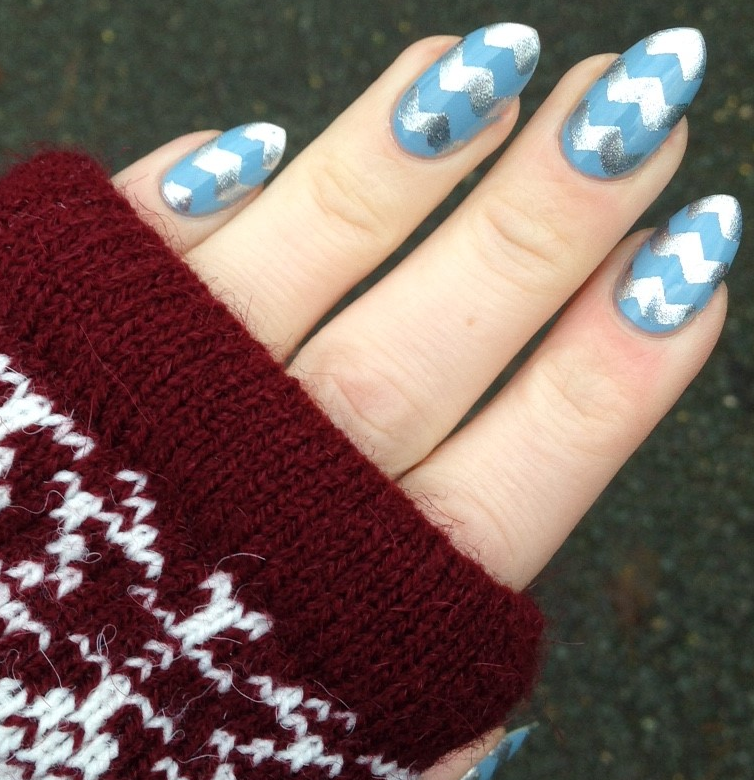
I did these nails a few days ago as I wanted something wintery for when I went to Winter Wonderland in Hyde Park. I wasn't sure what I wanted to do - I was initially going to do a gradient with some snowflakes over the top, but I did that last year and wanted something a bit different. I eventually settled on this design.
I started off with two coats of Elderberry (the blue) by Barry M, and topped it with Sally Hansen Insta-Dri to speed up the drying process. I then left it for about an hour to make sure it was really dry.
I then took my zigzag chevron vinyls from She Sells Seashells.These are like stickers, and I used tweezers to put a set of five chevrons onto a nail, using the pointed tip of my nail as a guide. I then peeled off every second vinyl, and filled in the gaps with a silvery foil polish that I got in last years' Ciate calendar (and I'm loving this years' too so far!!) ....I removed the remaining vinyls carefully with the tweezers, then topcoated.
It took a while to do this design on all my nails but the overall effect is really striking, I love them!! The contrast between the reflective silver polish against the duller blue is really pretty and keeps catching my eye.
On Fridays, if we both have time, myself and Laura from Naileymabob decide on a theme and both create a nail look based on whatever we've picked. This time, we decided to do things slightly differently; we decided to pick a mani by each other and try to re-create it!
I spent some time going through Laura's Instagram, and came across loads of manicures I wanted to recreate. However, I had to consider that I'm back at work for a 7-day stint from today so I had to rule out some of the brighter and bolder designs, and go for something in paler, more subtle shades.
The manicure I picked to recreate was this one, done 12 weeks ago according to Instagram. Me and Laura live at different ends of the country so hardly get to see one another, but I did actually see this mani in real life when we met up and I remember really loving it - it looked so stylish and clever!
I know that Laura used a gold glitter from Freckles Polish for the chevrons, but I didn't have anything similar really - the only full-coverage gold glitter I own is a chunky, textured one called Charm Bracelet by Seventeen. I do love this polish but wasn't sure how it'd work underneath a smooth polish....
For the peach, I initially wasn't sure if she had used Peach Melba by Models Own or the slightly oranger Papaya by Barry M....I settled with Peach Melba because I love it! After doing the mani and looking back on her Instagram again I realise that I think the polish actually was one of the Models Own 'Polish For Tans' shades - ahhhh didn't even consider that at the time!
The first time doing the chevrons went SO WRONG! I started off with a base of the glitter, and when it was dry (I added gelous to smooth it but it was still pretty rough!) I applied chevron stickers. This is where it started to go bad! Due to the textured glitter, the chevron stickers wouldn't stay stuck down and kept lifting off. Also, the peach (which I was using over the top) wasn't thick enough in one coat to create neat chevrons. All in all it looked rubbish so I ended up taking off the two middle nails and starting again!
This time, I started with a base of peach and added the gold chevrons over the top. I didn't want to do it this way as Laura had obviously used the gold first and I wanted to stay true to her mani, but at this point I didn't have much choice! I also added more Chevrons than Laura did as my nails are a bit longer.
Above you can see the mani of mine that Laura recreated - my gradient leopard print! I love her version and how it looks on her nails. We didn't tell each other until just now which mani we had picked to recreate, and it turns out we both recreated the ones we had worn on the same day back in summer. We are so psychic! Here's the original pic from 12 weeks ago of us wearing the manis together.
And here's my finished 'recreation' mani! I even copied the hand pose ;-)
Hello!
I've wanted to have another play with my chevron/zigzag (never sure what to call them!) vinyls from She Sells Seashells for a while, and when I saw a manicure on Instagram by @memyselfandmynails I was inspired to do a similar manicure.
I painted my two middle fingers white, using Snow Me White by Sinful Colors (two coats). I painted the rest of my fingers pink, using Pink Veneer by Models Own, hypergel. I've used more than half of this bottle already, and it's starting to go a bit gloopy :-( It's such a lovely shade, but can be a bit difficult to apply!
Once my two middle fingers were completely dry, which I helped along with a quick-dry topcoat and also waited a while - you need to do this as the chevron stickers are very sticky and if your polish isn't fully dry it will just peel off along with the stickers when you pull them up!
For the chevron finger, I placed a block of 6 chevron stencils over my nail, and then removed every 2nd one using tweezers. I did it like this so there'd be an even gap in-between! I then painted over the gaps with pink, then immediately removed the remaining chevrons.
For the flowers, I used a large dotting tool that I won via the amazing Naileymabob from Models Own, and then a smaller dotting tool for the leaves. The dots in the middle I made with a white nail-art pen.
I think this was such a simple look to create, but I adore it! I hope it's subtle enough for work as the colours are pale and there's not a pattern on every finger..... or am I just delusional that these are "plain"?! Ha ha I don't care because they're prettyyyy! I'll just have to keep my hands in my pockets all day....
Hello!
Two manis in one to show you today, that I did yesterday. The first one I created using both my new MoYou Nails stamping plates (sent for review) and my new Chevron Vinyls (bought from She Sells Seashells).
I used Naked Glow (Models Own Hypergel) for the base, two coats. Once dry, I stamped my little finger with a detailed pattern image from one of the MoYou plates, using Passion Fruit (Barry M). I found it quite tricky to get the stamp at the angle I wanted, and for it to cover my whole nail and it took several attempts, but it's all good practice! Unfortunately the 'large' images on the plates I got are too small to cover my whole nail, as they're too long! I will have to look at buying some extra-large ones because I do love the effect it creates.
I love the patterns on the plate, they're so pretty and intricate, and I'm looking forward to trying out more of them in different ways so keep your eyes peeled!
On my index finger I turned to my zig zag vinyls as I was so eager to try these! I decided to stick a row of six straight onto my nail, fully covering it, then peeled every second one off to make sure there was an even gap between each one. Not sure if this is how it's 'meant' to be done but I don't think I'd have got them even if I'd placed each one separately! I painted over my nail with Passion Fruit then removed the vinyls carefully with tweezers. I left it to dry before topcoating but it still smudged slightly - as did the stamp - booo! The smudging does look worse in these pictures than in real life though!
On the rest of my fingers, I took some of my gold circular studs, but didn't think these really matched, so I laid them on a bit of ripped-off newspaper and painted them with Passion Fruit too. Once these dried I stuck them to my remaining nails using wet polish to attach them, and topcoated to keep them in place.
I loved this mani, but as I was at work today, I decided it was just too bright, so after wearing it for the afternoon I reluctantly removed the studs and the chevrons and started again on all these nails. I re-painted them with Naked Glow, and once dry I added pointed french tips with Passion Fruit. For this, I used a small nail art brush (pictured above) but actually worked out I could have just done it with the brush in the bottle (as I had to re-do one just now after the polish cracked at work when I trapped my finger - was lucky my nail didn't break!!!).
Here's the adjusted mani, which is definitely less 'in your face' and I do like the simplicity of the tips, and the way the red looks sooooo bright against the nude. I love this colour combo! And I had to keep the stamped little fingernail as it took ages!
I bought Barry M's new gelly, Guava, last week and took the opportunity today. I was going to do a gradient, but I've done quite a few of those recently, so I decided to go for something I've not tried before - chevrons! As usual, I used the Barry M pens for the detail here.