Saturday 28 February 2015

Full Pastel Gradient

Hello!

Again I've not had much time for posting due to my work. However, here's some pictures of a manicure I did a few days ago. I've wanted to try a full pastel gradient for a while now - where the gradient goes across all of the nails on the hand. I used my usual gradient method and the polishes I used were:

Banana Split by Models Own (yellow)

Peach Melba by Models Own (peach)
Strawberry Tart by Models Own (pink)
Grape Juice by Models Own (purple)
Powder Blue by Models Own (blue)
Sugar Apple by Barry M (green)

...if I'd had all of the Models Own Fruit Pastel collection I would have used them all as they're the perfect pastels, but I don't have the blue and the green so had to substitute them with one of the new Hypergels and a Barry M gelly, but I think they still looked nice together!

If I'd not been at work I would have added a single silver stud at the base of each nail I think, which would have finished the look off nicely. But I still love these! 


Sunday 22 February 2015

Nails Inc - Alexa

Hello!

Another quick manicure to show you. I've not had as much time as I'd like to do my nails or post here this week as I'm in the middle of a 7-day-stretch at work. I do have some pretty nails planned for my days off though (if they turn out okay!). 

My boyfriend surprised me last week - he said I was going to have a parcel delivered, and when it came it was this amazing Nails Inc set designed by Alexa Chung. Inside there's 6 gorgeous full-size polishes. There's a navy, a nude and a grey, and a holo glitter. There's also two clear polishes, one full of hearts and the other full of stars. It's great to see a mainstream brand use different shaped glitter and I was so happy to own the set as I've admired it online for ages! Also in the set there was a quilted bag to keep the polishes in, and a nail file. I never buy myself expensive polish sets but I like it when other people buy them for me, they feel like such a treat! <3


Anyway, I was desperate to try the hearts/stars but wasn't sure how I wanted to use them. I also didn't have much time to do my nails so I decided to save the shaped glitter for another time, when I had a manicure planned around them. Instead I reached for the grey polish, which is called Winter Lilac. It's an absolutely stunning shade, and only took two easy coats to be opaque. The brushes in these polishes really impressed me, they were wide and curved at the tip so you could practically paint each nail with just one swoosh of the brush! I was a bit worried about the chunky silver lids of these polishes - although absolutely stunning this style of lid is usually difficult to hold. However it was fine because the lids pulled off revealing a smaller screw-top lid underneath - much easier to grip/turn!

I painted the tips with the holographic glitter polish (just called holographic) which is also stunning - I love the tiny glitter particles. It goes so well with the grey! The overall finish of these was quite subtle so I added a studded accent nail with silver studs to match the glitter. 

I love that this set gives a nod to trends that a nail artist would appreciate, like shaped glitter pieces and holo polish. I also like that the shades that come in the set are classic, yet not too predictable - I'm glad there's no reds, as that is too predictable! Can't wait to try out the other polishes!

(Winter Lilac on it's own before I added the glitter and studs!)

Friday 20 February 2015

Negative Space Chevrons

Hello!

Quick post today to show you what I'm currently wearing on my nails.


I used single chevron vinyls from She Sells Seashells to create the negative space. I used tweezers to place one chevron vinyl on each nail, then painted over the nail in black (Nails Inc, Kate Spade). Usually I remove the vinyls immediately, but this time I let the black dry slightly, then painted over the top part of my nail using Crowley by Pretty Quirky. This glitter is one of a one-off duo I won in a giveaway held by Pretty Quirky, and it's absolutely stunning! These photographs definitely don't do it justice. Crowley is a rich mix of different coloured tiny glitter, tiny flakies and just general gorgeousness.

I'm pleased with the finished manicure, it looks quite understated from a distance, but the negative space gives it an edge - and I can't stop looking at the pretty glitter under different lights! <3 I also can't wait to use the second glittery polish I got in my giveaway prize!


Monday 16 February 2015

New HyperGels - Do They Gradient?

Hello!

So I know with new polishes I often see the question "Do they stamp?". Well, I'm not into stamping when I do nail art, mostly because I'm not very good at it! What I do enjoy (as you'll probably know if you read my blog regularly) is gradients. So as soon as I saw those three paler HyperGel shades by Models Own (reviewed in my last post) I knew I wanted to try them out as a gradient.

I wouldn't necessarily have put all three of these shades together in a gradient - I knew the pink and blue would look good as they were both so pale but wasn't sure about including the peach as it was a bit of a darker colour. However I went ahead with all three just to see what they would look like. At first I thought it looked awful, but I persevered and I'm really happy with the result!

For gradients it helps if the polishes are really pigmented so you don't have to sponge on loads of layers to build up the colour, so these hypergels were perfect.


I used my usual method - started off with two coats of the 'base' shade (the lightest of the colours to be used in the gradient usually) which was Powder Blue. Once dry (I used a fast drying topcoat then waited overnight) I painted the three colours (the other two are Long Beach Peach & Paradise Pink) onto a small wedged make-up sponge, and dabbed them onto each nail. I did this a few times, moving the sponge slightly higher/lower each time to blend the colours. A topcoat smoothed it all out. 

It looked lovely on its own but I felt like adding something and I've not used my pretty studs for ages! I'd just bought a new stud-wheel from Poundland which had these gorgeous big silver diamond shapes in, so I used those. On an accent nail on each hand I added some pastel studs in matching shades to the gradient, then some gold studs to finish it off.

I really like these! 


Sunday 15 February 2015

Models Own Hypergels - New Shades

Hello!

A very exciting post today. One of my most favourite polish brands ever, Models Own, sent me five of their ten new HyperGel shades that have just been released for Spring. HyperGel polishes are super-glossy with a gel effect finish - they are supposed to look as if you have had a gel manicure in a salon! 

The ten new shades are a mixed bunch, some are pastel shades and some more vibrant, but are all worthy additions to the HyperGel family.


(pic copyright Models Own)

These polishes retail at £4.99 and are available to buy now, online at www.modelsownit.com, in Models Own Bottleshops and in selected Superdrug and Tesco stores.

The ones I received to review were Purple Orchid, Long Beach Peach, Tropical Green, Powder Blue & Paradise Pink. I have not used topcoat in any of my swatches.


I'll start by showing you the two darker colours. 


Purple Orchid is a rich purple, that appears rather darker on the nail than on the shiny bottle-top. I used three coats, and it builds up nicely. The texture is slightly more gelly-like than the pastel colours I tried, but application was smooth and even after the first coat. A lovely sophisticated shade. 


**********


Tropical Green is next. Before I even read the name for this polish I thought it looked very tropical, and would be a great shade to wear on hot summer days. It'd also be great for halloween - it reminds me of slime! This polish had a very jelly-like consistancy, and was much more see-through than the other shades. I used three generous coats, and it was still not fully opaque - from a distance I don't think this would be too much of a problem though!


 **********

Now on to the pastel shades. I love a pastel polish, and own sooo many already! I was very interested to see how these new Models Own offerings would compare with my current favourites, so I've also added comparison pictures with other polishes that I use regularly as my go-to pastels.


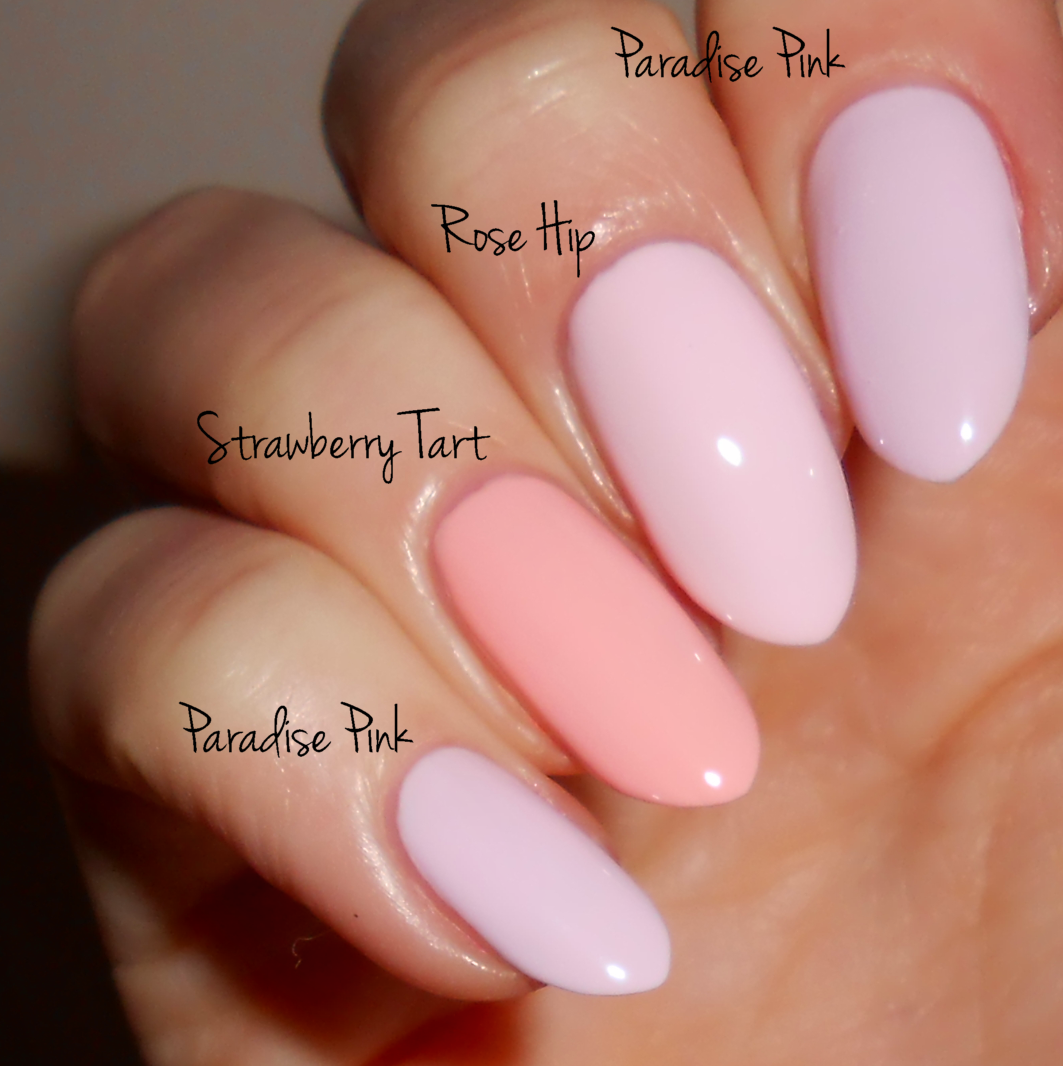
Paradise Pink is a beautiful pastel pink, very very pale. Application was wonderful - the polish is so smooth and creamy. I used three coats but could have just gone for two. This is a beautiful colour and very 'me'.


As soon as I saw this on my nails I thought it was very similar to Rosehip by Barry M. I've used that as a comparison along with Strawberry Tart by Models Own.  As you can see, Rosehip is very similar, but Paradise Pink is perhaps a little more of a dusky pink. I prefered the formula of the Hypergel rather than the Gelly in this case which surprised me! Strawberry Tart is much brighter in comparison so not really a dupe. 


**********


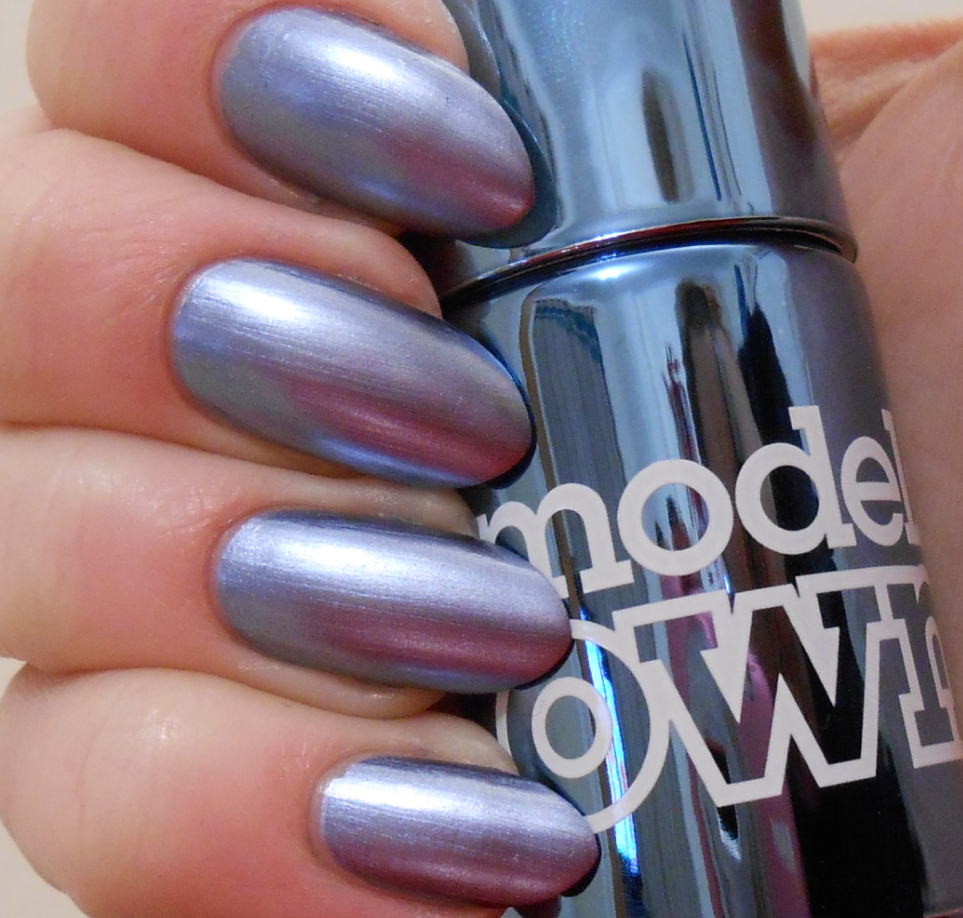
Powder Blue I would describe in a very similar way to Paradise Pink (above) in application and appearance. So smooth and creamy and perfect. Just two coats here. I love it!


I compared this with Barry M gelly shades Elderberry & Blueberry. Unfortunately I don't own Blueberry Muffin from the Models Own Fruit Pastel collection or I would have included that too! Elderberry is much more of a pigmented dull grey-blue. Huckleberry is quite similar, but lighter and paler. Again, I prefer the formula of the Hypergel and I think Powder Blue will easily take over as my favourite pastel blue shade. 


**********


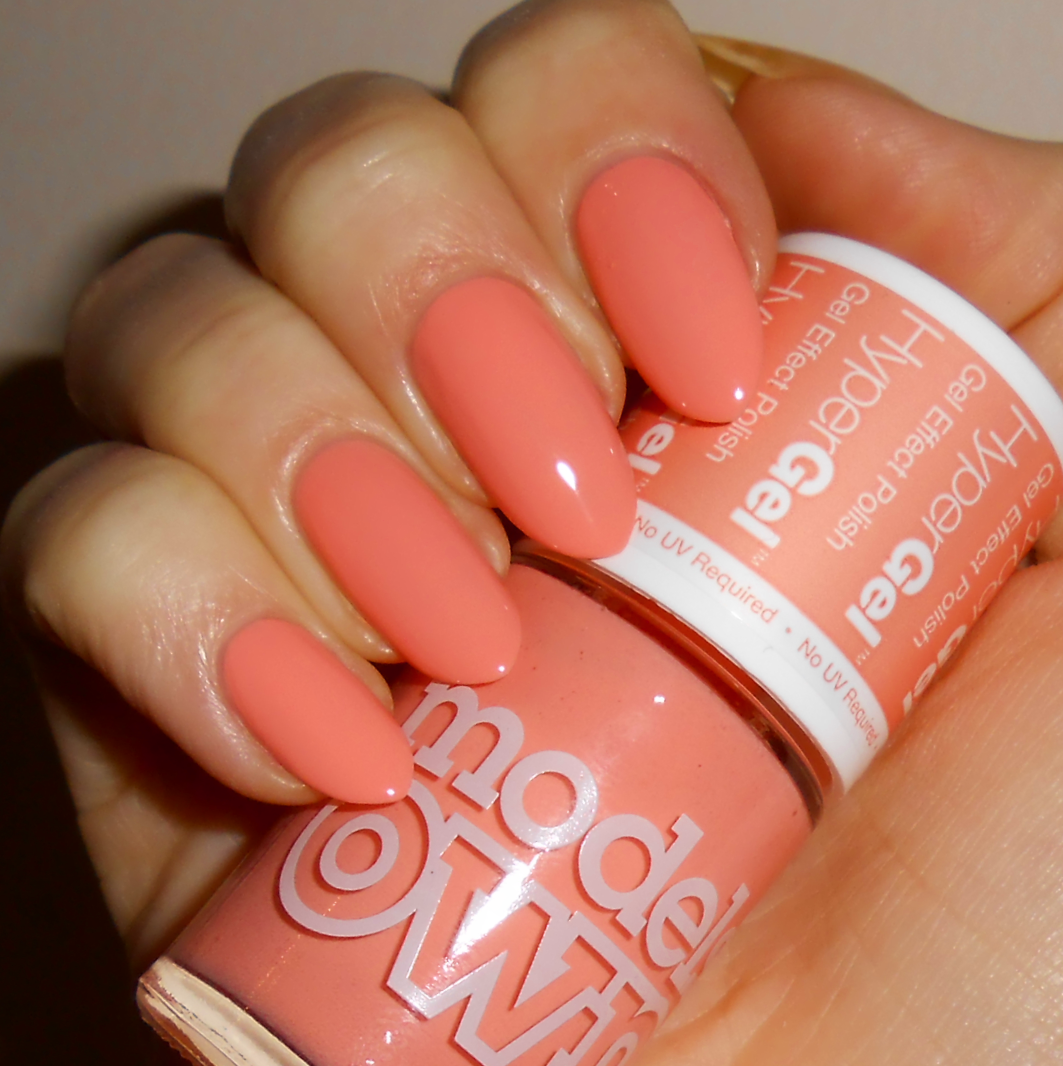
Long Beach Peach is a stunning peach. I used three coats for full coverage. I think that this one is absolutely an ideal shade for spring, it's so fresh! I'm loving peach nails at the moment.


I compared this to Barry M Papaya and Models Own Peach Melba.Papaya is much darker, and I'm glad to see that Peach Melba is quite different too - more yellow toned, with Long Beach Peach being more pinky. I like that they're different because I love them both!


**********

Overall, I think all 5 polishes are great. Lovely smooth application and I really loved the high-shine effect once they dried. My favourites are the three pastel shades. I thought the formula was slightly better on these - more creamy and opaque more quickly. Also as I mentioned above I'm a sucker for a beautiful smooth pastel shade, so these three are right up my street!

Powder Blue has to be my absolute favourite.

I'll be posting again tomorrow to answer a very important question: "Do they gradient?" Haha. Gradients are my most favourite type of nail art to create and I'm desperate to use these pastel shades and see what I can come up with, so check back tomorrow!

Friday 13 February 2015

Heart Tips for Valentines


Hello!

Okay, this is going to be the last time I do this design I promise! But when I had the striped version on my nails a week or so ago I wasn't very pleased with the neatness of my stripes, and I got thinking whether the design would look good without them. I decided to use black, white and red as I thought they'd look really striking together. I couldn't decide whether to do a black base with a white outline around the heart, or a white base and a black outline. So in the end I decided to do both!


I used the Kate Spade Nails Inc black, and my new Barry M white, Cotton. Let me just say that Cotton is beautiful and perfect, I'm so glad after it took me a while to find/buy it. The red is my beautiful Dior polish that I got for Christmas. I've described in more detail the steps I went through to create these nails in my other post (link above) if anyone wants further info on how to do them! Here's a picture I remembered to take mid-way through the design... (on the black nails I did the heart first in white before going over it with the red to make the red stand out more!)


I loooove the overall effect of these when finished, I think they're much better and 'cleaner' looking than my striped ones. I can't stop looking at them! For an extra dimension to these I also added gold underneath the tips!


Thursday 12 February 2015

Models Own Chromes: Indigo and a gradient.

Hello!

I'm posting today to show you the second Colour Chrome shade I bought in the Models Own sale. I only bought two after looking carefully at a lot of swatches and deciding which would be right for me. I used to buy lots from a new collection and then only end up using one or two, so I'm glad I've been more sensible this time - these colours are perfect for me and I love them both! See my previous post for swatches of the other shade I bought, Rose.

So this is Indigo! Again, I used two coats. Careful application is key with these. I started off by buffing my nails to make sure they were smooth. I don't usually buff them as I think it thins them and makes them a bit weaker, but for this polish it's kind of important to have a really smooth base. I didn't use basecoat or topcoat as this effects the overall look.

When applying the polish I tried to use three smooth brush-strokes per nail, one at each side and one down the centre, to keep the polish non-streaky. The polish dries quickly so I was able to apply a second coat straight away! Here it is:


These are so hard to photograph!


After one day of wear I decided to make these more interesting and turned to my favourite type of nail art - the gradient! I was very interested to see if these polishes would work in a gradient and if the colours would blend.

I did the gradient in my usual way, painting both colours onto a make-up sponge and dabbing the colour onto each nail, repeating a few times to build up the colour. 

I loved the finished result, I thought it kind of looked like a colour-change polish. The chrome effect definitely added a new dimension to gradient nails. I thought they looked as if they'd gone rusty at the ends. A friend at work said they looked like mermaid nails!

Wednesday 11 February 2015

Gelly Stress!


Hello!

Today I'm not showing off any nail art, I basically just want to rant about my stressful shopping trip (and show you what I eventually bought!!)

So as many of you will know, Barry M have recently released two sets of new polishes. There is the Speedy Quick Dry collection which consists of 9 pastel shades that dry quickly. The bottles look so cute with chequered lids and I was tempted to get a couple when they were released, but after looking at a lot of swatches I decided against it - all the colours were similar to ones I already own, and "quick dry" isn't really something I'd look for in a polish as I always use quick-dry topcoat over my manicures anyway so it doesn't matter if the underneath polish dries quickly or not! I did love the colours though, and the fact they apparently have a wider brush with a curved end, and the lid patterns! I think I have been very good not letting myself have any!

Now onto the second release; three new gelly polishes. I adore the Gelly range and along with Models Own Fruit Pastel it's my favourite range ever! The three new colours released are a pale pink, a sky blue and a white (slightly off-white)? I liked the pink and blue but again, I own very similar colours already. However I was very interested in the white shade, which is called Cotton. I've been looking for a new white since Boots stopped stocking Sinful Colors - their 'Snow Me White' was perfect! I know I get on with the formula of gelly polishes so I knew Cotton would be my new go-to white. I also needed a new bottle of Sugar Apple as mine has run out. 

I patiently waited until today (11th Feb) when the new Barry M polishes were supposed to be released in Superdrug. They weren't due to be released in Boots until 18th Feb, but I popped Boots first before I went to Superdrug (better points system!!) and was pleased to see they DID have the new polishes - well, they only seemed to have Cotton from the new gellys, which suited me fine. As a bonus, there was a sign saying it was 2 for £6 on all gelly polishes until the 17th Feb. Perfect, so I thought, and picked up Cotton and Sugar Apple. However, at the till they didn't go through as £6, and the lady tried to charge me £7.98 (full price for both). I queried it, and was told only the polishes in the "top rack" of the Barry M stand were included. I asked which exactly these were, and she pointed at Blueberry, Prickly Pear, Chai & Cotton. Now anyone that knows Barry M knows that Blueberry & Prickly Pear are old shades, Chai is from the Autumn range and Cotton is brand new! I didn't go into all that with the woman but just mumbled that I didn't really understand how it worked, but that I didn't want to pay full price and left empty handed!

I then went to Superdrug to see if I would have more luck there. The main Barry M stand was set up to house the new Speedy Quick Dry but NOT the new gellys. Whaaat? Then further down into the shop, nowhere near the Barry M stand there was a random pop-up stand that was obviously for the new releases. Why it wasn't at the front of the store next to the Barry M stand I don't know - it was right at the back and I nearly didn't notice it at all! Even finding it didn't help as it was practically empty and they had no "Cotton" anyway, AND it was 2 for £7 in Superdrug, so less of a saving.


By this time I'd started to query what I'd been told in Boots, so went back and studied the sign on the Barry M stand again. It definitely said "2 for £6 on all gelly paint" so I found a different assistant and spoke to her about it, pointing out the sign. This lady couldn't have been more understanding and helpful, saying she agreed with me that they all should be included as that's what the sign said, and overrode the till to get me the offer price. Definitely more sensible and reasonable than the first lady I spoke to. Yay!

I've come to the conclusion that "Cotton" wasn't supposed to be out in Boots yet, so wasn't working on the offer. Maybe that's why the offer ends on the 17th, ready for the release of the new shades on the 18th. Except they were already out! 

Sorry for the massive rant, it just seemed so overly difficult to buy two nail polishes, and both shops didn't seem to coincide with what Barry M's social media were saying. I don't really get the point of release dates if they're not going to be adhered to, but it's okay because I have my polish now. Phew!! And I also got some other goodies too:


Tuesday 10 February 2015

Striped heart tips


Last year I came up with a striped design with hearts on the tips of my nails. This look was perfect for pointed tips as the point fitted with the point of the heart, and they were so much more effective than I thought they would be! Here are the original ones from back in September.

I decided that as it's Valentine's Day at the weekend I would re-create the design, with different, slightly lighter colours. 

I started off with a base of Banana Split by Models Own. I can't gush about the fruit pastel collection enough - the formula is so smooth and creamy and lovely, the colours are so delicate and then there's the bonus of the subtle fruit-sweetie scent once the polish is dry! Anyway - I started off with two coats of this, then topped with Insta-Dri to help speed up the drying process. Here it is on it's own because I love it and want to show it off!


Once it was fully dry I used a pink Barry M nail art pen to freehand the stripes. I'm a bit annoyed because they aren't as neat and even as I'd like, I should have used nail vinyls! Anyway, I then roughly drew on the heart shape at the end of my nails and coloured it in using Peach Melba by Models Own. I topped with Insta-Dri again (I always do this before adding anything with the nail art pens as it needs to be fully dry!!) and then went round the outline of the heart again with a white nail art pen. I did this a couple of times as the white pen doesn't show up as well as the black. I also added a little 'shine' line to each heart, which I didn't do last time but I like!

One more coat of Insta-Dri (which reminds me, I need to buy more!!) and I was done.