Hello!
At the weekend I was down in London, and couldn't resist a trip to a Models Own Bottleshop (I went to the one in Stratford Westfield). I took advantage of their 6-for-20 offer, and my haul included three of the new Diamond Luxe collection. These polishes have real diamond dust in them to make them shimmery! I also picked up a new white, and the banana and peach scented Fruit Pastels.
From the Diamond Luxe collection I picked out Oval Plum, Emerald Green and Princess pink after looking at a lot of swatches. I picked the green as I thought it was a beautiful shade, the pink because I can't resist a pastel pink and the plum as the shimmer looked really pretty in the darker shades.
I used all three over the last few days to test them out, and created two different manicures. I'll show the manicures first, then let you know my opinions on the polishes!
The first manicure is this 'pop art' style one where I used Emerald Green and Oval Plum. I also used my Barry M black nail art pen for the details. It looked great from a distance but I don't think it was neat enough close up!
Here's Emerald Green before I added the pattern - it's a bit greener in real life, this is with the flash on my camera!
Here's the second manicure - this is a base of Princess Pink (two coats) with a glitter gradient using Hot Stuff from Models Own's Disco Ball collection.
I loved the look of these polishes in the bottle - the gold lids and lettering were really pretty, and they looked so rich and opulent. The choice of shades was nice and it was so hard to choose! The brushes were wider than usual which was good for a quick application. The polishes needed 2-3 coats to stop them looking patchy. I felt like the shimmer didn't really show up very much in the pink and the green, I'd have definitely liked more shimmer. However I love how the shimmer shows up on the plum shade, it's so vibrant and this is definitely my favourite of the three. If you are thinking of picking up any of these shades and don't know which to choose I'd definitely recommend looking at swatches first to see how each comes out on the nail, because if you're expecting each one to be super sparkly you might be disappointed!
Hello!
Some more new nail art today. These nails were inspired by @lookatmynailart on Instagram who posted a beautiful blue version of this manicure. When I saw it I immediately knew it was something I'd like to re-create.
I decided to create a pink version. For the base, I used Strawberry Ice Cream by Barry M. This is one of their older polishes although I only recently purchased it. It's not one of their gelly range, but there isn't a gelly that's this perfect shade of pale pink - I love Rosehip but that's a bit TOO light for what I wanted here. However, this polish is very sheer and jelly-like and even after three coats I could still through it slightly! I stopped at three coats as I didn't want the polish to be too thick.
Once this was fully dry (I used fast-dry topcoat and waited about an hour) I applied straight nail vinyls (stickers) from She Sells Seashells as guides to form the triangles. I could have used striping tape for this but found using the vinyls are much easier - they're pre-cut, and less flimsy. This is what they looked like without the leopard print - I thought they looked quite nice like this!
I filled in the triangles with one coat of Lychee by Barry M (above). This one is a gelly so is a good one-coater! I peeled off the vinyls using tweezers. After some more fast-dry topcoat and some more waiting, I doodled on the leopard print pattern with my Barry M black nail art pen.
I topcoated this, but I was worried about smudging the leopard print, so I decided to 'dab' the topcoat gently over the design, then once dry add a second coat. This worked really well and prevented smearing the design after I'd spent ages filling in each triangle!
I love these nails, it's such a clever design (that I borrowed!) and looks so intricate, but it wasn't too difficult! Here's a quick collage of photos I took mid-design, including the top left which was a doodle I did at work to get it straight in my head how I wanted the design to come out on my nails!
Hello!
I kind of just threw these nails together last night and they were a combination of ideas. I already had heart-tips in mind as I was considering doing this for my BFF Friday manicure - I went with another idea in the end, but still love how heart tips look - and I wanted to try them out on my new pointy nails - they'd make good hearts, I thought!
I picked these colours inspired by my work - our uniform shirts are a kind of pink/purple stripe pattern, and our logo is a darker pink. I work for a train company and today we lent a train to match.com as they wanted to do a big dating/promo event on board - they called it The Love Train! So because of this being in my mind, I came up with these nails!
I actually loooooooove them! I think outlining the heart made the hearts really stand out and look almost 3D. They took me a while, and I'm happy with the hearts - I wasn't sure if I'd be able to get them looking even/symmetrical and I knew I would just start again with something easier if they went wrong- luckily that didn't happen.
I started with a base of Prickly Pear (Barry M gelly) - three coats. This isn't my favourite BM gelly polish at all - there are much more gorgeous, stand-out ones (such as Greenberry!!!) ....but I end up using it in so many designs and my bottle has nearly run out! It's very versatile! Once this was fully dry, I added pink stripes with my Barry M nail-art pen. I then drew out the heart using the black nail-art pen. I filled it in with Rhosilli, from the Barry M matte collection. This is almost a perfect match for my train company's logo so I've adopted it as my 'work polish'. I started off using a small nail-art brush to fill in the hearts but then found it was easier to just use the brush out of the bottle! Once THIS was dry I outlined the hearts again in black to neaten them up. I finished with a layer of Sally Hansen insta-dri to seal everything in and add a shine.
I'd be lying if I said these didn't take me ages, but it was partly waiting for each layer to fully dry before adding the next one, and the fact I did the same design on every nail (not just accent nails!)
Here's a picture of Prickly Pear before I added anything else - I need to appreciate this colour more!
Then some more of the design (two nice ones from my camera, then the rest are ones I took at work with my shirt/the walls/my coffee - woo! Sorry about the scratch on my finger spoiling the pics, it's from a horrible thorn in my garden :-(
Hello! Myself and Naileymabob try to do BFF Friday whenever we can but our jobs/lives often get in the way! We managed to fit one in this week though which we were both happy about as it encouraged us both to actually do some nail art!
(I've just found out that Laura can't post her blogpost yet as she's sorting out some family stuff, but if you head over to instagram she's posted her nails there for now!)
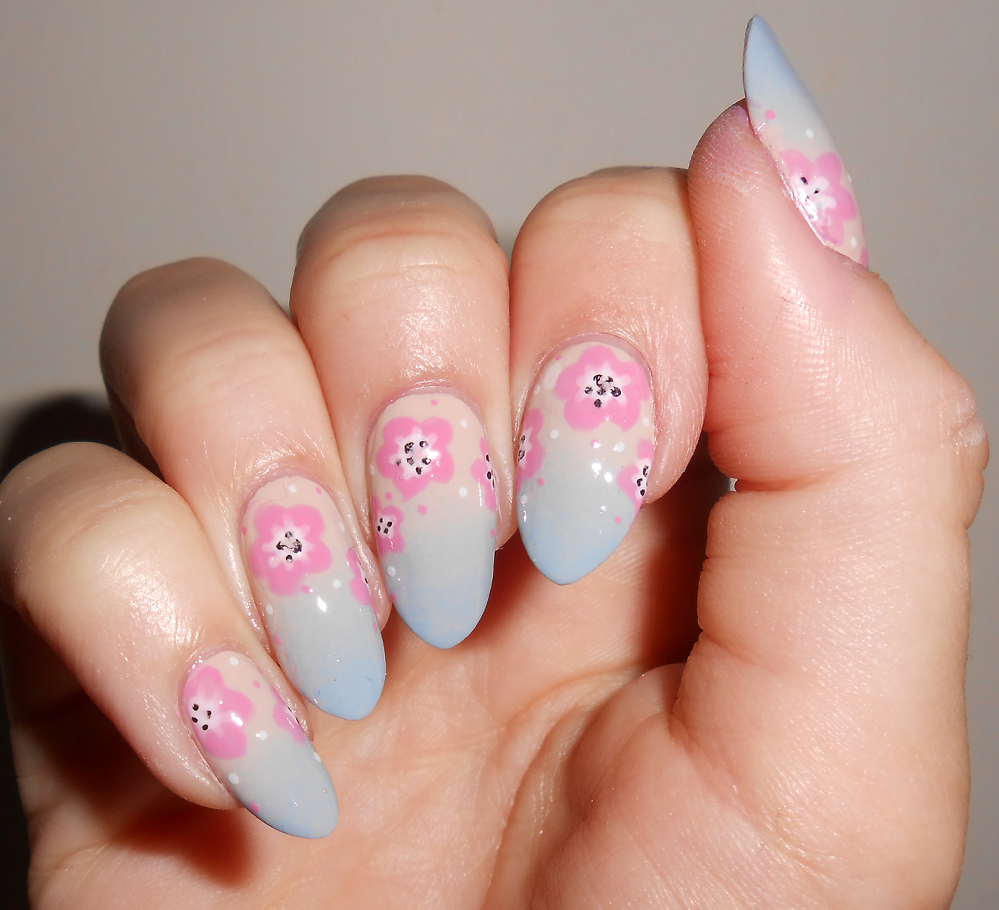
This week's theme, chosen by Laura, is Negative Space. As you all know this means leaving some of your nail 'blank' or 'polishless' while still creating a design. I've done negative space nails before here (half moons) and here (single chevron) and really liked the effect both times. I wanted to do something slightly different this time, so decided to add dotted flowers over a bare nail. I decided to do this on the middle two fingers of each hand - mainly because I've got a repair going on on a break on my index finger, so couldn't leave it polishless, so thought I'd incorporate this into the design!!
I already had these two polishes in mind for the design, before I even bought them! I knew they'd look nice together and quite autumnal. This is Mustard and Chilli from the new autumn/tribal range of gelly polish by Barry M.
I also used my prize from a recent competition ran by Orly on Instagram. The winners all received a bottle of Orly BB Creme which is a new product designed to be like a BB Cream but for your nails! The website has this to say:
"ORLY BB Crème is ORLY’s biggest innovation since the Original French
Manicure itself. It’s everything you need for beautiful natural nails in
a bottle. It whitens, it brightens, it smoothes and it protects –
giving your nails an instant make over and a healthy glow. Containing UV
filters, it also helps prevent discolouration of the nail too.
Instantly transform your nails in just two coats. Wear alone – no other
polish needed."
...So basically, this isn't a nail treatment as I first thought, but a polish designed to keep nails looking natural but improve the colour/texture and general appearance of the nail. I was a bit skeptical at first - why not just use a clear or sheer peachy shade to get this effect? But actually, after using this, I think it's rather good! It does everything it says and makes my natural nails appear so healthy - whilst still looking natural.
I reckon this would be great for someone who has their nails bare a lot (for work or whatever reason) but wants to keep them looking nice. Not so great for someone like me who always wears polish, but now I have something to use if ever I need to have naked nails.
So anyway - after that digression - I used this as a base for the negative space nails, which made my nails appear really healthy and clean, and hid any staining from excessive polish use.
I added the flowers randomly using my Models Own dotting tool, and then created a gradient with both colours on all my other fingers. I really love the look of this manicure - I wish I could have done the flowers on all my nails! They look really 70s!
To tone these down for work, I sadly removed the gradient nails and just painted these with the Orly BB polish. I love how it makes my nails look! Although I don't know if I'm keen on having designs on just two nails and the rest plain - people at work thought I'd forgotten to do the rest of them, and also I kept catching sight of the dark red and thinking I had blood under my nails!!
Hello!
I decided it was time I posted something about the Nailtiques kit I received as part of a prize from a giveaway by The Naily Mail last month.
There are quite a few different nail care products by Nailtiques, and this kit contains three of them. It has:
Formula 2 - (blue bottle) This is described on the leaflet as being:
"A treatment for soft, peeling, bitten, weak or thin nails.
Formula 2 consists of a unique blend of protein and conditioners to strengthen nails. The protein immediately acts to help bond nails that are splitting or peeling resulting in long, strong and healthy nails."
Formula 2 comes in a little bottle with a brush. You're supposed to apply it daily to bare nails, similar to how you would use other treatments such as Nail Envy. I used to use nail envy as a base coat to all my manicures, so I decided to switch to doing this with Formula 2 instead. I couldn't bring myself to have completely bare nails as you're supposed to, but I do think this is helping my nails. Since I've been using it I've had no breaks, and my nails feel harder/stronger and look more healthy.
The lack of breaks could also be down to my new nail shape - they used to bend quite a bit at the sides, but my new 'pointy' shape seems to have lessened the chance for this to happen.
The bottle is only small but there is still quite a lot left, even though I've been using it for nearly a month now, so hopefully it will last a while yet!
The only issue I have with it is that the brush in the bottle is unevenly cut at the bottom - half of it is a few millimetres longer than the other which makes it tricky to apply! Pic of the wonky brush:
Oil Therapy - (orange bottle)
"A delicate blend of vitamin-enriched oils specifically formulared to prevent and treat brittle nails and cuticles naturally. Softens cuticles by replenishing the skin's natural oils. It also acts as a preventative and treatment for dry, brittle nails by sealing in moisture."
Firstly, this oil smells absolutely gorgeous! I couldn't really think how to describe the smell until I read on another blog that it smelt like marshmallow. I suppose this is kind of correct - it's quite sweet but not overly so, my boyfriend thinks it smells a bit almondy. Delicious, anyway. It's definitely the nicest-smelling cuticle oil I've used. It comes in a little bottle like Formula 2, and I've been brushing it onto my cuticles a few times a day then gently massaging it in. It's not overly greasy and soaks into the skin well.
The brush makes it easy to apply, although a shorter/firmer brush, or even a 'pad' like what you might apply eyeshadow with might make it even easier. The brush in my bottle was severely bent to one side though which I don't seem to be able to correct :-( It's a shame I've had issues with both brushes, it does make you question the quality of the brushes slightly, but I suppose it doesn't really alter how well the oil works once it's on!
Pic of the bent brush:
Cuticle & Skin Gel -
"A glycerin and aloe enriched formula that conditions and penetrates deep into the skin. The gel acts immediately to help soften cuticles, promote healing of cracked cuticles and restore smoothnessto rough skin."
This little pot of cream is kind of gel-like, hence it's name! It's aimed at very dry/damaged cuticles, and according to the leaflet it can also be used on other areas of dry skin too, like elbows and knees. My cuticles are pretty well behaved, so I didn't think they would need such an intense treatment as this, especially since I was using the oil.
However, I was having my first pedicure in a salon a few weeks ago, so for a week or so before that I applied this gel to the dry/cracked skin of my heels to see if it would improve it - I didn't want the nail lady at the salon to see how bad my feet were! And I think it really really made a difference - my heels were much softer after only using the gel once a day for a week! So I definitely think it'd help people with really dry/cracked cuticles.
The only downside is that the pot is tiny (it looks quite big in the pic I've used but it actually contains a very small amount!) and I practically used it up in just a week! This could be because I was applying more on my heels than a person would to the cuticles, but still, the pot is tiny and I can see it running out much faster than Formula 2 or the oil.
Overall I really like this stuff, and I think once it has run out I will repurchase it and keep using it instead of Nail Envy. I think when you use polish as much as I do, it's definitely a good idea to use a nourishing treatment as a base coat.
My only slight issue was the problems with both the brushes but I think I was just unlucky in both cases, and like I said above, I'm still able to apply the formula/oil.
Thanks again Lauren - I would never have tried Nailtiques if I hadn't won your giveaway! :D
Hello!
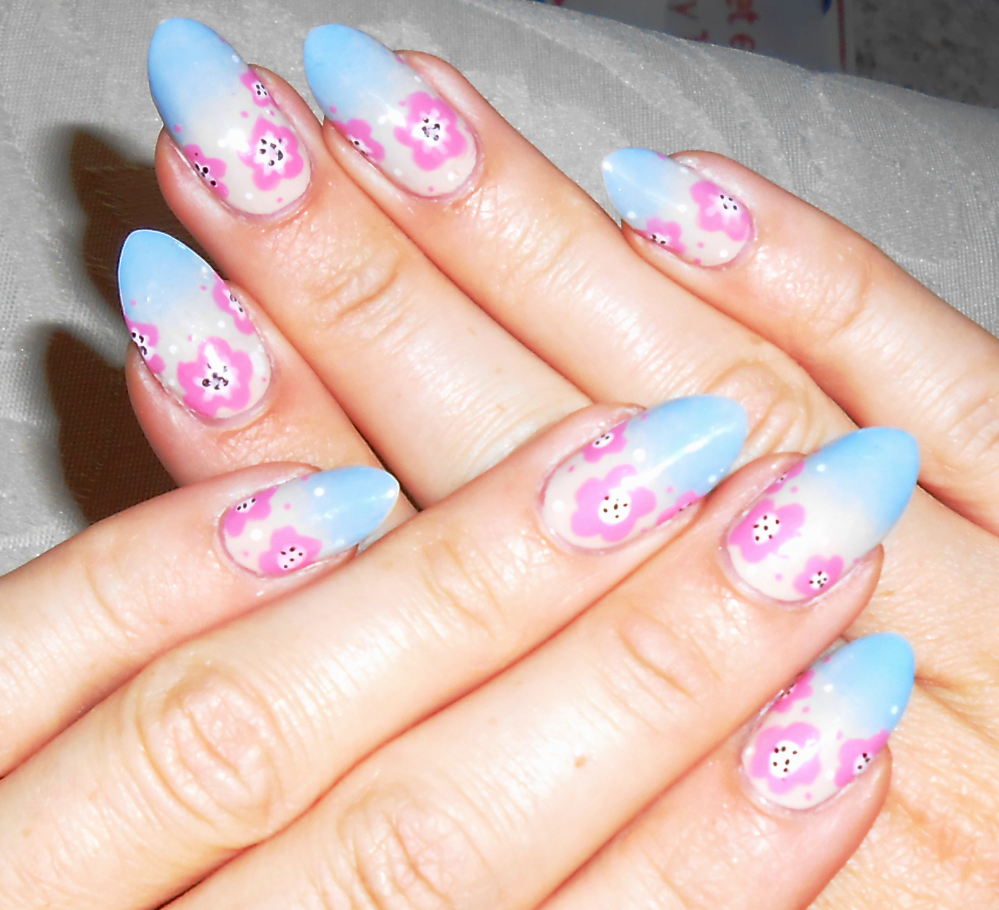
Finally had chance to try out some nail art. These were to wear to work so I wanted to keep the colour scheme quite pale/muted.
I wanted to use one of my new Barry M gelly polishes (new to me, not to Barry M) Elderberry, which is a kind of grey/blue and it's gorgeous. I knew I wanted to create a gradient but most of the other gelly shades are quite bright. When I picked up Lychee I knew it was the perfect shade to use with it. As always I used a makeup sponge to create the gradient and helped it to dry quickly using Sally Hansen's Insta-Dri. Here's the gradient with the polishes used before I added anything:
I then used the pink, white and black Barry M nail art pens to draw the flowers, and sealed with another coat of Insta-Dri.
I really like these, although at first I thought they looked a bit dull, they're ideal for work as they're pretty but not too in-your-face.
Hello!
Today I've got lots of pics of my other Polish Me Silly purchase. This is Minty Madness, a mint-to-white thermal and I've been after it for ages!!! It doesn't disappoint, it's stunning and I couldn't stop looking at it all day.
In these photos I'm wearing two coats of Minty Madness over two coats of white.
It's green when cold and white when warm. A lot of the time it was a beautiful gradient! I wore this yesterday when I went to see Wicked - the colour was quite suitable for the occasion! Heres loads of pics from various points in the day...
Hello!
I've got the most gorgeous polish ever to show you tonight! This is Paradise (a.k.a Obsession, IDK why it has two names!) by Polish Me Silly, an American Indie company. I've wanted Minty Madness, a white-to-mint thermal from Polish Me Silly for months, and when it came back into stock on Rainbow Connection, I decided to treat myself and get it. To make the postage worth it I also picked up this polish, which I'd recently seen swatches of and loved.
It's a multi-chrome, which means it looks different colours from different angles. I've got a few duochrome polishes but none are ANYTHING like this beauty. Apologies for the pic-spam but I just couldn't stop taking photos - if you check my instagram I also posted a really short video of the different colours when I tilted my nails.
This is two easy coats of Paradise over a base of black (as the polish was a bit sheer on it's own)


.JPG)


.JPG)


.JPG)


