Wednesday, 27 August 2014

Orly Nail Rescue

Hello!

Last week I had a really bad nail break- it didn't break right off but cracked really low down. I posted a pic on Instagram asking for help- I have used the 'teabag repair' method before but found that this never really held more than a day, especially if I was at work!

A fab person suggested I try ORLY Nail Rescue so I had a quick look online to see what it was and how much it cost. It was quite pricey at £10.95 but I felt it was my only option so ordered it from Amazon. After an agonising wait for it to come (I was sure it'd arrive Tuesday after the bank holiday weekend, but it came today!) I was eager to try it out.


This is what comes in the kit - nail glue, magic(!) powder and a buffer. The instructions were nice and consise:

Here's my nail before I started. Gross right?! It fully bent back when I was opening a fridge, I'm surprised it didn't snap right off, but instead I got this kind of bend/break in the top layer right across, and a small crack on the left side...


After I removed my polish and teabag I followed the above instructions. It was dead easy....Here's what it looked like before buffing away the excess:


And after: (sorry about the state of them in general!)


It was still quite rough even after buffing, it kind of felt like textured polish! I went around the cuticle with acetone on a small brush to try and create a neater edge. To counteract the roughness I had to apply quite a few coats of basecoat, polish and topcoat to get my nail looking as smooth as the others, but I think it worked! 

My nail definitely feels a lot stronger. I will let you know how long it lasts for, but hopefully I can just re-apply or top up the powder every couple of days or before each mani, as needed, until my nail is long again! Annoying but I'm willing to do it to keep this nail as this is my swatching/photographing hand!

Also, the little pot of powder and the bottle of glue are quite big, this kit should last me for ages, to keep this break mended and for any future ones, so I reckon it was worth the money. 

One last photo of my nails all painted - you can't even tell the nail rescue stuff is on!! :-) This is Porchester Square by Nails Inc and it's a lovely nude, very subtle and perfect for work (and a base for nail art!) 


Monday, 25 August 2014

Revlon Parfumerie: Wintermint

Hello!

As lots of you may know by now, Poundworld have recently stocked the new(ish) Revlon Parfumerie polishes, a range of scented varnish released just earlier this year. They usually retail for £6.49 and I treated myself to one earlier in the year to see what it was like, and also because the bottles are gorgeous! 
When I heard that they were in Poundworld I went as soon as I could to see what they had. In my local one (York) they didn't have every single shade in the collection, but there was about 8 different ones, including two I'd previously lusted after. I didn't hesitate in treating myself and I came away with Wintermint and Autumn Spice for the grand total of £2.


I decided to apply Wintermint, which is a sparkly, shimmery green peppermint shade with a scattering of pale turquoise glitter. In these pictures I used three coats with no base or topcoat. I looooove it, it's subtle enough for work but it's got a gorgeous shimmer to it.

The scent is not what I expected - I loved the colour of this which is why I picked it but I wasn't keen on the thought of nails that smelt like toothpaste. However, that's not what kind of 'minty' scent this is - it's sweeter - it reminds me of Kendal Mint Cake or any kind of minty sweet, and it's quite nice. 


The only thing I would say is that it's not a scent I want to constantly smell - I think I had this issue with the last one I tried (Ginger Melon). I've just eaten a slice of toast and it was strange to suddenly get a waft of mint while eating!!

Saturday, 23 August 2014

Dotted Flowers

Hello!

Another new manicure today. I wanted to create some nail art, but I can't have them too crazy for work as I've mentioned loads of times! I decided a possible way round this would be to use really pale pastels - from a distance you can hardly tell there's a design at all (which made these SO hard to photograph!!)

I started with a base of Huckleberry (Barry M) and then used my Models Own dotting tool to create the flowers, one layer at a time, using Rosehip (Barry M), Sugar Apple (Barry M) and Miss Sunshine (Accessorize). I am still totally in love with the pastel Gellys that Barry M do, and I just wish they did a pastel yellow - they don't currently which means I always use this Accessorize pastel yellow, which is running out :-(

I finished off with white dots using Barry M's white nail art pen, and a topcoat of Sally Hansen Insta-Dri!

As I said, these were so hard to photograph! Half the pictures I took completely washed out the design and you couldn't see it at all, the other half the design looked okay but my fingers looked all red/orange/gross! I've had to include the latter pics so apologies for how my fingers look....


Thursday, 21 August 2014

New Almond nail shape!

Hello!

Posting to show you my newly shaped nails that I'm really pleased with! I decided to re-shape them after seeing a lot of people with gently pointed nail tips, including AJ from Nail Lacquer UK and my friend Jenny at work. I've also cracked my index finger really low down :-( so thought filing them slightly shorter would make the break less tragic when it finally surrenders!

Here they are with a simple diagonal gradient using Barry M's Rosehip and Sugar Apple that I wore for work:


The last pic above showing where the break is! So bad! :-(
I also experimented with adding a pastel-ish galaxy design over the top of them, but I think I prefered the gradient on it's own!


I was recommended to get Orly's Nail Rescue to mend my break - I'm desperate so I've ordered it to give it a try, I'll let you all know if it works! 

I also recieved my prize from The Naily Mail giveaway today, which was some beautiful polishes, including a new bottle of Rosehip which I need as mine is running out and it's definitely my favourite polish EVER at the moment! Also included was a Nailtiques treatment to make nails stronger, which I'm really up for trying as mine are so bad at the moment. I will keep you updated on my progress there too!

Tuesday, 12 August 2014

Mix-and-Match Pink & Blue

This was my first go at nail art since before my hols, so I decided to re-create a design I'd recently seen and loved! 

I picked a design by @iscreamnails that I saw on Instagram. They remind me of WAH nails with really funky and bold designs, and most of their manis being skittle - with a different design on each finger. They're in Australia though so I can't visit!! :-(

I used Pink Veneer by Models Own and Regents Place by Nails Inc. I also made use of my Barry M nail art pens and my She Sells Seashells nail vinyls for the zig zags. I love the outcome, and although the design is not originally mine I loved being able to recreate it! It did take ages though! Here's the outcome:


And here's the original manicure from Instagram:


Saturday, 9 August 2014

Gel nails for Salou

Hello!

If you follow me on Twitter or Instagram you'd know I've just been away on my holidays - 10 days in Salou! I'm back home now, and it went so fast!

Before I went, I decided to get my nails done with gel so I didn't have to worry about chips or have to take any polish with me. After a lot of research into salons I eventually picked Pastille in Leeds as they've got active social media accounts meaning I could look at all the pretty nails they'd done! When I booked, I found out I was getting my nails done by Olivia, who I already knew of via her personal Instagram account which was even cooler!


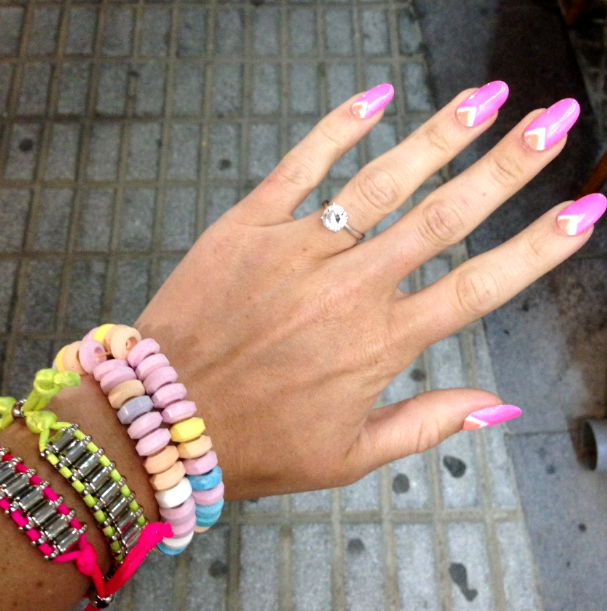
I picked the two brightest colours available, and went for a triangle design, which Olivia did soooo neatly! She didn't even use a template/vinyls for the white V, it's all freehand! I loved getting my nails done, it was such a treat, and Pastille and Olivia were so nice and friendly. My nails looked amazing for the whole of my hols and I couldn't stop taking pics of them - here's some:


And a pic of me and my boyfriend enjoying Cava Sangria....


And some cheap polishes I picked up in a gift shop - love these!


I'm back at work in a few days so I spent the last hour soaking off the gel nails, following the instructions Pastille posted on their Instagram. I wish I'd got it done in the salon cos it's taken me ages and is so fiddly! Here's two more photos - first is my nails as soon as I got them done then after 2 weeks (they're not faded, just different lighting!) to show the growth. Second pic is me taking them off!


As I said, I'm now back home in England so will be back posting regular nail art from now on! x

Thursday, 24 July 2014

Ikat/Diamond Pattern

Hello!

I fancied some really bright, summery nails, so decided to copy a diamond/ikat sort of pattern I'd seen. I used Greenberry, Grapefruit and the Yellow LE Barry M. 

I created the pattern in pink and yellow with a dotting tool, then once it was dry (helped with fast-dry topcoat!) I outlined the two diamond shapes using a nail art pen. I did this using tiny line-type motions to make the edges look jagged. Another coat of topcoat and I was done!