Second post of the day! Yesterday I was reading some blogs, and saw quite a few mentions of a-england. I've been aware of this brand for some time but never really properly looked into it. However I had a good browse of their beautiful website, and eventually decided to treat myself to the one that stood out the most. I was very impressed that postage was free and I think that's what swayed me to eventually buy one (as I don't usually like just buying one polish and paying lots of postage, so I usually buy a couple to make it worth it...but couldn't afford to do that this time!)
The one I picked is called Rose Bower and is a beautiful, rich dark pink/red with a holographic shimmer. I just fell in love with the colour, it looks so vibrant! Having ordered it yesterday morning, I was amazed to find it on my doormat today! And had to immediately try it out because it looked sooo stunning in the bottle.
And on the nail! Looooook:
<3 <3 <3 OMG I have no words <3
Hello!
It was my work's xmas do yesterday evening, and I wanted to go for really bling nails for the occasion. I really like the idea of lots of sparkles/studs on nails anyway, and what better chance to have a go than for a Christmas party? I also wanted something a bit OTT and wacky since I can't have that kind of thing at work.
I started with two coats of the beautiful Charm Bracelet by Seventeen. I loooove this beautiful gold textured glitter, and it's fab for Xmas! I then grabbed all of my studs, rhinestones and gems from various places - some of these are from nail wheels from Poundland, some came in little kits where you get a nail art pen with some gems, and the more metallic studs are from Born Pretty.
I decided I definitely wanted to go for the big, pearly coloured gems. I added two or three of these onto my nails, pressing them into a thin coat of wet topcoat to stick them down. I was going to leave it at that, but all my other gems were calling out to me. I decided to add green, pink and gold, as well as the odd different-shaped or coloured stud to add to the randomness.
I finished off by adding a good few more coats of topcoat to seal them all in. They look so sparkly and chunky and fab- very OTT but that's what I wanted! And I think I only lost one or two gems throughout the night - and I've even done the washing up this morning and they're all still in place. They're not as obtrusive as you'd think to have stuck to your nails - I felt sure they'd ping off at the slightest thing but they all seem very well stuck down!
Hello,
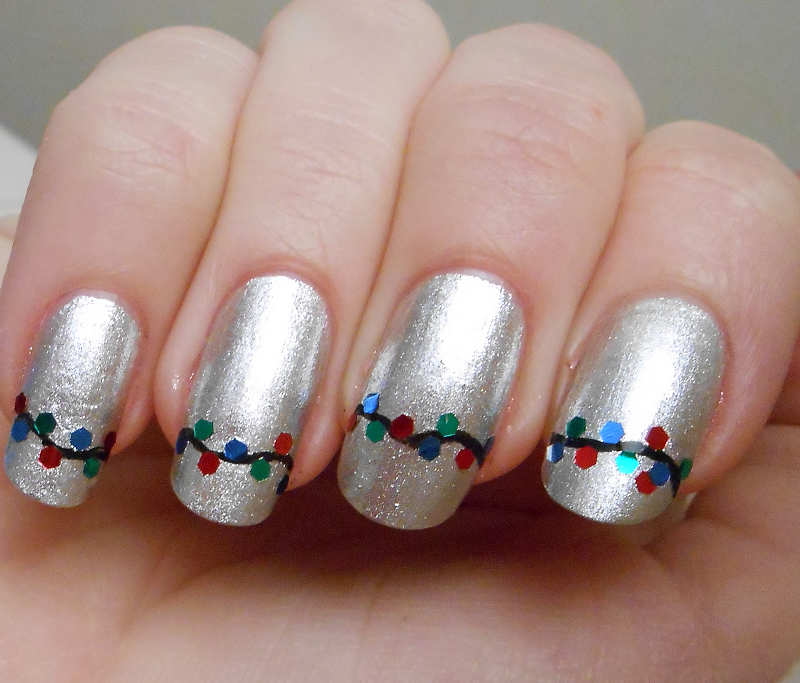
More Christmas nail-art to show off today! My red nails yesterday were sooo shiny and pretty, but it meant that any tiny chip was really obvious (to me, anyway) and I wanted to try something else. So I took it all off and came up with this.
This is another use of the beautiful silver I got in my Ciate calendar. I then added wobbly lines with a black nail-art pen and festive-coloured glequins, which I added one by one, and sealed in with a few coats of Insta-Dri topcoat. I'm hoping it looks like a string of xmas lights!!
Hello!
I've had some free time this afternoon after work, and decided to try and do some more Christmassy nail art, as my snowflakes were starting to chip :-(
I began by painting my nails red, using Boudoir by Ciate. I'm really impressed with all my advent calendar polishes so far! This is two coats, still quite jelly-like and a bit see-through, but lovely colour.
I then used my white nail art pen to draw on the lines - I was kind of thinking candy canes... and then I drew on the reindeer, after practicing on paper first because drawing isn't my strong point. For inspiration for the shape of him, I used this reindeer from Brit Nails' xmas jumper nail art. I thought it was a really simple but realistic outline for a reindeer that even I could manage with practice (beautiful mani Allie!)
I finished off with a topcoat to make them all shiny!
I then decided that this was just a bit too bright/busy/noticable for work. So I reluctantly decided to revert them all back to red, but keep the reindeer.... however as I started going over the white with another coat of red, I realised you could sort of still see the design underneath, which was kind of cool, and less obvious! So I went over all my nails again with one thin coat of the red Ciate polish, now quite thankful for it's sheerness!
Hello!
I've got a pretty manicure to show you tonight, using two more of my Ciaté polishes from my advent calendar. I loved both of these and couldn't decide which to use first, so I decided to put them together to create a wintery gradient, as they were quite similar in colour.
The blue is called Ferris Wheel and the mint green is Pepperminty. I was especially chuffed with the mint green one, firstly because it kind of matches my blog name, and secondly because my w7 mint colour had gone all glooply and I've recently chucked it away - so it's great to have a new one, especially one as pretty as this.
I used a make-up sponge to create the gradient. It helps that the colours are so similar - they blend really well - perhaps they're a bit too similar, meaning this gradient is very subtle. I then used my trusty Barry M white nail-art pen for the snowflakes, using some ideas from my first snowflake manicure that I did a few weeks ago. I was really happy with that manicure as I found I could actually draw snowflakes reasonably, which is why I wanted to do it again, with a more wintery colour scheme this time.
After drawing on all the snowflakes, I topped it all off with my pretty holo glitter from Claire's. I picked this as a topper because you can hardly see it in some lights, meaning you can still see the design below with no problems, but in other lights it shimmers and sparkles lots of wintery shades.
Here's everything I used, apart from my base coat (Nail Envy) and topcoat (Insta-Dri) that aren't in the pic but are used in every mani :-D
...and here are a few more pictures of the end result. These pics (apart from the one I used at the top of this post) look a bit more blue-y than it looks in real life, but still show off the pretty snowflakes and glitter!
Quick post to show off my current nails. This was another product of trying something too complicated, getting annoyed because it wouldn't work, taking it off and needing another idea quick! So I went with a simple glitter gradient.
The base colour is by Color Club, and then I used Claire's holo glitter, No7's silver glitter, Barry M's gold glitter and w7's pink glitter to create the gradient. It was hard to control how much glitter went on so I think the pink went on a bit too much on some fingers, but the general effect is okay. I want to change them already though!
Quick post today to show off an early Christmas present! This was from my fab friend Naileymabob who had the polish made specially and designed it with AJ of Nail Lacquer UK. This beauty is called Christmassy Bob and is a really pretty, delicate mix of pink and very light blue glitter in a pastel pink base, with some snowflakes mixed in too! I love how it's still christmassy, because of the snowflakes, despite it not being a 'traditional' Christmas colour. And pink is my favourite shade too, winner!
Here's mine and my two friends' bottles - I think four of us got a bottle as a present from Bob. <3 Each one came with a pretty Christmassy charm too - mine was a Christmas tree :-)
This applied really nicely. I think I applied a couple of coats here. The only difficult thing was getting the snowflakes out - even with fishing it was hard and I only managed to get one per hand in this application (you can see it on my index finger) - I will definitely try again though - maybe the more I use it the easier it will be to get them! I love how pretty this is, with the subtle glitters, and I love that it was specially made for me and my friends. Thanks Bob, such a fab idea! :-D