Sunday, 27 April 2014

Daisy Dots


Hello!

If you follow me on Instagram you'll know that last week I've been trying to decide what to do with my nails for a wedding I was attending at the weekend. I wore a yellow flowery dress, but wasn't sure whether flowery nails would be too much - whether I should do another pattern like lace, or just a design on one accent nail etc. I also couldn't decide on colour - pastel or navy?! Haha - dilemma! Here are my practice nails once I'd decided on a navy base...


I compared all five of my navy polishes and eventually picked this one as it was the nearest to the navy on the dress - the other ones were really dark. The one I picked was Scandalous Shenanigans by China Glaze. This was navy with a blue shimmer - really pretty, but an absolute nightmare to apply - it was sooo runny, and got into my cuticles and everywhere, and with it being so dark it was so hard to clean up. Also, even with two good coats, you could still see through it to slight imperfections on my nails even though I'd used a base coat. Maybe I've just got too used to the gel-look polishes that make nails look flawless, but ...urgh.

I then used white and yellow polish for the flowers - I used a dotting tool, which I never usually do - I usually just use my pens, so I wasn't very skillful with it! I really shouldn't have tried a new technique and left it so late the night before the wedding to do these - I wasn't 100% happy with them, but people did say they liked them so I suppose they were okay!


I also did my mums nails to match her dress- we settled on grey (Dorien Grey, Sally Hansen) with a lace-print design over the top which I used my trusty white Barry M pen for!


Friday, 25 April 2014

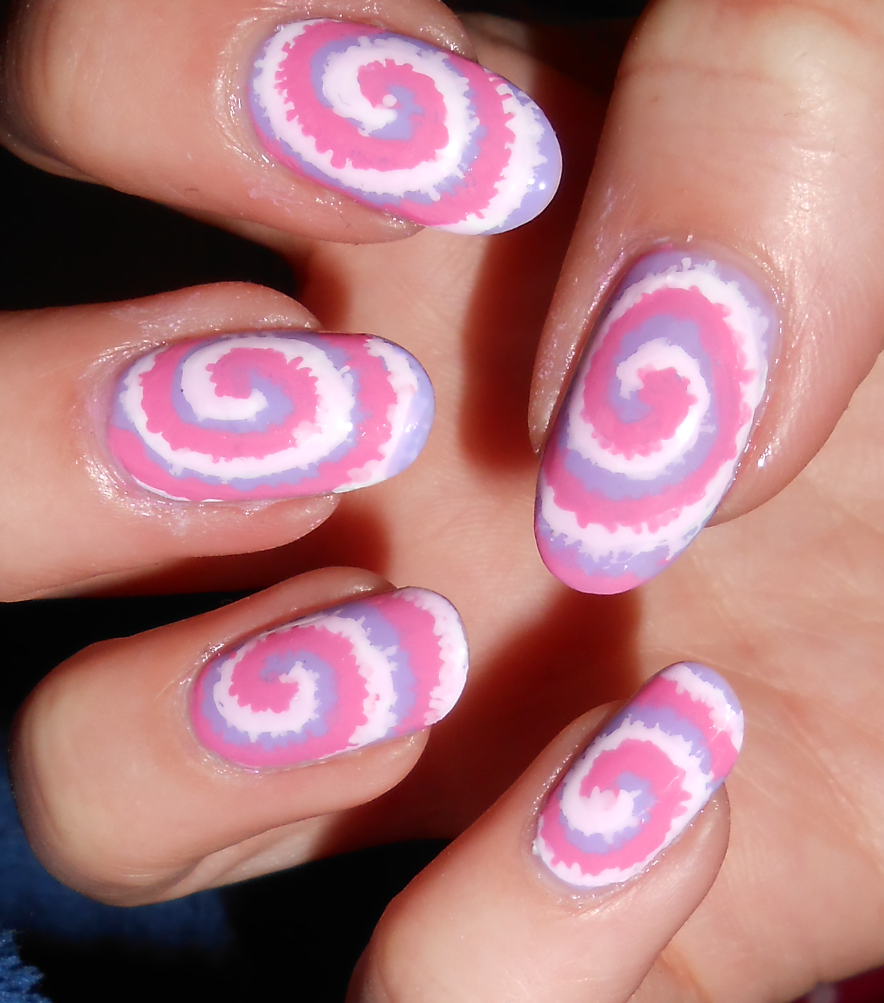
BFF Friday - Pink Tie-Dye


Hello! Time for another edition of BFF Friday, where myself and Laura from Naileymabob pick a theme, and both create nails based on it. We don't tell each other exactly what mani we're going to do, so it's always fun to see how the other has interpreted the theme!

Today's theme is Pink Tie-Dye. I picked the theme this week, as I was inspired by a manicure I saw on instagram by b_jessica_3. So gorgeous! I wanted to recreate this exactly, but decided to replace one of the two pink shades Jessica used with a purple, so I wasn't totally copying! I also initially decided this as I thought it'd make the whole mani more pastel and less bright, but it didn't....oh well! 

I started off with a base of Barry M's Prickly pear. This was 2 quite thick coats as it's quite sheer in just one. Once fully dry, I drew on a loose spiral using the white Barry M nail art pen. I then added a pink spiral (also Barry M pen) beside it, adding in 'jaggedy' edges to get the tie-dye look. I had to go over the white and pink again when it had dried as they can dry quite patchy/pale, but it didn't take me too long!

I finished with a topcoat of OPI red/pink sheer tint, 'Be Magentale with me' to add a slight pink tinge to the white and just because I wanted to see how it'd look! I'm pleased with the finished look - it was good that this mani required adding jagged, uneven edges to the spiral, because I didn't need to worry about it being perfect. These especially look good from a distance - so effective!


Check out Naileymabob's interpretation of this weeks theme and her blogpost here!

Monday, 21 April 2014

Daisy Chains


Hello! 

Daisy chain nails today. I don't often do flowers on my nails because when I've tried in the past they've never ended up very neat. But as these are light colours, it's not too obvious if they're a bit uneven!

I used Huckleberry by Barry M as a base, which too two lovely coats to look like this. I adore this polish! I then used the black and white nail art pens and the LE Summer Yellow for the flowers. 

I like how these look, but not sure I like the black of the 'chain' - I want to try these again but without the black - just little clusters of daisies around the nail. 


Saturday, 19 April 2014

Easter Eggs


Hello! Quick update on the manicure I posted yesterday. I used three of the Polish For Tans collection, and after a few days wear they were looking past their best. To spruce them up for Easter, I used my white nail art pen to turn them into easter eggs - helped by the shape of my nails, especially my index finger! I then went over each nail with different OPI Sheer Tints - I love how they look over both white and over bright colours. I love how they make the white pen look coloured! Here's a quick pic from my previous post to show how my mani looked before I added the sheer tints - the differences in colour is fab!


On my thumb, index and middle finger I have a base of Shades, which is like a neon pinky-coral. On my thumb, I topped it with the blue sheer tint, which turned it a bit darker. This blue was a bit heavy, and looked a bit streaky. On my index finger I added the purple sheer tint, which was less heavy, and made the pink less neon, but still super-bright. I especially love my middle finger, which I've topped with the yellow sheer tint. It turned the pinky shade bright orange, and the white of the pen to a lovely yellow - so good for easter! I did think the yellow sheer tint would be the one I used least from the set, but I don't think that now!

On my ring finger I have a base of Sun Hat, which was bright barbie pink. I added the blue sheer tint again (and it was a bit heavy/streaky again) ... it turned the pink kind of purple. My little finger has a base of Beach Bag, an orange/coral. I added the red sheer tint here, which made the coral more of a bright orange, and the white pen went pale pink.

I think my favourite combinations are definitely the yellow over Shades (middle finger) and the red over Beach Bag (little finger). I want to try Sheer Tints over every polish I have now, to see how they'd look! And I'm really happy how it turns the nail-art pen a different colour - I use my pens in practically all my nail art but am limited to the fact that there's only black, white and pink....so being able to add a subtle tint over the top to change the white to another pastel shade has many possibilities!!


Happy Easter everyone! :-)

Friday, 18 April 2014

Polish For Tans

Hello...

I caved earlier this week and bought some more polish online from Models Own, because they were still doing their 6 for £20 offer. I loved the three pinky/orange shades in the new Polish For Tans summer collection, so I picked up those, along with a new bottle of Utopia and a few new shades of lip-stix. When they arrived, I couldn't choose which of the colours I wanted to use first, so went for all three. 

The pink (ring finger) is Sun Hat, the orange (little finger) is Beach Bag and the coral (other three!) is Shades. I love all three - they're so luminous and bright. Sooo stunning, I know I'll be using these a lot over summer! <3


Thursday, 17 April 2014

Pineapple!


 Hello! Really looking forward to showing off my nails today. These were inspired by a pair of jeans I saw in a magazine, that were from Topshop - here they are:

I really liked the simple pineapple print, and wanted to recreate this. I spent a few days thinking of how to make the mani more interesting, and eventually came up with this design last night. I used Key Lime and the limited edition summer Yellow from Barry M, as well as Sinful Colours Snow Me White and coloured studs from Born Pretty. 

I'm really pleased with how these turned out, and gutted that I can't keep them on longer - back to work tomorrow so got to go back to plain! I might be recreating this design again in summer, or at least using that pineapple in future manis now I know I can do it!


Tuesday, 15 April 2014

Prickly Pear Plait

 
Hello!

Here are my nails today. I am at work again today, with two days off coming up. On my days off I'm desperate to try some bright, patterned designs on my nails, especially with the weather getting nicer! Today, however, I've got to keep my nails quite plain for work. My uniform has a pink/purple shirt, so I picked a purple polish for my nails today.

This is Prickly Pear by Barry M; one of their gelly shades. I love all of the gelly polishes for both their colour and shiny finish, and I use them loads! I was initially just going to leave my nails plain purple, as I'm going to be changing them tomorrow anyway, but then I saw this blogpost by Rebecca over at Lane's Lacquers where she'd done a fishtail accent nail. I was inspired to create one myself, as I've not done fishtail for ages!

I used Blueberry (Barry M gelly) and Snow Me White (Sinful Colors) to create the fishtail braid design. You just need to paint on stripes of polish diagonally, building it up one side at a time, leaving a few mins for the polish to dry between stripes. Unintentionally I made each stripe really small so it actually took ages to build up the design right to the end of my nails! Next time I'll make each stripe wider like Rebecca did in the above mani!  

Also, I should have waited a little longer before adding a topcoat, as it kind of smeared the design a little. Arghhh! Usually I would remove a design if it smudged, but this took me too long so I'm going to wear it for at least a day, haha.

Here's a quick pic of the mani in progress, taken on my phone:


And another one of the finished product!! x