I had a lovely day today shopping in London with my friend Kathie (who is so fab at nail art)! We had fun looking at all different kinds of nail varnish, and I accidentally bought myself a new bottle!
This is Damselfly by Accessorize. I've never seen it before but when I caught sight of it today in Boots I just knew I had to have it! So pretty!! It's a bright blue with silver, pale blue and dark blue glitter/bits.Really unique, and only £3.45 :-) I couldn't wait and applied it on the train home (the carriage was empty so I hopefully didn't annoy anyone with the smell)
This is three coats. I think it'll be terrible to remove but I'll cross that bridge when I come to it! So pretty, everyone go and buy it. There was a lovely orange too, with black and white bits in....yum.
*
I also wanted to use this post to show off some of my friends' nails, because they are awesome, and they don't have blogs! The first is my colleague Chantelle at work who is so skilled at Leopard Print. Love the addition of gems on her ring finger!
And here is a photo of my spotty nails earlier today with Kathie's nails - fab use of chunky hex glitter to separate the brown and white sections - so neat - I've got to get some of that! She is working on a blog which she hopes to start soon. Sorry the pic is bad quality! EDIT: HERE'S HER BLOG! http://famousfingers.blogspot.co.uk/
And this heavenly sight was in Selfridges today - we wanted everything!!
For week 9 of our challenge, I had to create delicate print nails. I wasn't looking forward to this challenge! I've seen loads of fab delicate print nails around the nail-art-blog world, but most have either been done using stamping, or done with a lot of artistic skill - both of these things I do not have! I can't draw on paper, so I really can't on my nails!
I finally decided that I'd make some small dotted flowers on my nails using a dotting tool. "delicate print" to me suggests pale colours, so I selected Sally Hansen's Dorien Grey (loooove) as the base colour, and my favourite unbranded pale pink and 17s white, which is called mini skirt for the flowers. However I was really unhappy with the result! The flowers looked mushed together and uneven, owing to not being able to get an even amount of polish on each dot, and uneven spacing between the dots. ARGH! Anyway, here is a photo of my attempt, with some random dotting on my thumb...
I decided that I quite liked the dotting I had done on my thumb, so took off the horrible blotchy flowers and just dotted. They're still not evenly spaced and evenly sized, which is REALLY annoying to me! Here is another picture of the finished product, and also of Dorien Grey on it's own because it's beautiful!
Got some ideas of other things I want to try this week, including something with my crackle topcoat and something with my new Nails Inc Feathers set that my boyfriend got me :-D Hopefully I will create something I actually like soon!
My textured Barry M was starting to peel off after a few days wear... I was pleased with how long it lasted because I pick at anything I have on my nails so it withstood that well! I didn't mind taking it off, but it was quite stubborn to take off!
So now my nails are like this:
I used my brand new Gelly Lychee as the base colour. It's just beautiful, so shiny (I haven't got a top coat on my middle and little finger, it's just the natural shinyness of the Gelly.
It looked stunning on it's own, but I've recently bought some nail stickers in the shape of different chains. I wouldn't usually buy something like this because I think stickers on nails can look a bit tacky, but I liked the look of these ones, and liked that they weren't the usual hearts etc. They were only £1 from Savers as well, so I thought I'd try them out. I got about 12 small rows of different kinds of chain stickers in the pack. The only problem would be if you wanted to use the same kind of chain on all your nails at once... there's only enough in each strip to get about 3 or 4 nails-worth!
So I decided to use a strip of chain sticker on one accent nail on each hand, cut down to size with nail scissors... then I also added a coat of my current favourite "treasure" glitter to my pointer fingers... and then a little gold gem on my thumbs. It was fun playing with different looks for each nail, and I think they look nice together, and not too OTT. What do you think? :-)
As I mentioned in my previous post, I've just treated myself to one of the new Barry M textured polishes. When I heard about these and saw swatches from other nail bloggers, I knew I would have to try one out. I didn't get the full range as I wasn't sure I'd use them much, so I picked my favourite - the pink! I thought if it's going to be a strange texture, it should be a normal-ish colour... and also, it's called Kingsland Road which is very similar to my street name, so was obviously meant to be bought by me. ;-)
I applied three coats of the polish. You definitely need this amount, as it's quite see-through after one coat, and still a bit patchy after two. I've had this on for longer than a day and it's stayed on well so far, even though I mess/pick at my nail varnish (I know, bad!)
Like other bloggers have said, I'm not quite sure how much I'll use this, and whether I will encorporate it into my nail art? I definitely had to try it though, especially as Superdrug were doing 2 for £6 on Barry M, which meant I could also get one of the new Gelly's too!
What do you all think of textured polish? I still haven't made up my mind!
Here's my second manicure for green week! I bought this green glitter for 99p at the start of the year and have been desperate to try it out, but was saving it for green week! It's the same make as the glitter I used on my treasure nails.... I used it over the top of my recently acquired pale green Essie.
I was a little disappointed with this glitter, it took lots of coats and added 'dabs' to get a lot of glitter on each nail. Because I had to use so many coats, and because it was cheap I think, it took ages to dry, even with a fast-drying topcoat. But it was only 99p so I don't mind too much! Here are the polishes I used... doesn't that green glitter look beautiful in the bottle??
Even an hour or so after applying, it was still not fully dry and kept smudging so I ended up taking this off pretty quickly too! :-( However I did treat myself to these while I was in town, so my nails are already pretty again - another post soon...
I had two ideas I really wanted to try this week! I went with crackle nails first for two reasons. One is because I'd just recently bought the polish and really wanted to give it a try. And also because I thought it would be slightly less 'in-your-face' than my other idea that involves glitter, which would be better for work.
I bought this fab little set from Primark for just £3! You get a bright coloured base (there's different ones in different sets), a black crackle coat and a clear top coat. All for £3, awesome!I chose the set with green because I don't actually own a bright green colour, and I thought this one looked really nice. Also I didn't have a plain crackle top-coat! And obviously it'll be great value for money cos I can use them separately.
I decided to apply this before work yesterday morning. I first applied my new Green Tea & Bamboo Strengthener by Sally Hansen that I bought the other day with a 25% off voucher from the new Boots mag! (otherwise I wouldn't have let myself have it for the price). I then applied one coat of the green. One coat gives quite good coverage, and I thought that as it was mainly going to be covered up with the black anyway, I wouldn't waste time doing a second coat. (first mistake)
I then waited about 5/10 mins until the green was dry to the touch, then applied the black. (second mistake)
Once the black had crackled and dried, it had a kind of matte/discoloured finish, which I suppose is why you get a topcoat provided. I decided to try the primark top-coat to continue with the theme and to see how it worked. It was nice, very shiny and immediately improved the look of the nails. Butttt it took forever to dry, and I ended up smuding a nail, as I was kind of trying to multi-task (get breakfast, coffee, dressed etc!) ...you can see the smudge on my pointy finger here - had to go over it again!
I think this look is reaaaally effective. I made some big mistakes in applying it, and here is what I have learnt from my first go at applying this!
1. Give yourself enough time. You must let each coat fully dry before you attempt the next step.
2. Apply more than one layer of base coat, even though it's going to be partially hidden under the black.
(these two points are made because I only waited about 10 mins between the green and the black.THis meant that when I painted on the black, it partially removed the green at the bottom of some of my nails, and made it uneven in other places, which you can see in the pics. I think two fully dry coats underneath would have worked way better.)
3. Use a quick-dry topcoat if you are in a rush!
I'll definitely use this crackle again, maybe over a gradient or something! Oooh so many things to try! I think for now though I will take it off and try my second look for green week.
As it's still animal print week of our challenge, yesterday I came up with these! I work at a train station and my job this week is sitting upstairs in an office keeping track of where all the trains are and announcing them when they get into the station. I do a lot of talking, however my hands are free to doodle, so I decided to take in my gold and black nail-art pens and have a sneaky play.
I'd decided just to do black/gold leopard print, but after trying it with black blobs and gold outline, and the other way round, and wasn't impressed. After a quick google, I decided I would try zebra print. I'd failed at this in the past so wasn't really hoping for much. But because I had so much time to focus on it, I am really pleased with the outcome! I googled for a zebra print, and tried to follow bits of the pattern on each nail.
This probably took me about 4 hours in total as well as announcing trains! But it was good because I had time to let each dry before I did the next one. I'm especially pleased with how the nails on my left hand (I'm left handed so did them with my non-dominant hand!) turned out. I thought I wouldn't be able to do it at all, especially using the pens which you have to continually gently squeeze to get them to work. But it did!
Today I might take off the nails I've done leopard print and replace them with zebra so I have a full set... what do you think?
Can't wait til next week (green week) ...I've got a few things I want to do!
Week 7's challenge was one I was looking forward to - animal print! I've only tried doing leopard print nails a few times but they've always seemed to work out well - probably because you don't need to be completely neat and exact. I was really looking forward to trying out some new colour combinations, and I really wanted to try something pink!
I used my unnamed Glam pale pink (my favourite at the moment!), Ledbury Road bright pink by nails inc, and a black nail art pen for the details...and seche vite to finish it off (which slightly smudged the black because I didn't wait!)
Hopefully going to try some more colour combinations on the same theme during the week, as I love leopard print!
My boyfriend bought me this lovely Ciate Caviar mini-bar set for Christmas. He chose it himself which I love, because he managed to choose something up-to-date in the world of nail art, and as a bonus it comes with 4 lovely Ciate shades as well as 4 bottles of caviar beads.
I've been saving it to use on a special occasion, and when better than for a trip down to London to see some friends, including Naileymabob and others!
Here's my lovely Caviar set:
I love the polishes that come with it. The pink and orange are so summery, and the silver and gold are always good to have. I like that there's a choice of colours with the Caviar beads too, not just the one bottle.
So here is my first attempt at applying them.
I found it quite difficult to get an even covering, especially around the edges of each nail. I also found it difficult to 'compact' them down - the instructions said to tap/press gently on them to ensure they were all compressed but they just stuck to my fingers and came off when I did this! I added a top-coat to ensure they didn't come off, but I think this discoloured the beads a bit. Also, because I put on a top-coat, the whole layer of caviar/base coat started to peel off like a false nail during the day! I ended up removing them while we were sat having a coffee, which was a chore in it's self.
I don't think I will try these again any time soon, and if I do I think I'll just do an accent nail with the beads (which is what I was going to do this time but got a bit carried away!)
A plus point is that, even if you do all 10 of your nails, hardly any of the caviar beads are used up! I thought one manicure using these would use about half a bottle, but this isn't the case. Here is my bottle of beads after using them:
Keep a look out for my week 7 animal print nails, that I will post later tonight!
These are my nails today after my attempt at valentines hearts went wrong - I didn't have a steady enough hand! These took forever and needed quite a steady hand too for the black lines...
I started by drawing on the black line as a guide using a nail-art pen. I then filled in each segment with:
To Buy Or Not To Buy (the lilac) Essie
Heartbeat (pale blue) 17
Miss Sunshine (my new yellow) Accessorize
I probably should have used a small nail-art brush but I just used the brushes in the bottles. I needed 2/3 coats of each. I didn't worry too much about being exact, it was okay to go over the black lines cos I was planning to repaint them again at the end, which I did - argh so hard to be neat with a nail art pen without it blobbing everywhere!
Still - I like the outcome (if you don't look too closely!)
Still planning to do something heartsy for valentines day, and use my caviar beads at the weekend! Expect more posts soon!
Yay, look at my nails! ^
I sent these in to Look magazine when I saw they were asking for pics of nail art. I'd only just started out doing pretty things with my nails when I did this design (the cherry blossom, or as the magazine has named them- Fancy florals) so I was really happy when they said they wanted to put it in their mag! Also I didn't find their email for weeks as it'd gone into my junk mail, so I didn't even know if they'd actually feature these or if I'd missed my chance, as they didn't get back to me. I noticed a new issue was out today and had a flick through, and yey, there they are!
If anyone wants to submit their art, the address is look.co.uk/nails and you can upload as many as you like. You have to log in via Facebook but you can set it so it doesn't spam your profile with posts.
Because I was all happy with this, I decided to buy myself a little reward in town this afternoon:
I got:
Sally Hansen - Insta-Dri top coat (£5.99 Boots)
Accessorize - Aztec (£4)
Accessorize - Miss Sunshine (£1.20 in the sale) ...wanted a cheap pale yellow!
I was going to create some more yellow nail art with the pale yellow for this week's challenge, but then remembered I have an assessment at work with my boss tomorrow, and apparently the rule is to have nails that are "one colour". I've kind of stuck to this rule, because I've applied Aztec, which is technically one colour, from one bottle... it just shimmers beautifully from purple to green in the light!
In these pics, I've applied three coats. It definitely needs more than one coat as it's quite shimmery. I've added a topcoat of my new Sally Hansen.
(between the second and third coat of Aztec, I picked up the bottle to check the name, but I'd not screwed the top on as I was in the middle of coats. So I dropped the bottle to the floor and some splodged out :-( Good job it's a laminate floor! Shame I wasted some though!)
The Aztec is gorgeous, I love the way it catches the light. These pictures don't do it justice. It applies beautifully too. The Sally Hansen topcoat is also BRILLIANT. It doesn't dry as fast/rock hard as Seche Vite, but it goes on really well and isn't as gloopy, and still dries pretty quick!
I'll let you know how it lasts!
I knew that yellow nails were coming up, and wasn't really looking forward to this challenge as I don't own a nice yellow as it's not a colour I wear much! The one I do have is an ancient Barry M one that I once added a few drops of red to, so it's kind of a mustard colour. Definitely not something I wanted to cover all my nails in! I had the idea of doing animal print with the yellow and an orange, but then realised that animal print is next weeks challenge anyway, so didn't want to do the same thing two weeks in a row.
While chatting with a friend at work about the awkwardness of yellow nail varnish, she started thinking up things that are yellow, and came up with this: fried egg nails!
This was so quick and easy to do. The base is two coats of Sally Hansen's Dorien Grey, the white is by 17 and the yellow is my Barry M mixture I mentioned. I got out a nail art brush to use but just ended up using the brush in the bottle to splodge on the white, then the yellow. It took me hardly any time at all.
I want to try this again when I have more time, but make daisies instead of eggs - definitely prettier! And I did end up taking this off more or less straight away as I didn't want to get mocked at work for having EggNails!
Just a quick update to show you the addition I've just made to my geometric nails - and I like them so much better! The scruffy lines between the colours were annoying me, so I had the idea today to go over the lines with a nail-art pen. It's still not perfect but I think it looks a lot better, and like a stained glass window!
I only did this design yesterday afternoon, but after a shower/hair-wash and a day despatching trains at work, they were looking really scraped at the ends so I've touched them up a bit. Also the seche vite has kind of "separated" at the edges of my nails - I find it tends to do that quite a lot which is annoying because it ruins the flawlessness/smoothness. I think I will buy a bottle of Sally Hansen's fast drying top-coat shortly as I've heard good things, see if that is any better!
Looking forward to attempting something for next week's challenge - not sure what though! Yellow is odd to work with... I have a few ideas! Watch this space x
I don't want to post these nails cos I'm not pleased, but a few friends knew I was attempting them and I think they want to see the outcome!
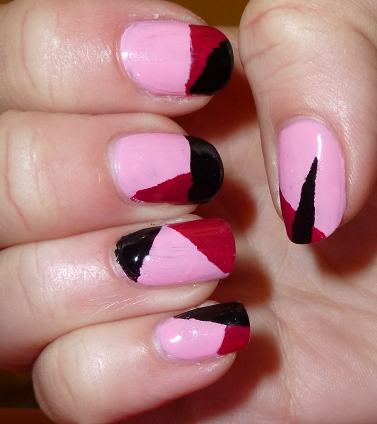
I was trying to recreate this which was posted on facebook recently. Stunning work! Not wanting to copy exactly, I decided to use shades of pink instead of purple, because I love pink and have a lot of different shades in my collection to choose from. I think my first mistake was choosing two really contrasting colours for the two pink shades - if they were more similar (like the two purples in the facebook pic) then I think my mistakes would be less obvious!
Okay - here is my attempt:
The biggest problem I have with this attempt is that the lines between the colours aren't crisp and straight. They're so messy! I used masking tape for the sections, and have tried peeling the tape off when the varnish is wet, semi-wet, dry.... it all messes it up. So does peeling it off fast, slow, in the direction of the polish, in the opposite direction etc. Does anyone have any further tips on how I can make the lines more crisp? Any help would be appreciated!