Thursday 28 March 2013

Shimmery & Studs!


I quickly did these nails as my Easter bunnies were chipping off at an alarming rate - very sad! 

I've recently bought this bottle of Sally Hansen - it's called Ruby Rush and it's a lovely, shimmery pinky-purple. I picked it up for £1.50 in Zest in York. I wouldn't have chosen it to be honest, but I'd seen a swatch of this shade on another blog and it really stood out - so shiny! And I love dark pink (although actually this is definitely more purple). I'm also not keen at the moment on shimmery polishes - I like a block colour. But I picked this up and was eager to see how it applied.

Firstly with a dark polish it's sooo obvious if you make a mess! I've not had time to fully clean these up yet which is why you might see a bit of overlap on some of my nails/cuticles. 


I added some studs from my stud-wheel from Born Pretty and sealed them in with a layer of Sally Hansen Insta-Dri (which sadly I think is going a bit gloopy/discoloured due to my constant use of it!). Here's some pics of my mani, both hands, with and without flash!


Have a look what other British Nail Bloggers are up to this week:

Monday 25 March 2013

Week 13 - Spring Nails


Well - this week we were challenged to create Spring nails, despite all the snow outside! I'd seen some bunny and kitty nails online that I'd wanted to try for a bit, and decided the bunnies would be ideal for the Spring theme. These haven't gone quite as I wanted, due to me being rubbish at using nail art brushes. Meh! But I think they're still quite cute, in a misshapen kind of way! Sorry about the black smudge in the top pic, I was trying to get my nail art pen to work, didn't want it making a big splodge on my nails so for some reason tried it out on my palm instead!

I picked 5 pretty pastel colours to use. Here they are:


To Buy or Not to Buy by Essie (purple)
Miss Sunshine by Accessorize (yellow)
Spearmint by w7 (green)
Un-named pink by Glam
Heart Beat by Seventeen (blue)

I then used my white polish, which is also by Seventeen, to paint some rabbit-faces on the tips of each nails. I just free-handed this with the brush, and thought it looked quite cool just like this:


I then totally failed with the ears. I tried using a really small nail-art brush but I just can't draw neatly with them! So I gave up and just continued with the brush (that's already in the bottle!). I wanted the ears to be cute and tapered towards the end, but I basically only managed to do two uneven lines/blobs on each nail. Oh well.

I then added the eyes and nose with my black nail-art pen which I find less faffy than using a dotting tool. I'm going to topcoat, but I left it about half an hour then started, and the black was still smudging, so I better leave it a bit longer!

Bunnies! <3

Ask a British Nail Blogger - Most Wanted Polish


I'm not really a massive fan of expensive brands of polish. I like any brand, as long as the colour is nice and the finish is good, and you can often get this from cheaper brands, such as Seventeen, Barry M & w7. So there's not a particular brand I would go for if I had unlimited money, I'd just go for fab colours!

However last week I saw the most gorgeous polish on one of the blogs I follow - Naily Perfect. Here is her swatch:


Look how shiny! I adore pink, and glitter, and Sally Hansen! I've never seen a polish quite like this before. Due to it being £7 on the Superdrug website I've sent a link to my boyfriend ....Easter Present?!

So this is definitely my most wanted polish - not that I've been lusting after it for years, neither is it out of my reach, but yeah - this is definitely the one I want at the moment. I don't usually spend more than £3 or £4 on one bottle so this one would be a nice treat.

Also I'd buy the full Sally Hansen Complete Manicure range if I could! However I do not need that many polishes..... but it'd be awesome to just have shelves upon shelves of polishes. Here's me (the short one) wistfully staring into the window of a shop in London:


Friday 22 March 2013

Tiny Little Pennies - wonky french manicure


I'm soooo happy with these nails! I've spent about two hours working on them tonight so I'm very relieved they turned out okay. 

 I bought some born pretty stuff a few weeks ago, and recieved it in the post at the beginning of the week - EXCITING! I got a wheel-full of different studs which I'm desperate to try out, and a tub of pink 'glequins' as the Nailasaurus and others are calling them - a cross between glitter and sequins. I'd seen these used in a variety of ways, and was inspired to actually go ahead and purchase them by the fabulous (and famous) Kathie when I saw this manicure. I had seen lots of very pretty ways to use these glequins, but as soon as I saw this manicure on Kelsie's Nail Files I knew I had to give it a go. She in turn was inspired by this look on Oooh, Shinies! 

So I think I managed to fit just enough links in that one paragraph(!!). I called this post Tiny Little Pennies after my sister's description of the glequins on this manicure! To create this look, I used Lychee by Barry M, Spearmint by w7 and my usual base coat of green tea and bamboo strengthener and topcoat(s) of Insta-Dri, both by Sally Hansen. And of course the MASSIVE tub of glequins from Born Pretty - what a bargain, they'll last my whole life!


I painted two coats of Lychee to start. I nearly didn't add anything else because the lychee gelly is so smooth and shiny and flawless! Love it! But I carried on, and used a small nail-art brush to paint the green shape across the top and down one side of each nail. I still find nail-art brushes really fiddly and can't work with them very well, but I persevered as I needed the line to be really thin at the side. It didn't matter if the join was a bit messy/uneven as it was to be covered up with the glequins. I then used a dotting tool to pick up each piece of glitter individually (I tipped a little pile out onto a piece of newspaper for ease-of-access!) and stick them onto my nail, where I'd added a top-coat to stick them onto. I did one nail at a time, adding the topcoat then the glequins. I then added a final layer of topcoat to each nail to seal the glequins in. Ta-da!


Wednesday 20 March 2013

Bathroom Tile Nails!


These nails were, believe it or not, inspired by some tiles I saw in a bathroom over the weekend in London... They were off-white, with grey and beige specks, kind of like this:

It made me think of some of my new and much-loved polishes... So to create this look I used: Lavender Cloud & Dorien Grey by Sally Hansen (the white and the grey) & Lychee by Barry M (the nude). I started by using a few coats of Lavender Cloud as a base. I thought from the name this might have a hint of purple/pink to it, but it's basically white! I then used a straw to splatter grey over the top. Cos my boyfriend was laughing at my method, I didn't splatter for the beige, but kind of mashed it on with the end of the brush. This took a while and I wasn't that happy with the result, but I've had some positive comments at work and it's beginning to grow on me. 


Monday 18 March 2013

Bloglovin'

Follow my blog with Bloglovin :-) xx

Week 12 - Violet Nails

This week I was supposed to create something in Violet. I realised that I actually didn't have any polish that would really count as 'violet'. I had two really pale purples, and two really dark ones. I don't really do purple nails! I haven't been near any shops luckily, or I think I would have talked myself into buying a new polish just for this challenge. 

Instead I decided to improvise. I found a pale purple Barry M polish that I've had for about 6 years and hardly ever used. It'd gone all gloopy so I added a few drops of nail varnish remover. I then added blobs of pink and blue varnish to make the colour darker. I shook it all up, and I'd managed to come up with a purple that was a bit darker and a bit richer. And I've still got my other, newer bottle of pale purple so it's all good!

 
Here are the results! I quickly blinged it up with some purple gems from my poundland wheel, and Barry M's Amethyst glitter. This is definitely not the neatest mani I've done, as it's my Dad's birthday today and I've got to wrap presents, make cakes, go and visit etc, so I kind of rushed. 


Also I've got lots of other ideas I'm desperate to try, so wasn't really inspired by Violet! Still, I'm enjoying the challenge and how it keeps making me step out of my comfort zone. Looking forward to Spring & Easter week that are coming up!

Wednesday 13 March 2013

Greenberry Gradient

I love this mani!!


I was determined to keep my three-tone glitter nails on for another day, but just as I was going to bed last night, one peeled right off, so I had to peel all the rest of them off there and then!! So this morning I knew what I was going to do with my nails as I've just bought greenberry gelly by Barry M. I was inspired to buy this colour after seeing my fellow nail-challenger Bob use it in this manicure. It looked so shiny! After my successful gradient using Lychee gelly and pink, I wanted to use greenberry in a similar way. I wanted to pair it with a more neutral colour, but I didn't want it to be too samey, so resisted Lychee again. I went with my other neutral favourite, Dorien Grey by Sally Hansen. Ahhh will I ever be bored of this beautiful colour? I think not. Totally worth £1! 


 I sponged on the gradient with a make-up sponge, and added a tiny bit of darker green to the very tips, using the green polish I got in my crackle-set from Primark. I was really pleased with the outcome (apart from being able to see the sponge marks a bit from the darker polish.) I thought it could do with something else though, so I wasn't sure what. I got out my 'tools and accessories' box to see what caught my eye...here's a pic of all my stuff all over the floor next to me as I worked! I try to just get out the things I need, but today I ended up with everything everywhere:


I went for my poundland rhinestone wheel, and was initially going to use the little emerald green squares. I changed my mind at last minute and went with these black triangles instead. They're fab because they look like studs, rather than of sparkly rhinestones. I stuck them onto a still-wet topcoat, then sealed with another. I'll see how long they last, because I've got about 100 layers of varnish on in total and that always makes it nice and thick and easy to pick off! Must resist as I'm really pleased with this look.


Oooh and also today I went into a new poundland that I forgot existed, in a little shopping outlet just outside the town centre. I found two shades of Sally Hansen! Both were very similar so I got just one, it's like a white with a subtle pinky/purpley tinge, and it's called Lavender Cloud. Can't wait to use it, and well chuffed with my find! Keep a lookout for it being used later in the month because I'm sure it will be if it's anything as nice as Dorien Grey.  

Tuesday 12 March 2013

Greeny, Gradienty & Glittery


Today I'm showing you my previous attempt at glitter nails, that I couldn't post as I had no internet! The inspiration for these was the glitter it's self - It's one of the only polishes I've had for a while and not used, so I really wanted to use it for glitter week. This glitter is from Claire's Accessories, who do some fab, unique combinations. This one has hex glitter in pale pink, pale green and gold, as well as tiny silver glitter. Here it is:


Gorgeous! In the bottle it reminded me of a kind of camouflage print, so I decided to team it with green. None of my greens seemed right, so after browsing a cheap cosmetics store in York called Zest, I picked up a pale green w7 polish called Spearmint. (Actually, this is a lie, I probably had several polishes that would have been fine to use for this look, but I'm addicted to buying new stuff! Already bought 3 new polishes this week arghhhh).... I picked this colour cos it looked quite muted in the bottle which is what I was after, however on my nails it was quite bright and vibrant!

I started with a base coat of Sally Hansen's Bamboo strengthener. Not sure if it's actually working cos my nails are so rubbish quality they seem beyond help, but I'm gonna keep trying. I used 3 coats of the green, and then created a gradient with layers of the glitter. It was quite hard to get a lot of the glitter where I wanted it, which ended up with me using a lot of layers and then it taking aaages to dry. You can also see by the pics that I changed my mind from my pointing finger and middle finger - these have glitter all the way down to the bottom of the nail, whereas on my ring and little finger I've only gone over the tip of the nail. Can't decide which looks best but wish I'd have stuck to one or the other, haha. Here are the polishes I used, including my Sally Hansen top coat. I also apologise for the dryness/grossness of my hands, but it's very cold outside at the mo and I work outside - my poor hands! I'm trying with the handcream but I always forget. Anyway - pics!


Monday 11 March 2013

Week 11 - Glitter Nails

Yay, I have my internet access back! I've got my first attempt at glitter nails for this week's challenge still to show, but I'm going to show you my second attempt first because it's on my fingers right now and I quite like it. I was struggling to think how I could make glitter arty in a way that wasn't a gradient. I had a google and saw a few ideas I was really keen on.... however, they were all gradients! Haha. So I decided to use three colours and see what I could come up with.


 I basically just kept painting on the different glitters to build up the layers, overlapping them a bit to try and blend them together (which kind of worked). I like these, but I reckon if I was to do it again, I'd use a base coat of red, as you can see through the glitter in some lights to my nude base coat - a bit more obvious in this next pic.

 
I used:
Gold Glitter by Barry M
Pink Glitter (no name?) by w7
Trafalgar Square by Nails Inc.


I finished off with two coats of Sally Hansen's Insta-Dri to make them smooth and shiny. I love this topcoat as it doesn't "split" at the sides like Seche Vite, but it does take longer to become rock hard... it dries, but it will still mark if you knock it for a while after. 

One last pic: Here's all my glitters in a nice little row, while I was deciding which to use and what to do! I love all of these and don't use them often enough...


Thursday 7 March 2013

Soft Pastel Gradient


I had some time spare before work this morning, and what better way to spend it than to do some nail art! I had nothing particular in mind, but looking through my boxes of nail-stuff (I now have three boxes, two for varnish and one for tools and extras like brushes, rhinestones, studs, loose glitter etc) and I came across a bag of make-up sponges I'd bought from the pound shop. I thought they'd be good for gradients, as previously I'd just been using a washing up sponge which is coarser and more "holey" ! But I'd not yet tried them out, so decided to do so today.


I began by applying two/three (can't remember!) coats of Barry M's beautiful Lychee gelly. I then used my regularly-used pale pink by Glam to sponge a gradient from the middle of each nail to the tip. The sponge was way better and made the gradient much smoother. I also worked out that you need to do quite a lot of dabbed coats, each one getting higher up the nail to create a really good gradient. I finished off with a thick topcoat of Sally Hansen's Insta-dry. This smooths out the gradient even more and makes the nails super-shiny!


I'm really pleased with how these turned out! They look so smooth and the colours go nicely together. Again, sorry about quality of pics; from my phone again. & didn't crop the last pic - was resting my hand on top of this model bus on my windowsill to keep my hand steady for the photo and actually quite like the pic as a whole!!


Famous 2!

Quick post to show off the latest issue of Look Magazine. There's quite a few pages about nail art in this issue which is fab, usually it's just a page, but there's some quite nice full-page pics of nail art trends as well as the ideas/readers pics page.

If you want to submit your nail art to the magazine, the web address is look.co.uk/nails. There's some fab fab art on there so no idea why they chose mine again!


Here's my original blog post for these nails, I didn't state they were "galactic" but glad that's what it made Look Mag think of!

Wednesday 6 March 2013

Multi-colour Crackle

Hello!
Quickly typing this up as I don't have any proper internet access until Monday - sad times! But wanted to keep my blog updated, so here's some photos of my most recent nail art... although sadly, bits keep getting chipped off what with moving furniture and cleaning. :-(
I'd recently tried out crackle varnish over a block colour, and thought how fab it could look over multi-coloured nails. I picked two of my old favourites for the base, which were Coral Pop (the pink) and Wave, both by 17, and both hi-shine. They're kind of like the Barry M gelly range, fab colours and consistancy. I painted my nails with the pink, and once this was dry I added blotches of green.
Last time I played with crackle, I didn't wait long enough for the base coat to dry. I think I waited about 10/15 mins, and it felt dry to the touch but when I painted on the crackle, it smeared the polish underneath leaving it bare and patchy. This time I left the base coat (the pink) on overnight, before adding the green blotches the next day. I let these dry for about an hour. The green still smudged a bit but the pink looked pretty good.
Here's the result... (sorry about pic quality, phone pics)


and some pics showing what my nails were like underneath before the crackle top coat - messy but it doesn't matter! (this was when I had to re-do three after they got all chipped, so colour combo reversed!)


Lastly, here's another pic I never got round to posting of blue glittery nails I did for this week's challenge theme. It was a look I'd used on one nail of my previous blue effort, and I thought it looked nice so did all my nails the same for a simple but sparkly look.


 Lastly again - my nails are in Look magazine again! YAY! I'll do a special post later with a pic of it. :-D

Sunday 3 March 2013

Week 10 - Blue Nails

Hello! Firstly an update on my previous sparkly nails. The house is covered in glitter from when I applied them! But once they were on and sealed with topcoat, they actually stayed on pretty well, and looked SO glittery! They catch the light so well. I ended up peeling them off yesterday - my own fault cos I can't stop picking at nails, especially if they are textured. My nails are so thin and flimsy underneath though :-( Bad times.

As I've mentioned, I'm in the middle of moving house. On Tuesday, a van is coming to take all our big belongings (sofa, bed etc) to the new house. Meanwhile, we've been using the car to take boxes of our smaller belongings....books, DVDs, clothes, NAIL VARNISH etc. So my nail varnish was all boxed up at the new house, but we are still living at the old house! My parents came to see the new house today, and while we were there I took the opportunity to raid my nail varnish boxes and find my rhinestone wheel, and grab all of my blue polishes, for blue nails week! I think my dad said something like "...no it's okay, I'll sort your house while you sort your nails!" I was like....cheers!! Hehe.

So I returned home with this little stash, and still no ideas:


 From left to right, the polishes are:
* Blue Dazzle (I think) by w7
* Motcomb St by Nails Inc
* Heartbeat by 17
* Seabreeze by 17
* Damselfly by Accessorize

I knew I would be able to do something as the theme was so broad. I've had a wheel of different coloured/shaped rhinestones that I bought from Poundland for a few months now. I knew this had a few blue ones in, and wanted to try and use these in my design if I could, because I'd not had chance to play with them yet! I decided I'd paint my nails various blues, and then section off triangles with tape and paint these a different colour. I'd then put a blue rhinestone at the point of each triangle. Here's a close-up of the two different shapes/colours of rhinestone I had to choose between. Not my favourites of the wheel, my favourite you can see a sneak peek of in the second photo - the emerald green square gem. I also like the magenta tear-drops. Going to be using those soon I hope!


I still wasn't very inspired, but went ahead anyway. I ended up doing both my hands completely different to each other! Here's a photo of my nails with just the base colours, and then pictures of how I added to them. I think I like it better with no additions, but I wanted to try something arty!


In the next pic, which is of my right hand, I really don't like how the triangle/gems ended up looking. They're too messy, and look too random- I tried too many things on one hand!


I prefer my left hand where I've done a kind of blue french manicure with the addition of a glitter accent nail like I've included on my right hand. I might change my right hand so it matches, but then again I probably won't because that's way too much effort! My left hand:


Sad about my middle fingernail that I accidently bent/bit off yesterday. Bad bad me. I usually bite my nails and it's a real struggle every day to stop biting or picking at my actual nail... so I'm really proud of the ones that are long, because it's really not normal for me! Going to continue trying to keep them long, as they're then a better canvas and I can carry on experimenting with nail art.

Friday 1 March 2013

Bling It On - Feathers


Hello! Today I've got some super sparkly nails to show you. Last month, I got a lovely Nails Inc - Bling It On - Feathers set from my lovely boyfriend. He went online and selected it himself like he did with my caviar set - good taste! And I would never spend that much on nail varnish for myself so it's good I have someone to buy me the occasional expensive thing!! I decided to have a go at applying these today. Here is a picture of the set...


In the set, you get two pots of "feathers", which are tiny strands of holographic glitter in two similar shades. You also get two nail varnishes, a pale brown/nude colour and a clear top-coat. There's a little tray for application and a brush. The idea is that you coat your nails with the nude, and while the polish is still wet, you dip your finger into the little tray which you fill with a little pile of the glitter. 


 You hardly need any glitter. Even with all my nails covered, the bottle still looks unused. It's simple enough to get the glitter to stick, and you gently pat it down to ensure it's secure, like with caviar beads. One problem was that it goes ALL OVER! I sat on the floor to apply this, and put a sheet of newspaper down, and I'm so glad I did! Here is the mess:


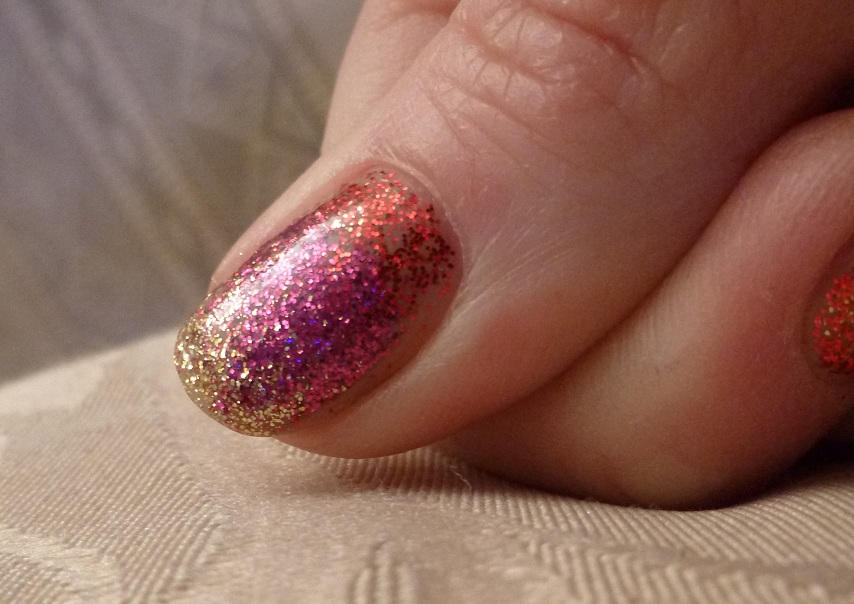
I repeated this step with each nail. I used the darker glitter on the majority of my nails, and the lighter, silvery glitter on my ring fingers of each hand for a bit of variation. I used the topcoat provided to go over each nail, which was tricky as it kept picking up/moving the glitter. I then added an additional topcoat of Sally Hansen's Insta-Dry to ensure it was all sealed in. The instructions say that the topcoat is optional as it makes the nails look less textured, but I think it's kind of essential to avoid shedding a trail of glitter wherever you go! 


This look is fab for the volume of glitter you can get on each nail, and how they're sooo sparkly cos the glitter catches the light in so many ways. I think, like with the caviar, if I was to use this again I might just use it on a few accent nails rather than all of them. Also like with the caviar, it's difficult to get an even/straight edge around your nails- it's not completely neat and even and I think this would be very difficult to achieve. This look creates a lot of mess and takes a while to apply... but worth it for the shinyness!


And lastly an update on my previous post with my speckled blue nails... I was right, it was VERY stubborn to remove. I'm in the process of moving house so couldn't even try the foil method to remove it cos I don't know where the foil is!