Hello!
I wanted to do some nice, bright nails for a trip to London this weekend. I knew I wanted to use my new, super-bright Electric Nights polishes I'd recently bought. These are by China Glaze and they're gorgeous!
I also wanted to try out my new swirly vinyls from She Sells Seashells. I thought I'd combine the two, and came up with this! For all nails I started with a white base - I used Cotton by Barry M. Once this was dry, I topped my ring finger, little finger and thumb with two coats of the neon glitter.
For the swirly nails, I waited a bit longer until the white was completely dry. I then used tweezers to carefully pull up a swirly vinyl, and stick it down onto the nail, two to each nail as my nails are long! I painted over with the pink, then removed the vinyl immediately. There were some imperfections where the pink leaked a little into the white, so I used a white nail-art pen to correct this before topcoating.
I looooveeee theeeemmmm!!!
My nails today are refreshing and summery! I've wanted to use nude with neon for a while and I came up with this design - and I love it! I was initially thinking of adding a leopard print design either over the neons or over the nude, but I liked the 'fresh' look of them without so left them plain.
The base is Lychee by Barry M, and the two neons are Beach Bag (orange) and Sun Hat (pink) from the Models Own Polish For Tans collection. They're stunning colours! I did the chevrons using template vinyls from She Sells Seashells.
Hello!
In my last mani, I used Princess Sabra by A England and using it really made me remember how much I love A England's polishes - they apply so beautifully and smoothly. While waiting for that mani to dry, I had a little look on their website and saw that Jane Eyre, a beautiful purple/black that I've admired before (partly just due to the name <3 ) was only £6 as it's 'gem of the month' I had to treat myself. Free postage too!
It came really quickly, and I was dying to use it. I didn't have any really inspired ideas for a specific manicure, but eventually decided to pair it with my silver holo polish by Seventeen (Boots) to come up with something pretty. I started off with a base of the silver, two coats:
I then waited for the silver to be fully dry. Later on I came back to the mani, and used straight and chevron nail vinyls (like stickers) that I got from She Sells Seashells. I applied them to the nail using tweezers, then painted over the exposed part of the nail (except from the triangle at the bottom) using Jane Eyre. I quickly removed the vinyls and discarded them. Here's a few quick photos from the process, it's pretty simple but fiddly, and sometimes a bit awkward to get the vinyl in exactly the right position you want, but worth it for the outcome!
I really like how these look, hopefully I will get a better pic in the daylight tomorrow because I don't feel like these photos have shown how rich and pretty this purpley polish is! Here's one more for now:
Hello!
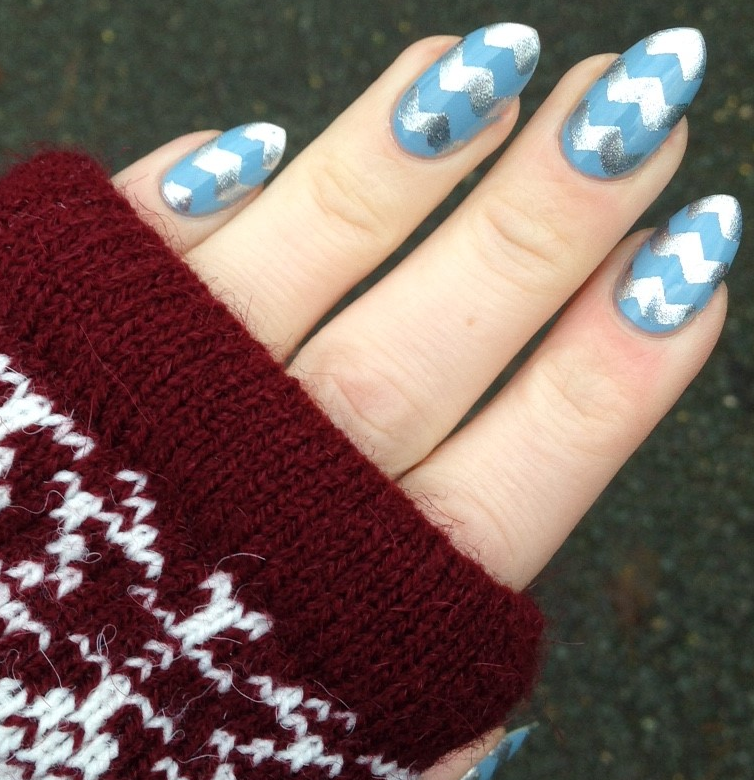
I did these nails a few days ago as I wanted something wintery for when I went to Winter Wonderland in Hyde Park. I wasn't sure what I wanted to do - I was initially going to do a gradient with some snowflakes over the top, but I did that last year and wanted something a bit different. I eventually settled on this design.
I started off with two coats of Elderberry (the blue) by Barry M, and topped it with Sally Hansen Insta-Dri to speed up the drying process. I then left it for about an hour to make sure it was really dry.
I then took my zigzag chevron vinyls from She Sells Seashells.These are like stickers, and I used tweezers to put a set of five chevrons onto a nail, using the pointed tip of my nail as a guide. I then peeled off every second vinyl, and filled in the gaps with a silvery foil polish that I got in last years' Ciate calendar (and I'm loving this years' too so far!!) ....I removed the remaining vinyls carefully with the tweezers, then topcoated.
It took a while to do this design on all my nails but the overall effect is really striking, I love them!! The contrast between the reflective silver polish against the duller blue is really pretty and keeps catching my eye.
Hello!
Some more new nail art today. These nails were inspired by @lookatmynailart on Instagram who posted a beautiful blue version of this manicure. When I saw it I immediately knew it was something I'd like to re-create.
I decided to create a pink version. For the base, I used Strawberry Ice Cream by Barry M. This is one of their older polishes although I only recently purchased it. It's not one of their gelly range, but there isn't a gelly that's this perfect shade of pale pink - I love Rosehip but that's a bit TOO light for what I wanted here. However, this polish is very sheer and jelly-like and even after three coats I could still through it slightly! I stopped at three coats as I didn't want the polish to be too thick.
Once this was fully dry (I used fast-dry topcoat and waited about an hour) I applied straight nail vinyls (stickers) from She Sells Seashells as guides to form the triangles. I could have used striping tape for this but found using the vinyls are much easier - they're pre-cut, and less flimsy. This is what they looked like without the leopard print - I thought they looked quite nice like this!
I filled in the triangles with one coat of Lychee by Barry M (above). This one is a gelly so is a good one-coater! I peeled off the vinyls using tweezers. After some more fast-dry topcoat and some more waiting, I doodled on the leopard print pattern with my Barry M black nail art pen.
I topcoated this, but I was worried about smudging the leopard print, so I decided to 'dab' the topcoat gently over the design, then once dry add a second coat. This worked really well and prevented smearing the design after I'd spent ages filling in each triangle!
I love these nails, it's such a clever design (that I borrowed!) and looks so intricate, but it wasn't too difficult! Here's a quick collage of photos I took mid-design, including the top left which was a doodle I did at work to get it straight in my head how I wanted the design to come out on my nails!
This was my first go at nail art since before my hols, so I decided to re-create a design I'd recently seen and loved!
I picked a design by @iscreamnails that I saw on Instagram. They remind me of WAH nails with really funky and bold designs, and most of their manis being skittle - with a different design on each finger. They're in Australia though so I can't visit!! :-(
I used Pink Veneer by Models Own and Regents Place by Nails Inc. I also made use of my Barry M nail art pens and my She Sells Seashells nail vinyls for the zig zags. I love the outcome, and although the design is not originally mine I loved being able to recreate it! It did take ages though! Here's the outcome:
And here's the original manicure from Instagram:
Hello!
This week's BFF Friday theme is: Fishscale nails! Myself and Laura of Naileymabob both made an order in the past few weeks from She Sells Seasells, who supplies fab nail accessories like studs and vinyls. When chatting, we realised we'd both ordered the new Fishscale vinyls, and were both eager to try them out, so decided we'd both create a manicure using the vinyls somehow, and this would be our theme.
Obviously with them being fishscales, I wanted to create something that made me think of the ocean. Luckily, I'd also ordered some seashell studs which are soooo cute, so I used these too. This is what I came up with!
I used Greenberry and Guava and a bit of Prickly Pear gelly polishes by Barry M. On all my nails except my ring finger nails, I created a water marble using these three shades. I was quite proud of this as I've never really done a successful water marble.... and I definitely won't be trying it again for a long time, so much messing about!!
For the accent nail, I started with a base of Greenberry (two coats) and let it fully dry. Can I just say, Greenberry is the most beautiful polish ever! <3 anyway, once it was FULLY dry, I stuck on the fishscale vinyl, painted over my nail with Guava, then used tweezers to remove the vinyl.
Firstly, I was very impressed that the vinyl covered my whole nail - I have had several products before in the past like stamping plates etc that claim to cover a full nail, but because mine are quite long they haven't.... but these vinyls were definitely long and wide enough to work really well!
Something I found difficult was actually getting the vinyl on and off the nail. Due to it being quite a complex shape, I struggled. When removing the vinyl from the backing paper, some of the little 'scales' that were meant to pop out of the pattern didn't, and I had to use a pen to press them out - which was hard because I didn't want to rip or stretch the vinyl. Also when removing it I had to be careful not to stretch it and mess up the still-wet polish. I did manage though, and I think I'll be a lot better at using these next time round having learnt how best to do it!
I wish I'd used more contrasting colours as the watermarble and fishscale patterns are not too obvious unless you look closely - although I do think you can see the patterns more obviously in real life, so that's okay!
Here's some pics with and without flash to try and show the marble and fishscale off!
Hello!
Here are my nails today. I used my new nail vinyls from She Sells Seashells for the negative space!
I started off with a base coat of nail envy, and when this was fully dry I used tweezers to stick the V-shaped vinyls(stickers) to my nails. It was so hard to position them exactly right!
I then painted the bottom of each nail with Models Own 'Shades' and the top with Seventeen's Holo polish. After each nail I removed the vinyl with tweezers before the polish was dry. In hindsight I wish I'd have let the first coat dry with the vinyl still on, then added a second coat of each colour before removing the vinyl, as I can really tell there's just one coat of these polishes - they look a bit patchy in some lights! This isn't too obvious in real life and from a distance though!
I topcoated with Gelous to make them smooth and shiny. I wasn't sure about these when I did them last night, but after wearing them all day they've definitely grown on me - loving them now!




.JPG)


