Hello!
I fancied some really bright, summery nails, so decided to copy a diamond/ikat sort of pattern I'd seen. I used Greenberry, Grapefruit and the Yellow LE Barry M.
I created the pattern in pink and yellow with a dotting tool, then once it was dry (helped with fast-dry topcoat!) I outlined the two diamond shapes using a nail art pen. I did this using tiny line-type motions to make the edges look jagged. Another coat of topcoat and I was done!
Hello!
Today I've got a special post to share - I have two new polishes from Freckles Polish to give you a sneak preview of. Both of these polishes are from a new collection to be released on August 1st, and the collection is called "A Typical British Summer" - very clever! Freckles Polish is an Indie polish brand, meaning all these polishes are hand-made.
The first polish I have to share is called Wellies Or Flip flops? which to be honest is the dilemma I've been facing for the past week - what do you wear on your feet when it's forecast to be very hot, with thunderstorms?!
This polish is a lovely bright blue shade with a scattering of different sized purple glitter, with the fab addition of some butterflies!
In these swatches I applied three coats with no base coat. I had to do a little fishing to catch those butterflies and place them on my nails, but this is normal with big glitter pieces. The smaller glitters came out very generously!
I loved this shade of blue, and the butterflies! I think next time I use it though I will use a similar blue as a base coat, then just use one coat of this polish, as some of the glitters/butterflies in the first coat got all covered up as I added more coats!
The second polish I have to show you is an absolute beauty and I love it! It's called Strawberries and Cream (yum!) and is a pale milky-pink base with tiny red glitter (squares and circles) medium red hexes and big red circles. There's also a scattering of tiny blue "lines" that really make this polish unique. I'm not usually a fan of this "line/bar" glitter, but in this polish it just seems perfect, and there's just the right amount.
Here's the pictures, look at those amazing big red circle glitters! Looooooove
I love pale pink polishes with a funky mix of glitter, so this one is absolutely perfect for me!
If you want a nosy at the other new polishes that are going to be released as part of this collection, check out Freckles Polish Facebook page, and also follow them on Instagram and Twitter for more sneak-peeks and updates.
The collection will be released on the 1st of August and you will be able to purchase them here on Etsy. Also, check out the polishes already for sale in the Freckles Polish store, they're so pretty, especially the holographic ones!
Hello!
This week's BFF Friday theme is: Fishscale nails! Myself and Laura of Naileymabob both made an order in the past few weeks from She Sells Seasells, who supplies fab nail accessories like studs and vinyls. When chatting, we realised we'd both ordered the new Fishscale vinyls, and were both eager to try them out, so decided we'd both create a manicure using the vinyls somehow, and this would be our theme.
Obviously with them being fishscales, I wanted to create something that made me think of the ocean. Luckily, I'd also ordered some seashell studs which are soooo cute, so I used these too. This is what I came up with!
I used Greenberry and Guava and a bit of Prickly Pear gelly polishes by Barry M. On all my nails except my ring finger nails, I created a water marble using these three shades. I was quite proud of this as I've never really done a successful water marble.... and I definitely won't be trying it again for a long time, so much messing about!!
For the accent nail, I started with a base of Greenberry (two coats) and let it fully dry. Can I just say, Greenberry is the most beautiful polish ever! <3 anyway, once it was FULLY dry, I stuck on the fishscale vinyl, painted over my nail with Guava, then used tweezers to remove the vinyl.
Firstly, I was very impressed that the vinyl covered my whole nail - I have had several products before in the past like stamping plates etc that claim to cover a full nail, but because mine are quite long they haven't.... but these vinyls were definitely long and wide enough to work really well!
Something I found difficult was actually getting the vinyl on and off the nail. Due to it being quite a complex shape, I struggled. When removing the vinyl from the backing paper, some of the little 'scales' that were meant to pop out of the pattern didn't, and I had to use a pen to press them out - which was hard because I didn't want to rip or stretch the vinyl. Also when removing it I had to be careful not to stretch it and mess up the still-wet polish. I did manage though, and I think I'll be a lot better at using these next time round having learnt how best to do it!
I wish I'd used more contrasting colours as the watermarble and fishscale patterns are not too obvious unless you look closely - although I do think you can see the patterns more obviously in real life, so that's okay!
Here's some pics with and without flash to try and show the marble and fishscale off!
Hello!
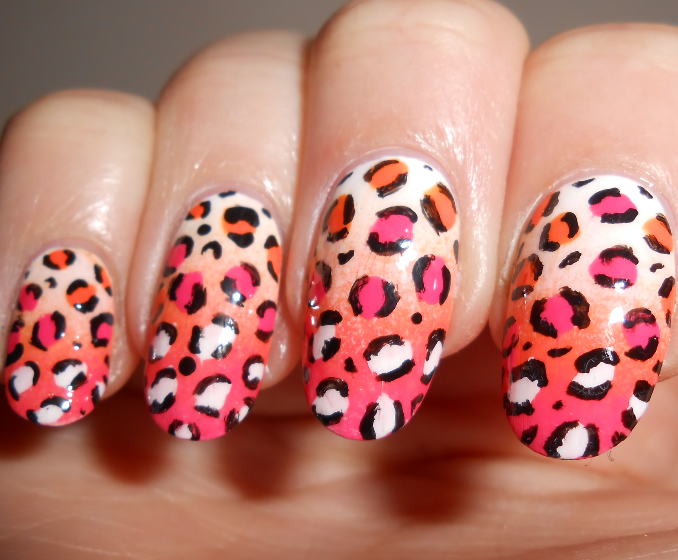
Urgh, it took me a while to settle on a nail design today! I started doing a few different things but each time ended up removing what I'd done as it wasn't working like I wanted! So I decided to return to my go-to nail art when everything else isn't working - a gradient!
I picked white (Snow Me White, Sinful Colors), orange (Mango, Barry M) and pink (Grapefruit, Barry M) and created my gradient in the usual way, using a make-up sponge. I find pastels blend better in a gradient and these were definitely not pastels, and resulted in a bit of a sponge-y finish. I really wasn't keen, so thought about what I wanted to put over the top! I went with leopard print, using the colours from the gradient, and I love the result!
Here's a quick step-by-step guide using pics I took on my phone as I went along, so apologies they're not top quality!
And some more pics to show off the finished design:
Hello!
Here are my nails today. I used my new nail vinyls from She Sells Seashells for the negative space!
I started off with a base coat of nail envy, and when this was fully dry I used tweezers to stick the V-shaped vinyls(stickers) to my nails. It was so hard to position them exactly right!
I then painted the bottom of each nail with Models Own 'Shades' and the top with Seventeen's Holo polish. After each nail I removed the vinyl with tweezers before the polish was dry. In hindsight I wish I'd have let the first coat dry with the vinyl still on, then added a second coat of each colour before removing the vinyl, as I can really tell there's just one coat of these polishes - they look a bit patchy in some lights! This isn't too obvious in real life and from a distance though!
I topcoated with Gelous to make them smooth and shiny. I wasn't sure about these when I did them last night, but after wearing them all day they've definitely grown on me - loving them now!
The Tour de France is passing through York, where I live, tomorrow, so I just had to do nails to celebrate the occasion! Unfortunately I won't actually be able to watch the race as I'm working, helping people passing through the station who are going to watch it.... *grumble grumble* .....anyway, it's been a fab atmosphere in Yorkshire for the last month, with pretty bunting everywhere, and yellow bikes! Here's one of the bikes at the front of the station (taken by me!), and a pic (found on google!) of the bunting that inspired these nails...
I kept these nails simple, as I think I'd have struggled to draw a bike or copy the Tour de France logo so I just stuck to the colours from the bunting/shirts and added a union jack! I used:
Snow me White (Sinful Colors)
Grass Slipper (Sally Hansen)
LE Yellow (Barry M)
Malibu (Barry M)
Passion Fruit (Barry M)
Slightly annoyed because I left the dots to dry for aaaages before I topcoated, but it still smudged, waaah! :-( Otherwise I think these capture the spirit of the event nicely :-)
Hello!
I've wanted to have another play with my chevron/zigzag (never sure what to call them!) vinyls from She Sells Seashells for a while, and when I saw a manicure on Instagram by @memyselfandmynails I was inspired to do a similar manicure.
I painted my two middle fingers white, using Snow Me White by Sinful Colors (two coats). I painted the rest of my fingers pink, using Pink Veneer by Models Own, hypergel. I've used more than half of this bottle already, and it's starting to go a bit gloopy :-( It's such a lovely shade, but can be a bit difficult to apply!
Once my two middle fingers were completely dry, which I helped along with a quick-dry topcoat and also waited a while - you need to do this as the chevron stickers are very sticky and if your polish isn't fully dry it will just peel off along with the stickers when you pull them up!
For the chevron finger, I placed a block of 6 chevron stencils over my nail, and then removed every 2nd one using tweezers. I did it like this so there'd be an even gap in-between! I then painted over the gaps with pink, then immediately removed the remaining chevrons.
For the flowers, I used a large dotting tool that I won via the amazing Naileymabob from Models Own, and then a smaller dotting tool for the leaves. The dots in the middle I made with a white nail-art pen.
I think this was such a simple look to create, but I adore it! I hope it's subtle enough for work as the colours are pale and there's not a pattern on every finger..... or am I just delusional that these are "plain"?! Ha ha I don't care because they're prettyyyy! I'll just have to keep my hands in my pockets all day....
Hello. Here's today's manicure! Palm Trees! I love doing manicures with a simple pattern or print repeated all over, I think it looks really effective.
The base shade for these is Sun Hat by Models Own from the Polish For Tans collection. This is a super-bright neon barbie pink, and no way as bright as in these pics - couldn't get the camera to quite capture the brilliant neon. I only used two easy coats of the base shade - I love these polishes so much!
Once the base was dry I added the little palm trees using my black and white Barry M nail-art pens. I can't believe these are still going strong as I used them in practically every mani - definitely my best nail-art buy EVER.
I finished with a topcoat of Nails Inc Caviar topcoat. This is my definite favourite of the moment but one I don't think I'd buy as it's £12 a bottle and I don't think I can justify buying that when I never keep my manicures on more than a day or two at a time! The bottle I'm using now I won as a prize.
Here are some more photos, ignore the extra "white lines", these are reflections from the flash/light in the room!