Thursday, 21 November 2013

The Snowman - Indy's Indies

Hello again!

Second post of the day, but I decided to show off one more Indy's Indies polish before I am back at work tomorrow. This awesome polish is called The Snowman, for obvious reasons! It looks like a mushed-up snowman in the bottle with all the big white circles, small black dots and orange shards. I think it's genius!!


How awesome!? 

I began with a base coat of white, with two coats of Cinderella by Sinful colours (a pale sparkly blue) layered over the top. I then applied two coats of The Snowman, again with a bit of prodding to get the pieces not overlapping and spread semi-evenly across the nail. To bring the manicure together I added an accent nail of a snowman's face, using my Barry M nail art pen and a bit of orange polish! 

I loooove this polish. Can you tell?! It's so unusual and cheerful (and a tiny bit sadistic if you think of it as lots of snowmen all mushed up and shoved into a little bottle, hehe) ....but still so awesome. 

The white circles were really easy to get out of the bottle, the orange shards too but they were more reluctant to come off the brush and go onto the nail due to being smaller. The black dots I couldn't see against the black brush so couldn't really place them, they just came out wherever!


If you would like to purchase this polish for the winter season, head over to Indy's Indies on Etsy, where you can buy it as a mini or full size bottle. There's also some other xmas/winter polishes, including What's Your Favourite Colour? that I reviewed earlier today. 

What's Your Favourite Colour? - Indy's Indies

Hello!

I've got a series of pretty posts to come up. I recently bought five Winter/Christmas polishes from Indy's Indies, which in case you didn't already know is a UK indie polish brand by the fab Danielle. She mixes all these polishes herself and has come up with some fab, glittery combinations for the Christmas season. Here are the polishes I bought, all mini-versions (you can get full-size too) so I could try out more for my money!


(L-R, The Snowman, Don't Eat Yellow Snow!, Elf Love, Crushed Candy Cane, What's Your Favourite Colour?)

(L-R, Don't Eat Yellow Snow, Crushed Candy Cane, What's Your Favourite Colour? Elf Love, The Snowman)

Aren't they pretty?? Each one is different, and they've all got really unique and gorgeous glitter combinations. I'm aiming to spend the next week posting a review and pics of each polish in turn.

The first I tried out and wore yesterday is What's Your Favourite Colour? 
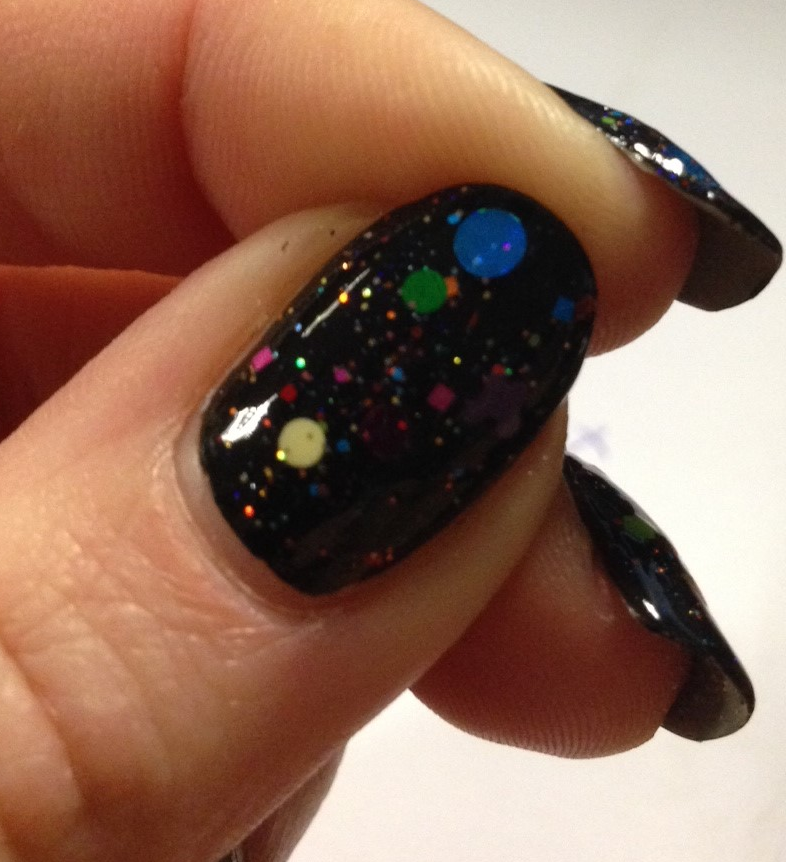
I spent a while deciding what colour to layer this over. When a glitter polish is all different shades, it's hard to pick a bright colour to go underneath. If I wore it over yellow for example, the blue/red/green bits will really pop, but you wouldn't be able to see the yellow bits. So I decided to just go for black. Plain, but I thought it'd really make the glitter pieces stand out. And it did!


This polish was brilliant to apply. Every dip of the brush brought me some more sparkly surprises! There are sooo many different colours and shapes in this bottle, and you don't really realise how much until you start applying it. As well as the tiny, multicoloured glitter, there's flowers, snowflakes, stars, butterflies, squares, circles of all different sizes, hexes and stars. In all different colours, and both matte, shiny and holographic glitters. Wow-eeee! 

It was really easy to apply and I didn't need to 'fish' for glitters, however due to me wanting a lot of big pieces in a range of colours and shapes on each of my nails, I did have to pick and choose which bits I wanted to use and position them accordingly. I am wearing two coats with a bit of placement of the big pieces in all these photos. I've also used a topcoat.

My favourite glitter pieces were the little flowers and stars, and also the biggest holographic circle glitters, that caught the light amazingly. The tiny glitter mixed in really added to the sparkle.

All the gitter pieces lay flat on my nails, I didn't have any problems with bits poking up, even with the shards and stars.

I had some fab comments from shop assistants on my nails yesterday when I was out shopping - every time I got my purse out at a till they'd mention them! One girl especially said they were amazing, couldn't believe they were my own nails and called over a colleague to see. They were really amazed when I said I didn't stick on all the glitter myself, that it was a polish containing all the pieces already!


This one turned out to be my favourite nail, I loved the big snowflake and the different glitters.


My thumb also looked cool with this yellow flower and the green star!


I also loved how the big blue holo glitter at the top of my other thumbnail kept catching the light!


As I mentioned, I will be posting a review for each of the other new Indy's Indies polishes I got, along with lots of piccies. Hopefully they will all be up in the next week or so, one a day, so keep a look-out for those! I know it's not Christmas yet, but I wanted to get the reviews up so that people would have a chance to see what they were like and buy them if poss before xmas!

Tuesday, 19 November 2013

Comparison...

Hello!

A quick comparison post of some 'then and now' nails. I don't usually do these, but I was looking through my pics and came across my first swatch of 'Beauxbatons Academy" by Lac Attack and wanted to share it as a comparison with my latest one. Also because I don't have anything new to post today, as I'm at work shortly, and in London tomorrow. Will definitely have some more nail-prettiness to show on Thursday though. :-)

So here's my first swatch of Beauxbatons, a good few months ago, and then my one from this week...


So I know the second pic is by no means perfect, I still need to work on my photography skills/style, and nail-painting! But I think I've improved on and learnt quite a lot since the first pic...

1. Hand/nailcare- I used to be really bad and pick off my polish, which tbh I still sometimes do but not as much, and only if it's really peeling! Also I didn't used to bother with handcream, but now I've got some Lemony Flutter from Lush that I try to use whenever I can on my cuticles. I also reaaaally try not to pick at the skin around my nails or bite them, both of which I used to do. And I really try to keep my nails all a similar length and shape, although I'm still not too happy with the shape now!

2. Clean-up - I've really tried to get neater with painting my nails, and if I get any around my cuticle I try to make sure it's cleaned and neatened up, I think it really improves a manicure.

3. Use of base and topcoat- I use Nail Envy now as a base. I used to think it was a pointless step but I think it does protect my nails and improve their quality, and prevent staining when using dark colours. A shiny topcoat always makes nails look more professional and 'finished off' - I use Sally Hansen's Insta-dri.

4. Use of a base colour under glitter or sheer polish. When I was younger and I bought a glitter polish, I'd always apply it straight to a bare nail, then be disappointed that it didn't look as dense and sparkly as in the bottle. I've only realised since getting into nails and nail-art that they look sooo much better over the top of a colour, or with several coats.

So that's that! As I mentioned, I've got some beautiful polishes to try out and review later on in the week so keep a look-out for those :-)

Sunday, 17 November 2013

Neutral Leopard Print

Hello,

I decided to try and get my 'nail art' back on last night, because I've not done anything proper for ages since I discovered Indies! I've wanted to try a kind of 'neutral' coloured leopard print for ages. I've done leopard print before, but it's always been really bright colours; pink, yellow, green etc. I wanted to go a bit plainer, as I've seen some fab leopard print manis in plainer colours.

For this look, I used these:


Barry M's matte mocha, Models Own's Utopia and a black Barry M nail art pen, as well as a base coat of Nail Envy and a topcoat of Sally Hansen's Insta-Dri.

I started off with two coats of Utopia on all my nails. I adore this shade, it's my current 'nude' crush! I had a thing for Lychee (Barry M gelly) over summer, but right now it's all about Utopia, yum.

I then added blobs with Mocha, just using the brush from the bottle. They don't need to be neat as they will get outlined with the pen soon.

I then added a topcoat of Insta-Dri, as nails need to be totally dry before using the nail-art pen over the top, otherwise it drags through the polish and ruins it, and I couldn't be bothered to wait for it to dry normally! Once it was dry, I outlined each blob with separated lines with the black, and then another coat of Insta-dri.

Lastly for my accent nail (which is only on one hand!) I painted it with the mocha, then added a freehanded stripe in utopia. Once it was dry I outlined the stripe with the black pen, and finished it off using two little gold studs. 


And my left hand without the accent!


Thursday, 14 November 2013

LacAttack over blue


Hello!

These are today's nails, and hopefully they'll last a good few days at work. I've had Beauxbatons Academy by Lac Attack for quite a while now, but have only used it once or twice. I need to make sure I use all my pretties more than once!!! I bought this polish from my friend Naileymabob who had ordered a lot of Lac Attacks - The Harry Potter ones - and I think for some reason she had two of this particular one, so I bought it, cos it looks beautiful! I don't know much about Lac Attack, but I've just googled them and they have lots of gorgeous polishes, although they're based (I think) in America.

Anyway, here it is. I've used it on it's own before and it's quite see-through, so I decided this time to layer it over pale blue, to match the glitter. So I started with a base of white, before adding two coats of Cinderella by Sinful Colors, which is a pale sparkly blue that needs white under it to show up! I was going to use Barry M's blueberry, but thought this was a little too dark. I then added two coats of Beauxbatons, then a nice layer of topcoat. 


Wednesday, 13 November 2013

Rich In Heart / Look Mag

Hello!

I went shopping yesterday to the Metro Centre in Newcastle, and while I was passing Boots I nipped in to see if they had any Sinful Colors polishes. The Boots in my local town centre is a big one but doesn't have Sinful Colors, so I was happy to find the stand in the one at the Metro Centre. As I was getting other stuff from Boots I limited myself to just one, and I selected a beautiful dark shimmery red - almost brown/black. It looked AMAZING under the shop lights. This one is called Rich In Heart and like all the Sinful Colors range only cost £1.99.

I applied it this morning before work. I found the polish quite thin, and went into my cuticles really easily when painting, which was really hard to clean up and looked a state! Despite the thinness, the polish is still really dark in just one coat, however I did two just to cover up a few streaks. It was so shiny even without a topcoat, but I added one to stop the polish marking my white walls! Unfortunately as I was getting ready for work I'd not let my manicure fully dry and I smudged one nail really badly and got a few nicks/imperfections in some of the others which annoyed me so much all day - it could have looked so flawless if I'd just let it dry longer arghhhh.

Here are some pics with the flash on (first pic) and off (second one), it was hard to capture the deep red shimmer, but I tried! In normal light they mostly just looked dark and shimmery, it was only in direct light (sunlight or in a shop etc) that the red really stood out.


Also, I managed to get my face in Look magazine again! I go through phases of submitting nail looks to their website, and they often seem to pick mine to feature even though there are other waaay better ones - I think it's cos they're lazy and already have a pic of my face from the first time they asked me. I think this is the fourth or fifth time I've been in. A bit puzzled about these nails they chose though - not only did I do them and submit them aaages ago, they're not even arty! I was just testing out my new Models Own colours, haha. Oh well, at least I got in....chuffed. :-D


Monday, 11 November 2013

Indie Glitter Gradient


Hello again!

I've got new nails again! I created this glitter gradient using two more Nail Lacquer UK polishes, a UK indie brand that I looove. I've had these two for a while now and they're both so pretty and sparkly.

I started with a base coat of black (I used my BK matte black as it's the only one I have) and then applied two coats of Turquoise Is Not Dead. I just love how bright and packed with glitter this is, it was so easy to get a brilliant coverage of glitter! I then used I Will Rainbow On You to add some colour to the tips of my nails. I added my usual topcoat to smooth it all out. 

So much sparkle! x